In BETA, you can add one or more prices to an event by navigating to the Prices tab of the event template. These prices will then be visible in your POS during the transaction process, or available online, if enabled in your settings.


You also have the option to select the price required to be paid during the booking process.

How to set up event prices for different Entry Type holderGo to the Event Template.Add a price to the event (this is what they will pay online, through a Event Widget).For people who need to pay (non–entry type holders):Go to Passes → Entry Types.Find the entry type you want to include (e.g., Annual Membership).Add the event template to that entry type.This makes the event free for anyone with that entry type, available through the Visitor's Home.For people with a specific entry type (e.g., membership holders) who should get in free:
PassesTrack Pass Usage and Expiry: See pass details, including usage history, remaining uses, expiration dates, and the option to purchase more.SubscriptionsView and Manage Subscriptions: Access subscription timeline, see creation date and upcoming billing, and pause or cancel the subscription as needed. (settings may be controlled by you, Gym Subscription Settings)Event BookingsEnroll and Track Events: View enrolled events, check enrollment from purchases or entry-based availability, and sign up for eligible events, based on their Entry Type.WalletManage Payment Methods: Add or change payment methods, set a default option, and ensure payment details are up-to-date. Gift Cards: View Gift Cards, and the remaining value - copy the gift card ID for ease of use in the BETA widgets. Purchases: View all purchases made, with details on items, dates, and status (e.g., succeeded, refunded).FormsSign Forms: Sign another form at your facility, their form will be pre-filled with their details, allowing for quicker signing.Manage Forms: Download completed forms and check status, including notifications if a form is expired or nearing expiration.
The Event Widget is used when you want people to purchase items or events.The Visitors Home Widget is used when you want people to enroll in events for free.These two widgets are mutually exclusive, they are designed for different outcomes.If you create and share the correct widget link, you’ll ensure people either purchase (Event Widget) or enroll for free (Visitors Home).
Visitors will be required to login with the same credentials (Name, date of birth, and email) that appear on the BETA dashboard. This ensures security, and allows them to control their family/linked profiles too.
A Price Add-on in BETA is an extra item or cost that can be linked to most prices, like passes, memberships, or retail products, to either suggest additional purchases or include required charges during online checkout.
Addons for products are available on Business and Above, while Adding a pass as an Add On is available on Enterprise Tier.
Link Product Add-Ons to a Pass/Event Price
Link product add-ons to prices or events, create bundles, and manage checkout options effectively.
Set the Price Only on the Course
This means the full course must be booked in advance.
Individual sessions (event instances) cannot be booked separately.
Once the first session begins, the course will no longer be available for booking.
Ideal for structured, multi-part courses where attendance from the beginning is required.
Setting a Price on the Event Instance Template
If you also set a price on the event template, individual sessions can be booked on their own.
This allows participants to bypass earlier sessions, which is not recommended for progressive courses.
Default pricing sets a fixed price per participant, regardless of how many people are included in the booking.
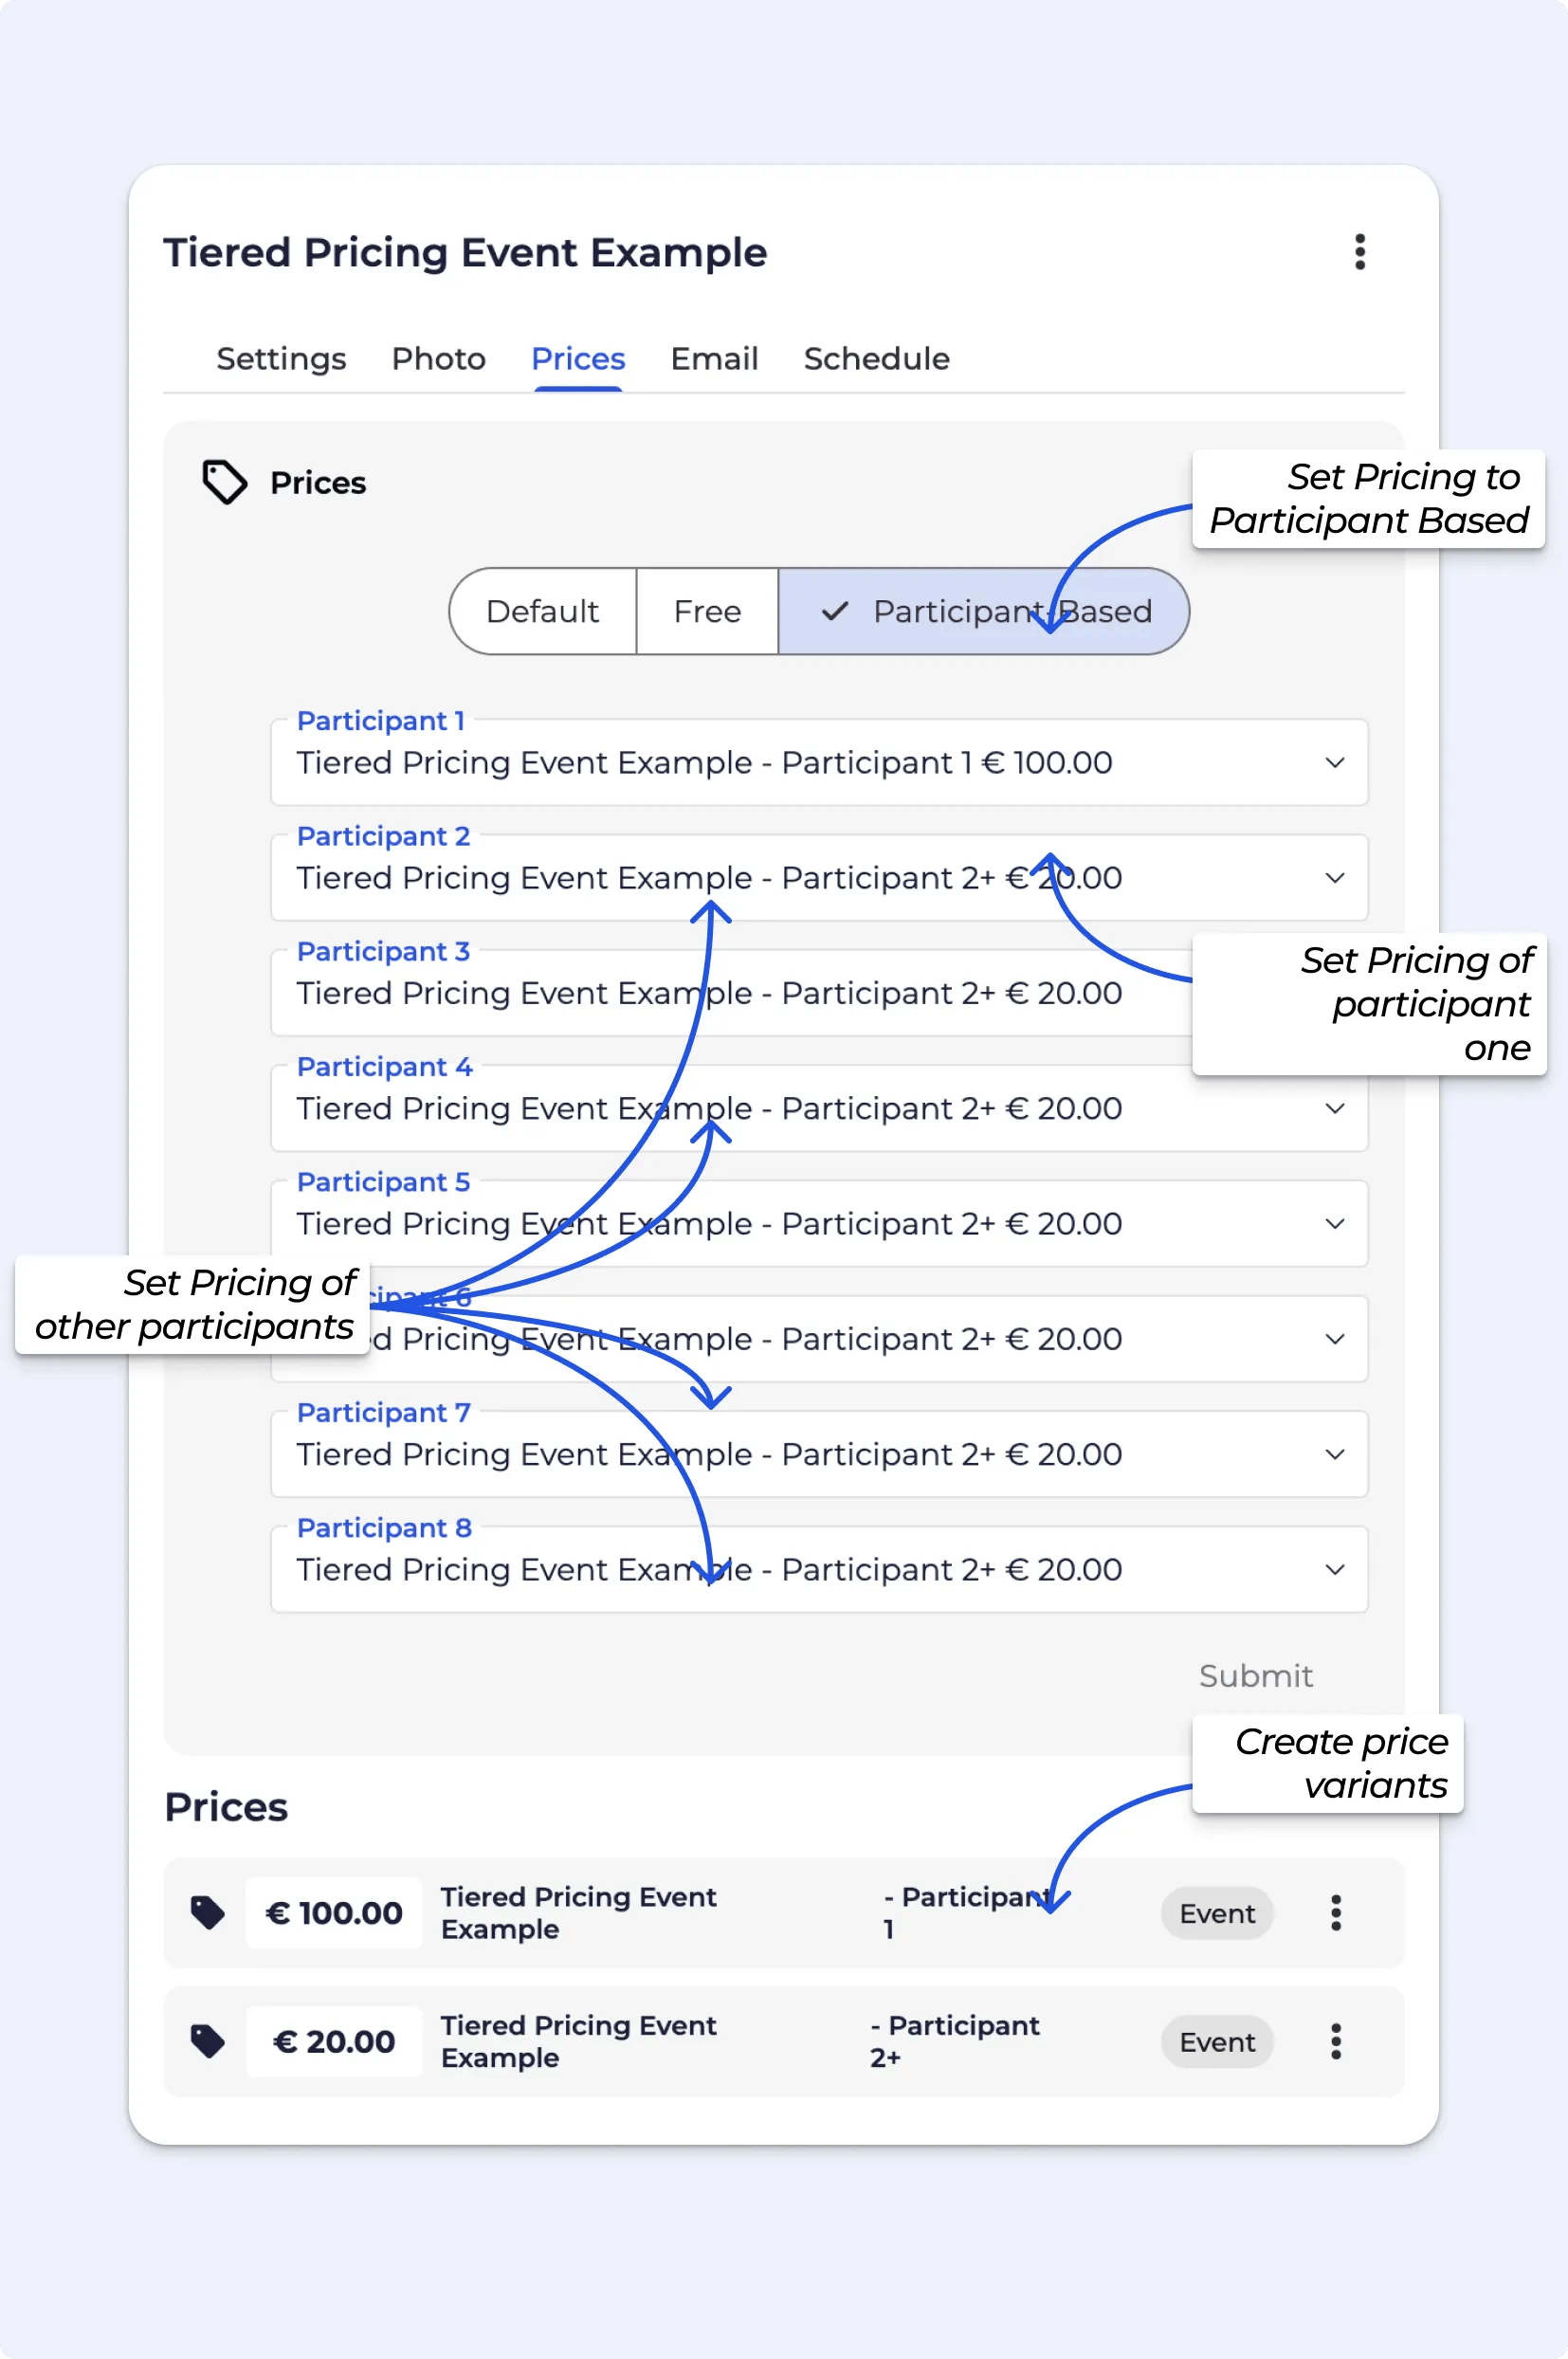
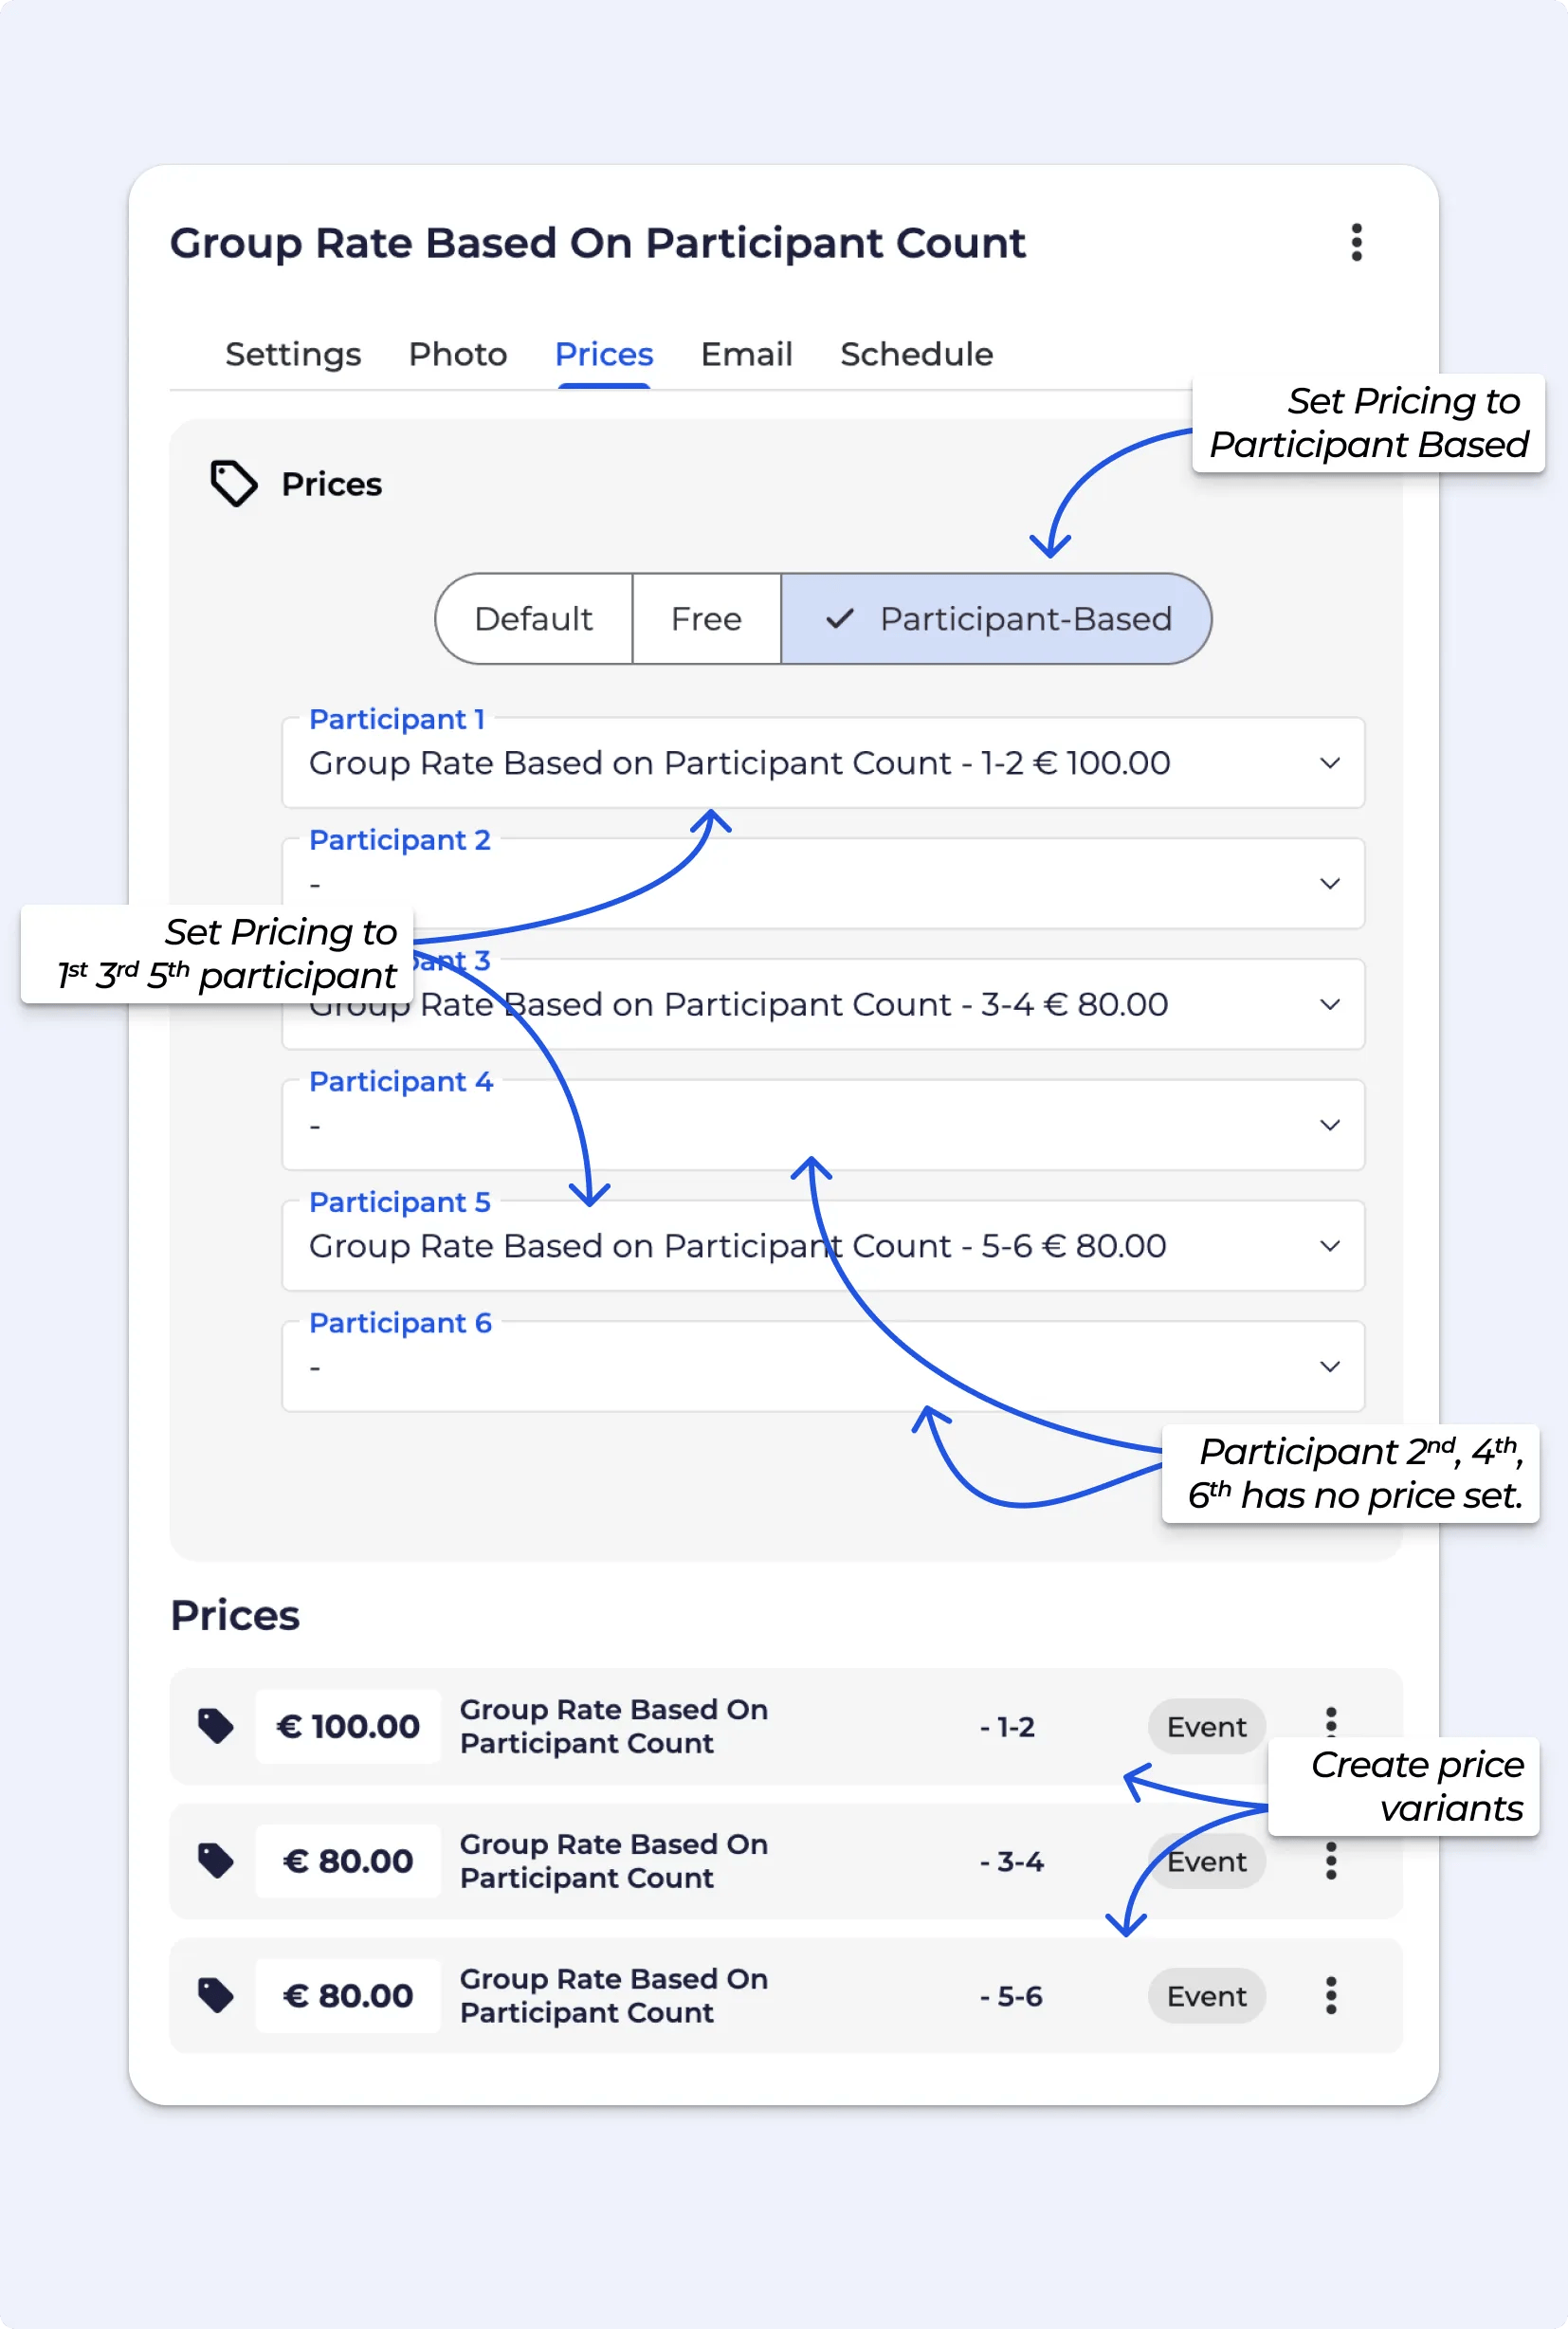
Participant-based pricing allows you to set different prices depending on the number of participants in a single booking.
You first need to create the prices for different participant counts (
e.g. first person = £10, second person = £18, etc.).
Once set, these prices can be automatically applied during booking, especially via the widget — BETA will calculate the total based on the number of participants entered.
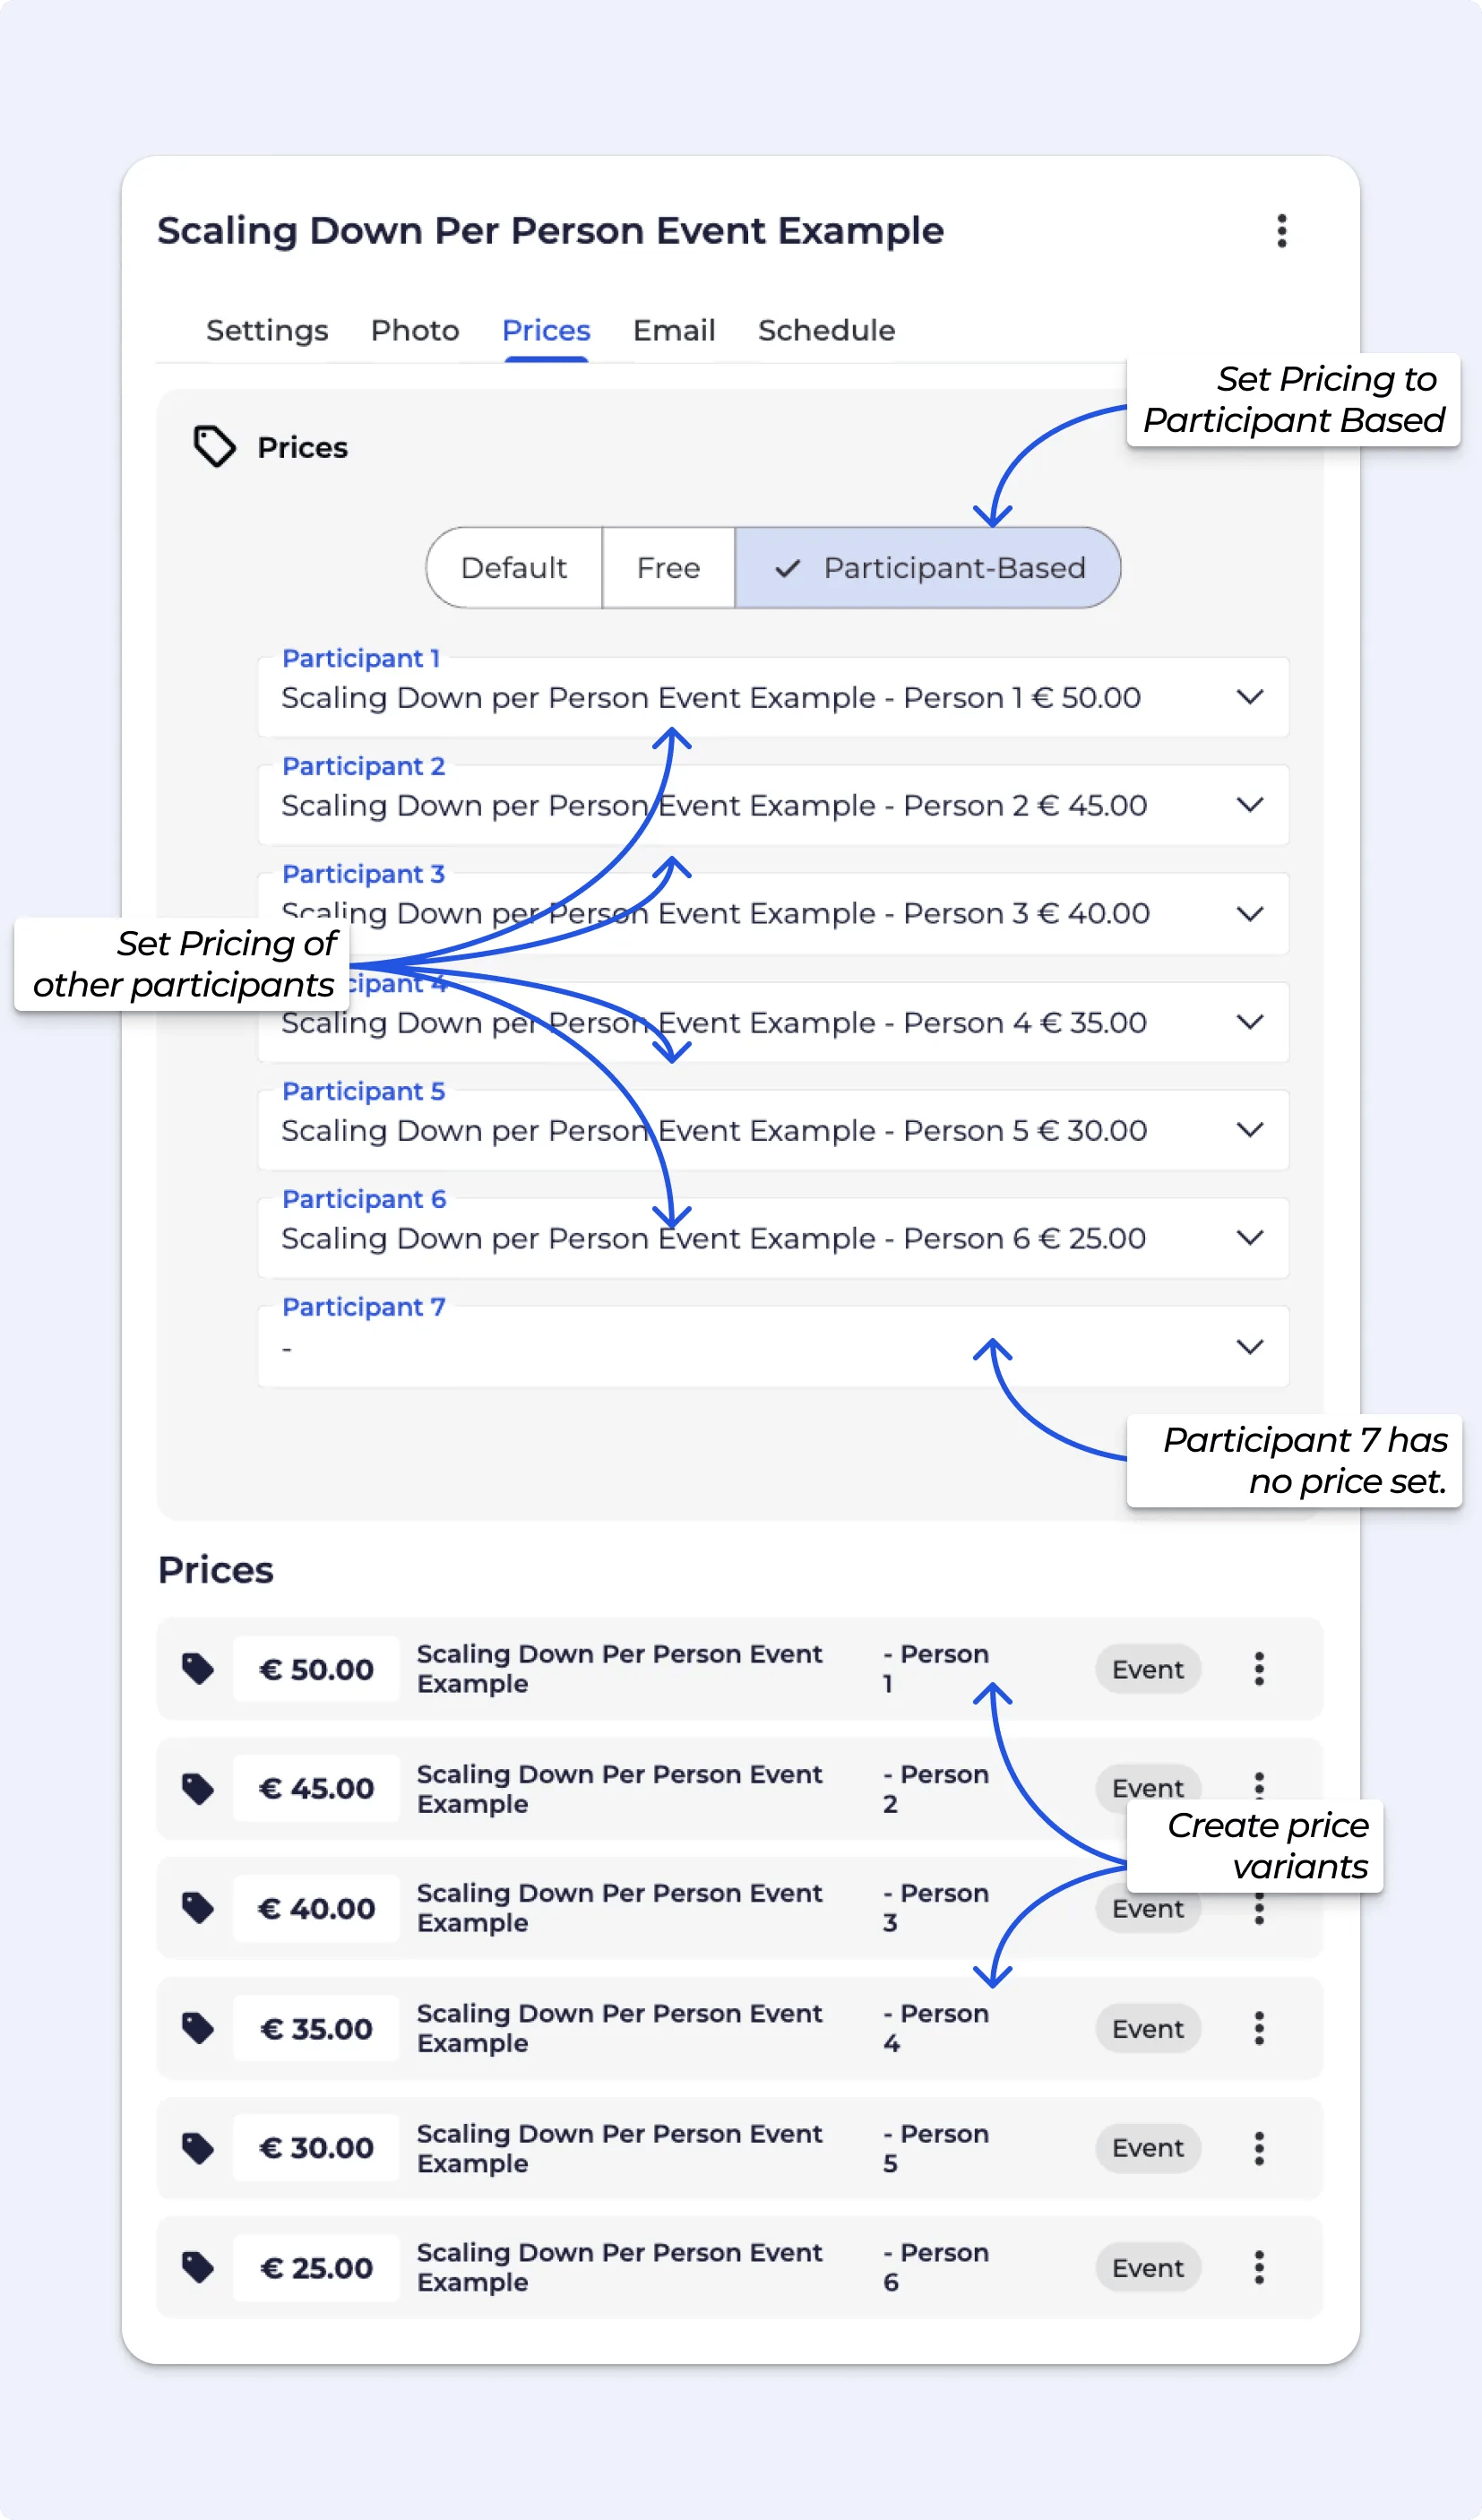
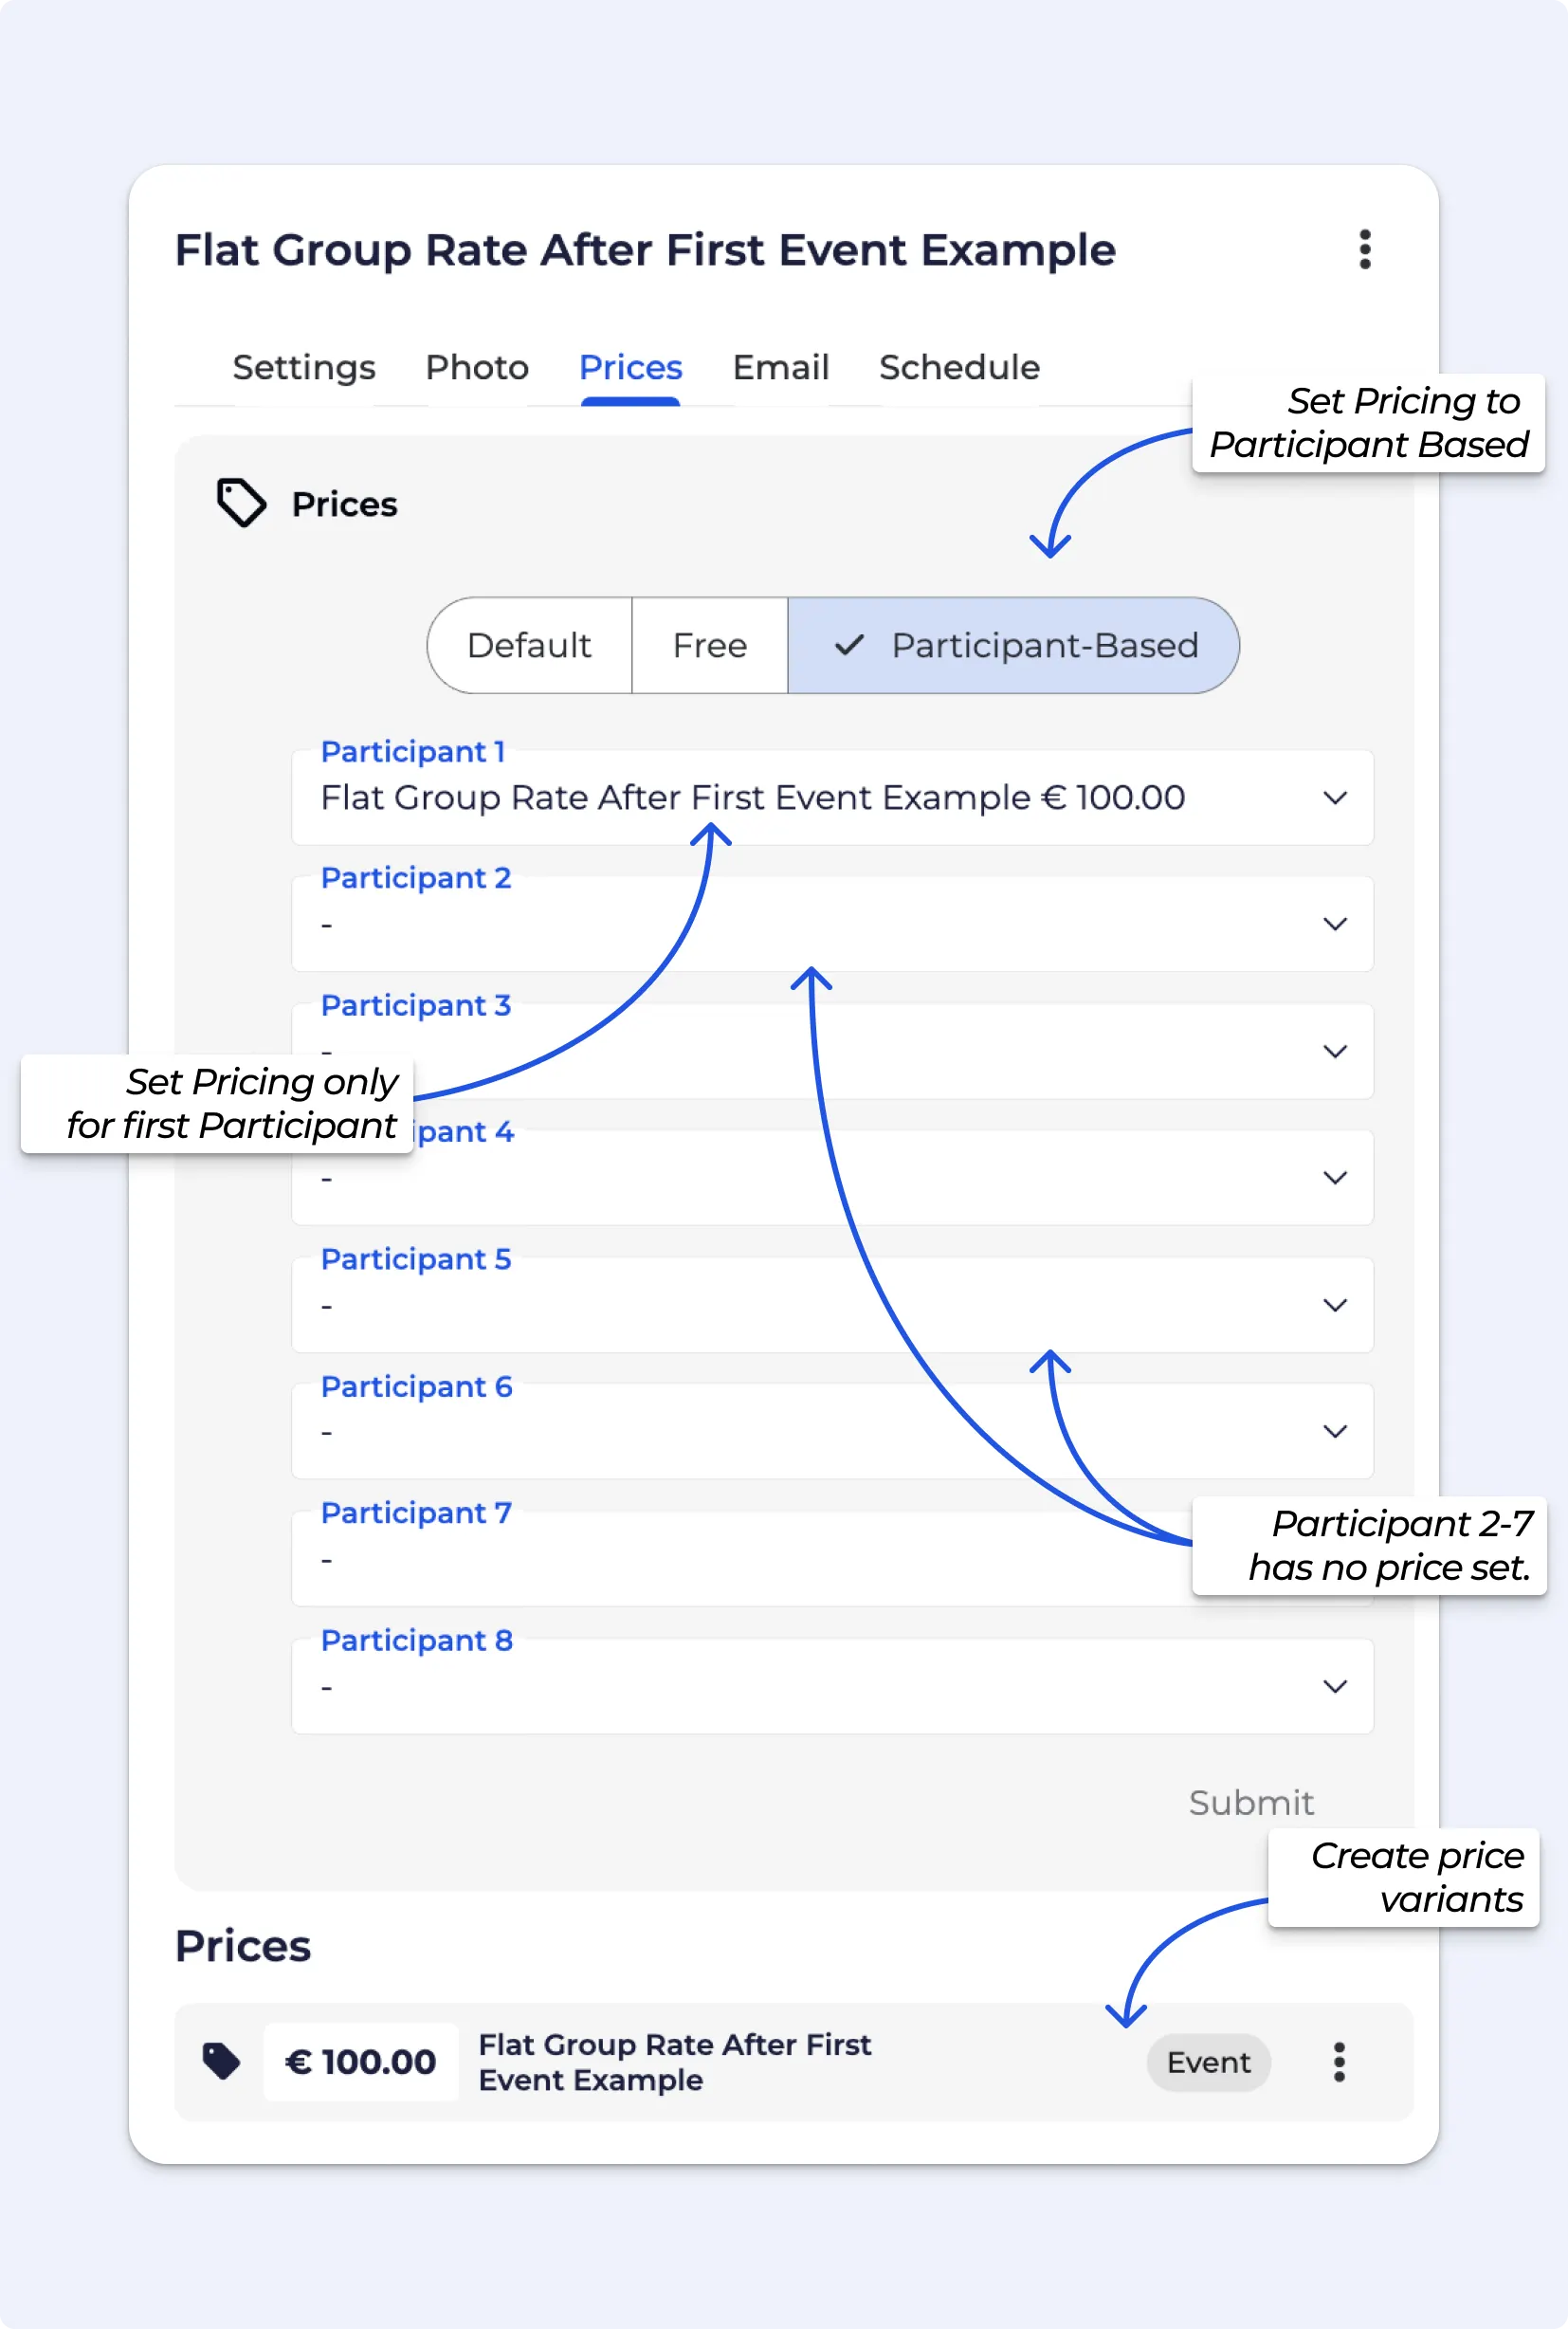
Participant-based pricing allows you to adjust the cost of an event based on how many people are included in a booking. Below are some common setups and how they work.
Useful for private sessions with a base fee and small group add-ons.
1st participant is $100
Participants 2–5 are $20 each.
Great for encouraging group sign-ups while reducing the cost per person.
1st: $50
2nd: $8
3rd: $60
4th: $40
5+: Free
Works great for family or team instructor led bookings where only one person pays.
1st: $100
2nd–10th: Free
Keeps cost predictable while allowing flexibility in group size.
$25 per person, up to 4 participants - max total: $100
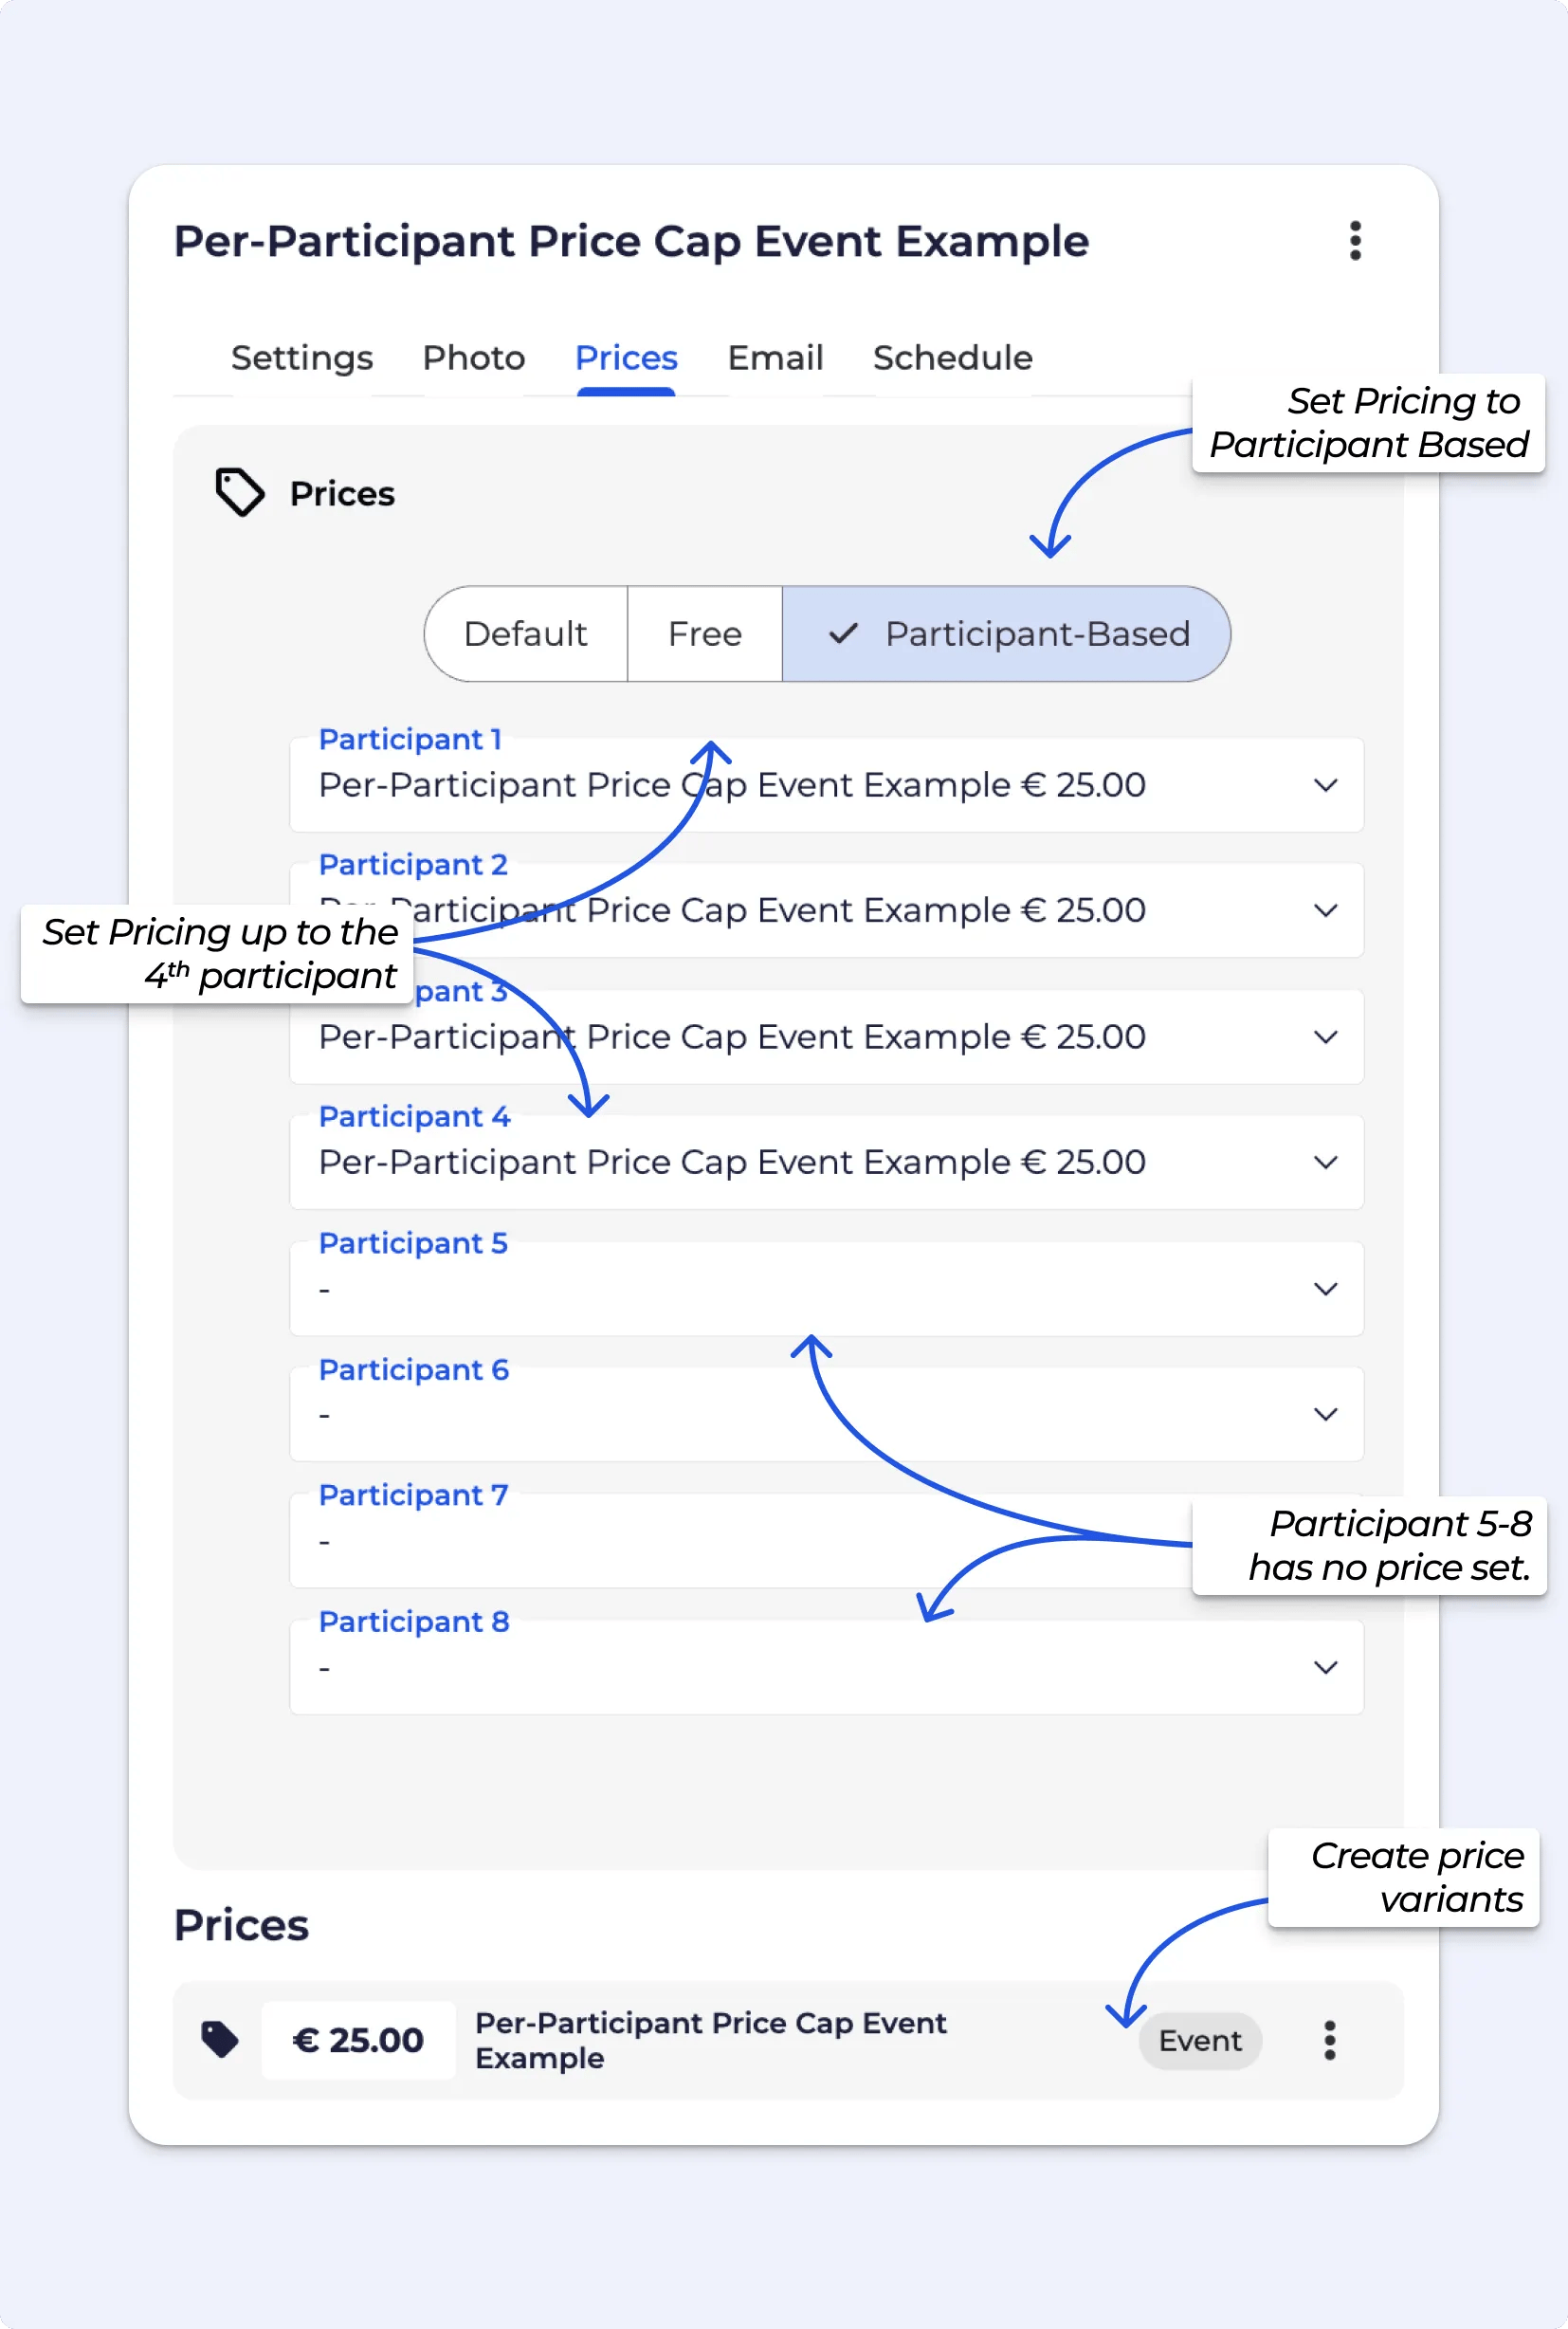
Sets a fixed price bracket based on how many join.
1–2 people: $100
3–4 people: $180
5–6 people: $260
When setting prices for events, passes, or products in BETA, you can choose where they are made available for purchase, either online via your website widget, in the mobile app, or both.
These are managed using separate visibility toggles, giving you full control over how and where your offerings are displayed.
Here's how it works:
Enable "Available Online" to allow purchases through your website widget.
Enable "Available in App" to make it purchasable through the BETA mobile app.
In BETA, you can sell events online, via the Widget Builder, or through the BETA app. Online and in-app sales not only simplifies the sale process for your customers, but also increases your overall sales and revenue for your business.
When you add or already have a price created, you can utilise the below functionalities:
Sell online - Sell at this price, online on your website
Sell in the BETA app - Sell at this price, via the BETA app
Available to passholders - Who Can Access Available to passholders Event Pricing?
Pass holders do this via on the Visitors Home, via Enrolment tied to Entries. See how to configure this below:
Yes, when customers book events online, they are automatically added to the event instance in the calendar. This helps keep track of attendance and ensures all participants are accounted for in the scheduled event.
Yes, online availability is subtracted when staff make manual enrol participants to events.
So, if participants are added by staff but choose to pay at the centre, the availability is adjusted accordingly. This ensures that bookings made online and those added manually by staff are synchronized, preventing overbooking situations.
On the Business Tier & Above, you get access to a dedicated Events Insights page.
To view sales figures for a specific event, you can download an items report from the Sales Page, which you can then filter the item column. You can vary the date range, and click item to download.
You can check in visitors from their visitor’s profile or the events calendar. Check-ins only appear on the event date.
Visitors can generate a QR code in the BETA app too! by clicking on the event on the date that the event is running ie, they can only generate QR codes for today’s events.
All event purchases made online will be visible in the Sales page and the Visitors page of your BETA dashboard, with a transaction state as succeeded. You might not see an online transaction on a Visitor’s profile if they used:
1. A different email during purchase than the one they signed the form with
2. Any typo in their name/birthdate during check out.
If an event or a course is NOT linked to a pass price (i.e., is not being purchased with a pass), visitors can sign up (thought purchase or for free, if pricing is set to free) to an event online through your generated events widget link.
For events that have been associated with an entry type (i.e., has been included in the pass price), participants would need to enrol from the visitor’s home widget.
Example: you need to create two prices for the same event template, one of which for purchasing online and one associated with a specific pass price (e.g., a free entrance for gym ‘members’), you will need to
How to add these?
For people who need to pay (non–entry type holders):
Go to the Event Template
Add a price to the event (this is what they will pay online, through a Event Widget)
For people with a specific entry type (e.g., membership holders) who should get in free:
Go to Passes → Entry Types
Find the entry type you want to include (e.g., Annual Membership)
Add the event template to that entry type
This makes the event free for anyone with that entry type, available through the Visitor's Home.
Yes! You can do this by setting an event template as free. When you mark an event template as "Free" from the Events Page, it disables any previous prices that were set up for that event. This means that customers will not be charged for attending the event, and any previously configured pricing options will no longer apply.
For a the Event to show up in your POS, and event widgets - you require both a price, and an event instance.
After making changes to your event template such as price, description, or photo, remember to update your widget link. Otherwise, the changes will not be reflected.

Still Lost? We’ve got you covered!
Use the search box on the main Help to search the entire list of available help guides, or drop your question in the Support Chat!