Learn how to create and manage your event types, set up recurring schedules, and customize templates. This page covers everything you need to structure and maintain your calendar of events.
This walkthrough covers how to create and manage Event/Course Templates, and schedule your events in the BETA dashboard. BETA has two types of Event Templates (Events & Courses) and Resources.
Here is the short of it:
Events: Single, standalone occurrences with a specific start time (e.g., a one-off yoga class).
Courses: Series of events that might be the same or varied (e.g., a 2-week climbing course with multiple sessions). When a course is purchased, that participant gets enrolled into all the events in that course.
This setup allows for flexibility in managing different types of Events.
Templates define the default settings for your events / courses.
Any updates you make to a template - such as the name, duration, max capacity, public description, color (calendar only), tags (calendar and widget), and auto-cancellation rules—will be automatically reflected in all corresponding events in your calendar as well as on your booking widget.
 This video has sound.
Templates allow you to control Events, their settings and content across your entire BETA dashboard.
Therefore when you edit a template in BETA, any changes made (e.g., to the name, duration, image, or pricing) will be reflected across your entire system, including your dashboard, website widgets, and BETA app. This means the updates will automatically apply everywhere the template is used.
If you want different settings for certain event instances, it's better to create a new template rather than editing the existing one. This ensures that your changes don't affect other events or offerings.

Public Description
Displayed to users in the widget when browsing or booking.
Event Descriptions support full HTML - so get funky with formatting.
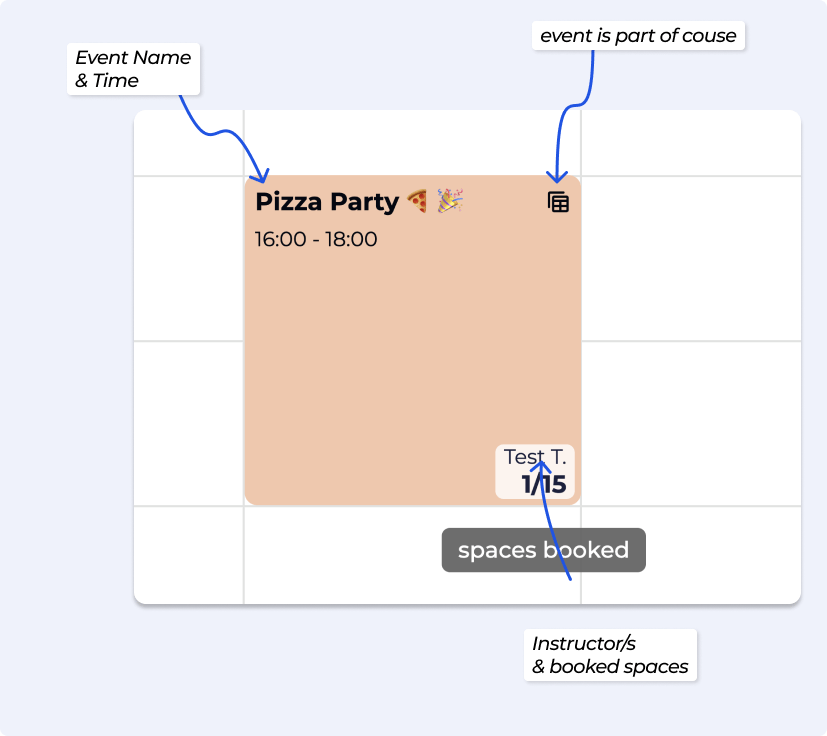
Event Instances are the actual events created based on Event templates. They represent individual occurrences of the events you've set up, and they follow the structure defined in the corresponding Event Template.
Advanced settings for Event are available on the Business tier and above. Advanced Settings allow you to control the following:
Configure Entry Types | Event Entries
Configure event entry types to manage free access for members / pass holders.
Courses differ from events as they encompass a series of the same or different single event instances.
For instance, a "Beginner Crash Course" might include multiple events such as:
- belay classes,
- top-rope classes
- and technique classes.
Purchasing the course provides clients access to all events within that course, offering a more comprehensive and structured experience.
Public Description
Displayed to users in the widget when browsing or booking.
Event Descriptions support full HTML - so get funky with formatting.
This feature is available to gyms on the Business Tier and above.
Event Resources tie Event Templates together, allowing you to define and manage what’s needed to run scheduled events - such as staff, space, or equipment.
Please refer to our dedicated help article linked below,
Set Up Event Resources
Create and manage event resources effectively, ensuring optimal scheduling of staff, spaces, and equipment for your events.
With BETA, you have two options to schedule events. Manually, or using the auto-scheduler. For an in-depth look on Scheduling Events and setting your calendar, please see
Create Event/Course Templates & Schedule
Learn how to create and manage event templates and instances effectively with our guide. Streamline event scheduling, duplication, and customization for your organization.
Recurring Events: BETA allows you to schedule events as recurring for a chosen time period. This can be set and edited at any time in the events page via the individual event template. Business & Above.
On the Event Template » Schedule » + Add » Date Range.
Events/Courses can be set to have four visibility settings on each Event/Course Template:
Set the template to Hidden, for it to only be viewed via a direct widget link.
Default | Custom | BETA | Internal | Member’s | |
Default |
|
|
|
|
|
Hidden | ✗ |
| ✗ |
|
|
Private | ✗ | ✗ | ✗ |
|
|
Archived | ✗ | ✗ | ✗ | ✗ | ✗ |
Manual bookings are confirmed by default until they are manually cancelled. If a booking is created as a manual booking, it can be turned into a transaction-linked booking by issuing a transaction on the booking. This will un-confirm the booking until the payment is finalized. If you would like to keep the confirmed state of the manual booking until the payment is finalized (i.e. to block out other bookings for that slot), create a new transaction-linked booking, and cancel the manual booking once payment is complete.
Transaction-linked bookings are confirmed when the transactions enters the suceeded state and become un-confirmed when attached transactions are refunded. Transaction-linked bookings can be manually cancelled once the transaction is confirmed to cancel the booking without refunding the attached transaction.
The Event Tab on profiles keeps track of their participation and engagement with scheduled activities. Each status provides specific information about their event attendance history:
Upcoming: Indicates events the visitor is scheduled to attend in the future.
Attended: Shows events the visitor has checked into and participated in.
Missed: Lists events the visitor was registered for but did not check into and are now in the past.
Cancelled: Reflects events canceled by the organizer after the user was marked as attending or manually canceled, either by the visitor or the gym.

Organize your calendar by filtering template tags, names (slots and events), bookings, and resources, making it easier to focus on specific areas.
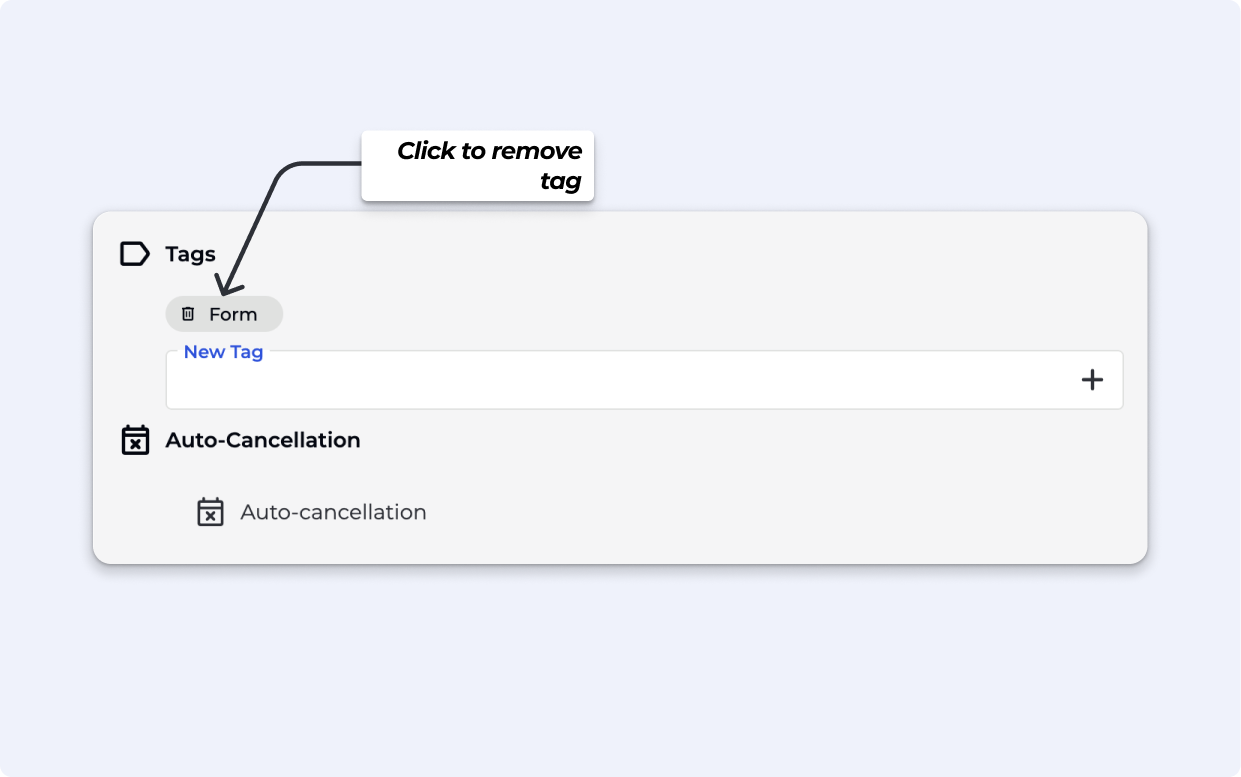
This can be done when editing the Event or Course Template Popup » Tags section, you will see a waste bin icon  - just click to remove that Event Tag.
Please note, if the event tad is still showing up in your Calendar or Event Widget filters, another Event or Course Template is using that Event Tag. Using the filters in the events » templates page will help you find those tempates.
| Jump to today |
| Week view |
| List view |
| Day view |
BETA's Dashboard Keyboard Shortcuts
These shortcuts help improve efficiency in daily usage of BETA.
To customise how you view your Calendar, you can adjust the view. Changes will only apply to your view.
Default: Standard spacing.
Spaced: Clean and minimal.
Thin: Compact for high data visibility.
Hide or display all events, slots, and staff schedules.
A .csv export can be exported for every event instances or course.
This allows to easily print out a Participant List if required.
Interested in seeing how to set up your Scheduling, see the Guides below
🔗 Edit/Modify an Existing Course (SCM)
Learn how to edit or modify existing courses in our guide.
Easily view today's events with participants at a glance. By default, this list is filtered to display only events with active bookings, providing a quick and handy overview right from your homepage. This makes it simple to track what's happening and manage your event schedule efficiently.
This view of each functionality on the Today's Schedule allows you to:
Click to Alter: Edit or modify details of the participant bookings for the event..
Event Details: View or update key details like time, location, and description of the event.
Manual Enroll: Add a participant to the event manually, ie without payment
Occupancy: Check the number of booked participants compared to event capacity.
Check-In: Mark participants as checked in for the event.
Cancel: Cancel the event and notify participants.
Create Transaction: If a participant was manually enrolled, and not checked in - you are able to create a transaction for that participant.
Checked In: See the list of participants who have already checked in.
No Payment: Identify participants who have not yet paid for the event.
Participant: View the details such as form status, proficiencies and name of enrolled participants.
Succeeded Payment: Verify participants whose payments have been successfully processed.
Once a participant has been manually enrolled and checked in, the option to create a payment disappears. If you wish to charge for the booking, it needs to be done before checking in.
To undo the check-in and create a transaction, delete the session linked to the booking from the participant's profile. Then, create the transaction and check them in again.
Yes! Regular events allow you to set a customizable start time and can recur weekly. This flexibility enables you to tailor the schedule to fit the unique needs of your climbing facility.
Yes! When creating an event instance, you have the option to select the number of weeks you would like this event to recur, relative to the date you've chosen. This allows you to easily set up events to run on a recurring basis without the need for manual input each time. Another option would be to use auto-scheduling events
Yes, indeed! You have the flexibility to customise a transactional email designed for a particular event, such as a birthday party. This allows you to request the necessary information needed for the booking and tailor your communication with the participants for that specific type of event.
Yes, BETA allows you to set different prices for participants in an event. This feature provides flexibility in pricing based on the nature of the events, accommodating various participant requirements.
No, courses cannot be set up on a recurring basis since courses are composed of individual event instances, and each instance needs to be selected manually when creating the course. Recurring functionality is available at the event level, allowing you to set up individual events to repeat, but it doesn't extend to the entire course.
Event courses in BETA consist of multiple events that have already been scheduled individually. Since the course is essentially a collection of these pre-scheduled events, it won't appear as a separate entity on the event calendar. Instead, you can view and manage the individual events within the course, each listed according to its scheduled time and date.
This approach allows for better visibility and control over the specific occurrences that make up the course
Yes, BETA allows you to set different prices for participants in an event. This feature provides flexibility in pricing based on the nature of the events, accommodating various participant requirements.
Yes! To simplify the identification of booked events/slots, you can switch to a list view in the events calendar page. Use the drop-down menu and select the list view option for a clearer display. Moreover, you can further filter your view by tags, event templates, slots and organizer, providing you with more customisable views.
Yes, you can manage this by setting the price only on the course template itself - do not set any prices on the event template, or set them to not be available online, for only POS sale.
If the price is set on the Course, bookings will only be allowed through the course registration—this ensures participants sign up before the first session.
If the price is instead set on the Event Template, each session (including later parts of the course) can be booked individually, allowing people to skip earlier sessions.