With BETA's Stripe integration, you can make terminal payments, online payments and set up subscriptions directly through Stripe. Integrated payment methods result in an increased efficiency and convenience, a reduction of human error and improved customer experience.
The Stripe integration is available for free to all BETA users. To use the integration you also need a Stripe account.

service | status | terminal payments | online payments | qr code payments | recurring payments | website |
Stripe | integrated |
|
| / |
|
Once the Stripe integration is set up, contact a member of the BETA team. We’ll add Stripe Terminal as a payment method in your Point of Sale. Following this, you will be able to accept in-person payments through the Stripe Terminal. A Stripe Terminal allows you to capture a subscription payment method too!
🔗Navigating through the Point of Sale (POS)
This page summarises vital daily actions you can perform directly in the POS.
🔗 Sell and Set up a Recurring Subscription
Learn how to set up and manage subscriptions using Stripe with our step-by-step guide. Perfect for recurring payments and optimizing your Point of Sale system.
An integrated payment allows you to collect payment from a client directly from the BETA Point of Sale via direct integration with that payment provider. In this way, customers can pay without the need for manually entering transaction totals into card terminals or recording the result of the transaction in BETA. Integrated payments increase efficiency and reduce errors for your gym.
Learn more about integrated payments here.
Stripe offers multiple ways to accept payments.
You can easily offer in-app or online sales by creating customised widgets using BETA’s Widget Builder. The seamless integration of Stripe's payment system ensures a smooth experience across BETA, online, and in-app transactions.
Recurring payments are taken for visitors that have set up a subscription. Subscriptions reissue the passes attached to the price every month after a payment is successfully processed.
Once you have set up the Stripe integration and a subscription in BETA, recurring prices will be automatically added to Stripe.
Allows for quick, one-time payments directly from Terminal, ideal for walk-in or ad hoc purchases. The card details are not stored, maintaining customer security while enabling immediate payment confirmation. The amount sent to the payment terminal is adjustable and can be a fraction of the remaining total.
When ordering your terminal for Stripe, you need to be using the Stripe Model no. Wise POS-E
🔗 Connect a Terminal to the POS
Learn how to quickly connect a payment terminal to your POS system with this easy setup guide.
Stripe Terminal are for one off payments through the Point of Sale, no card details are saved through this process. BETA will communicate with your Stripe terminal, and communicate back to BETA on receipt of payment.
When ordering your terminal for Stripe, you need to be using the Stripe Model no. Wise POS-E
For transactions requiring card details, you can manually enter customer card information, which then stores to their Stripe profile (if selected).
This enables future payments without re-entering card information, streamlining repeat purchases, and allows you to take Autobill payment, or payments over the phone.
🔗Share a Payment-Specific Link
https://www.notion.so/Share-a-Payment-Specific-Link-068563508cce44728fb57ad1b501538a
Select Stripe (card details) as a payment method in the point of sale when accepting card payments by manually entering the card details. This allows you to save visitors payment details to their Stripe Profile. This also allows you to generate a Stripe payment link, or take payments over the phone.

For on-the-spot payments using saved card information or to capture card details via Terminal, select Autobill to immediately charge the customer’s Stripe-linked payment method. This is essential for setting up Stripe subscriptions, where recurring charges are collected automatically.
Subscriptions Explainer
Find comprehensive guidance on managing subscriptions, including billing, payment methods, and troubleshooting issues within the BETA platform. Access tips for effective subscription management.
🔗 Sell and Set up a Recurring Subscription
Learn how to set up and manage subscriptions using Stripe with our step-by-step guide. Perfect for recurring payments and optimizing your Point of Sale system.
Select Stripe Autobill in your point of sale to instantly and automatically charge customer's stored payment method through Stripe.
IMPORTANT: A saved payment method is required to use Stripe Autobill.
No, a Stripe terminal is not necessary for setting a Stripe subscription, what is important is that you collect their Payment Methods in Stripe. That can be done in a few ways:
In the POS, you can sell using Stripe (card details) and manually entering the customer’s card details. Attention: Please ensure "store my payment info for future transactions?” is enabled.
Alternatively, direct customers to make their purchase through an online widget, see here to Create a pass widget for particular payment methods

Choose this option when billing items to a customer's existing active subscription. These transactions are combined into their next scheduled subscription charge, appearing as an invoice in Stripe. Unlike Autobill, subscription billing accumulates charges to be processed with the next cycle, ideal for managing incidental purchases under the membership plan’s billing interval.
Select subscription billing in the point of sale when adding-on items to a visitor’s subscription, within the limits of the membership credit limit (for Stripe).
The customer will be billed along with their subscription, this will appear as an invoice in your Stripe dashboard, which will be billed according to the billing period of the pass.
See how to Set membership credit limit (across facility) or to have a Individual Credit Limit Override for Subscriptions.
Please ensure, that you are following the below steps if you wish to connect an Existing Stripe account to the correct BETA dashboard - especially if you have a multi-location facility with multiple Stripe Accounts.
Key Considerations on using Multiple Stripe Accounts per Location When considering whether to set up separate Stripe integrations for each gym location, the final decision depends on your company’s accounting structure and operational needs.
Below are the key considerations to keep in mind:
Integration per Location: Each location has its own Stripe account and integration, these are handled separately. ie separate terminals etc etc
Saved Card Scope: Climbers’ cards are stored only in the Stripe account for the location where they were submitted. Stripe disallows saved details cannot be shared or used across different locations. Stripe does not offer an easy way to migrate stored payment methods between accounts. Moving saved cards from one location to another is a complex, manual process.
Subscription Billing Limitations across Locations : Transactions will not be able to processed to someone’s subscription from a different facility.
Member home: Members must log in to the specific gym location to view, manage, or update their subscriptions and payment details.
Auto-Bill Limitations across Locations: The “autobill” feature (instant charging someone’s saved card at the point of sale) works only at the location where the card is stored. - **Entry Access is *not* affected**: A member’s purchased entry remains valid at any location; this is not affected by separate Stripe accounts.

Find Stripe integration in the Integrations page in your BETA dashboard and click connect. This will take you to your Stripe dashboard and allow you to complete the integration. Always double-check you're logged into the right Stripe account before proceeding.
If you do not have an account already, this will prompt you to create one!
For multiple locations, the integration must be set up on each individual child gym, even if the Stripe account is to be shared between gyms.
The landing page will look something like this:
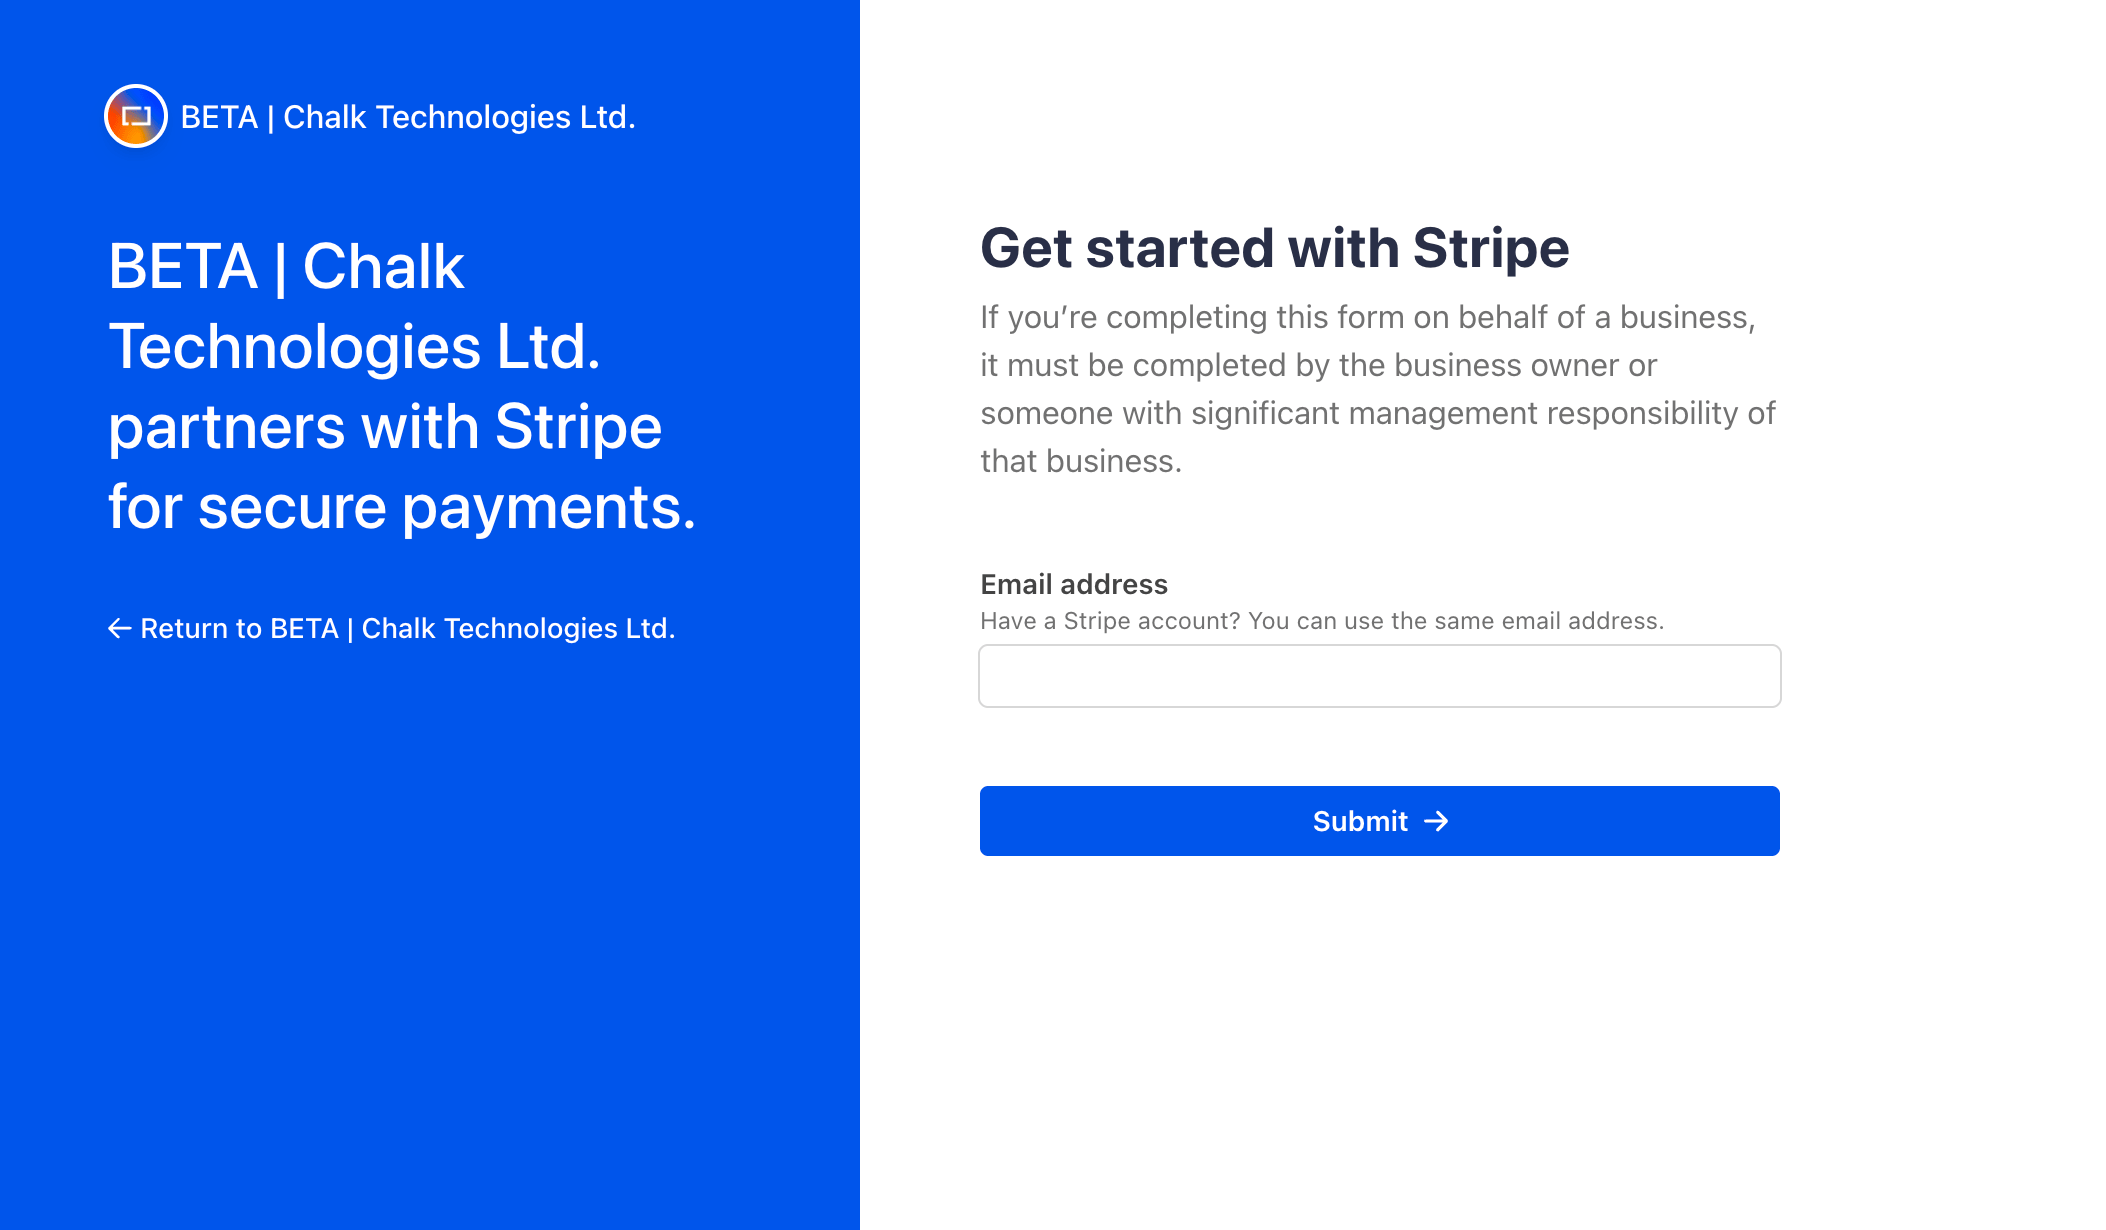
Find Stripe integration in the Integrations page in your BETA dashboard and click connect. This will take you to your Stripe dashboard and allow you to complete the integration. Always double-check you're logged into the right Stripe account before proceeding.
For multiple locations, the integration must be set up on each individual child gym, even if the Stripe account is to be shared between gyms.
The landing page will look something like this:

To find your Stripe Account ID, navigate to, https://dashboard.stripe.com/settings/account
To use a Stripe Terminal you must:
Have Stripe configured as a payment method within BETA, setup is managed by BETA.
Be located in a country where Stripe Terminal is Supported (see the current list here)
Have a Stripe Terminal device registered to your account and linked to your location. The device must be able to support server-driven terminal payments.
See › Link your Stripe Terminal, to your Stripe account to get started
Log into your Stripe Standard dashboard, and connect the reader to your account. You can connect multiple Terminals/Readers to your Stripe account.
Please follow along with Stripe’s help.
Stripe’s HelpMigrate Stripe devices to your Stripe Standard account. Your existing BBPOS WisePad 3 can be linked to your Stripe Standard account, in order to be used in the BETA POS.
Once you have Linked your Stripe terminals to your Stripe account that is integrated with BETA, you will be able to connect to your Stripe Terminal in the BETA POS.
Note, if you are in a multi-location setup, please ensure you are on the correct POS, in the correct location for that Stripe account.
Yes, you can connect multiple payment terminals to BETA. Follow the same process for each terminal to connect them.
🔗 Connect a Terminal to the POS
Learn how to quickly connect a payment terminal to your POS system with this easy setup guide.
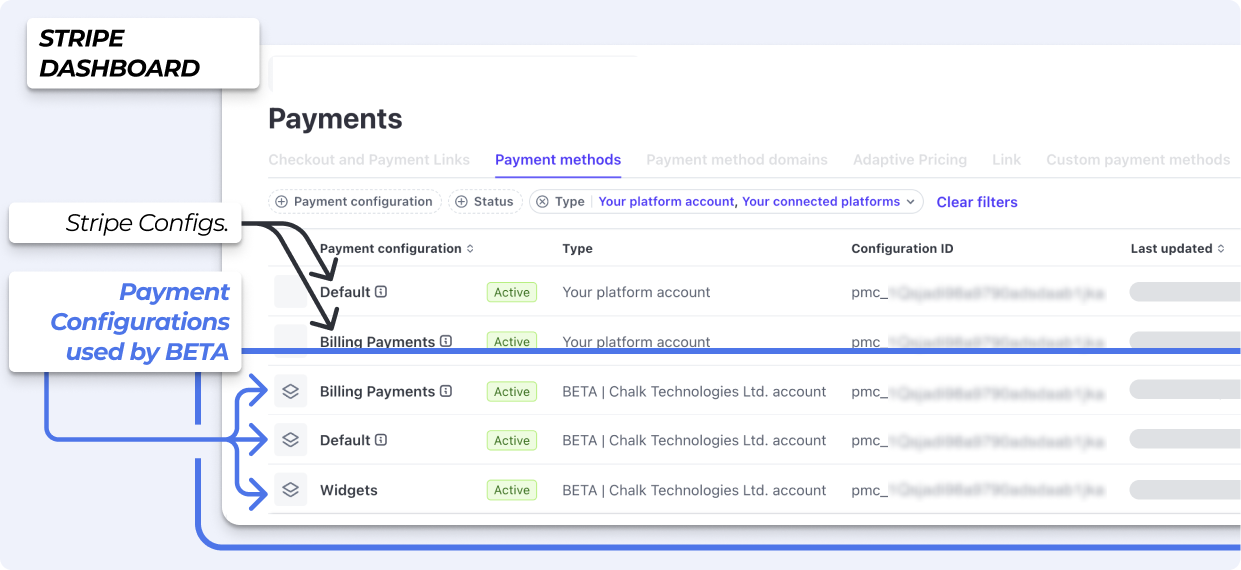
In your Stripe Dashboard, you can manager payment methods for your platform's destination charges, separate charges and transfers, and payments.
Stripe’s Help Page› Understand the Stripe Payment Method configurations
Once you connect BETA to Stripe, BETA will create three configurations:

Step 01: Enabled Google Pay and Apple Pay
Ensure you’ve enabled Google Pay and Apple Pay from your Stripe Dashboard. These payment methods are directly enabled there.
Go to Payment Method Settings in Stripe and enable the ones you’d like to accept. Once enabled, they’ll automatically appear in BETA where supported.
Step 02: Check your Stripe domain settings
In your Stripe Dashboard, go to: Settings » Payment Method Domains
Or use this link:
https://dashboard.stripe.com/settings/payment_method_domains
Please make sure the following domains are added and enabled:
sendmoregetbeta.com
widgets.sendmoregetbeta.com
Once added, refresh and test again to see if Apple Pay appears.
For the full information, please read the Stripe Documentation.
Using machine learning, Smart Retries chooses the best times to retry failed payment attempts to increase the chance of successfully paying an invoice. The machine learning system behind Smart Retries uses time-dependent, dynamic signals, such as:
Based on a combination of these factors, Stripe intelligently assesses when to retry payments. We continuously learn from new purchaser behaviours and transactions, which provide for a more targeted approach over traditional rules-based payment retry logic.
Smart Retries reattempts the charge according to your specifications for the number of retries and the maximum duration. You can also use automations to create different retry policies for different customer segments.
Bank debit methods To avoid bank fees, Stripe doesn’t retry invoice payments that customers made with bank debit methods including: BECS direct debit, Bacs direct debit, or SEPA direct debit.
Hardware
To order your payment terminal, please contact your payment provider directly.
Yes, you can connect multiple payment terminals to BETA. Follow the same process for each terminal to integrate them seamlessly.
No, connecting the payment terminal to BETA is designed to be user-friendly. Simply follow the step-by-step instructions here to integrate the terminal effortlessly.
The Stripe account is fully yours, it is controlled by the BETA POS, and your account is connected to BETA which is why when setting the account up, you will see both your gym’s name and BETA’s.
Subscriptions
Yes, you can! Read through the full Subscriptions Explainer
Stripe subscriptions leverage saved payment details in your Stripe Account (BETA does not store any card details).Stripe will debit the default payment method tied to the subscriber at the interval specified by the price. If a client has no valid default payment method on the date of charge, the payment will be retried or cancelled according to a gym’s retry rules. A gym can configure their retry rules from their Stripe account, here.
No, with Stripe’s recurring payment, you do not need to approve each payment individually at the scheduled interval.
Once you've set up your Stripe subscription, payments are automatically collected on the agreed-upon dates, saving you time and hassle.
Yes. BETA lets you pause subscriptions. This means you and your customers have the flexibility to take temporary breaks from the subscription without canceling it.
Stripe and GoCardless are both integrated payment providers in BETA, offering subscription services for your gym.
The main difference lies in how they process payments and handle subscription management. With Stripe, customers provide their card details for automatic payments, while GoCardless uses direct debit, requiring bank account details for payment processing.
Online sales
Yes, BETA provides a practical solution for selling passes and courses online through our easy-to-use widget builder. BETA is currently integrated with the following payment providers that accept online payments; Stripe, GoCardless, Square, and Payconiq. Learn more about our widgets here.