This guide covers Epson Receipt Printers that are compatible with BETA and how to connect a cash drawer through an Epson receipt printer.
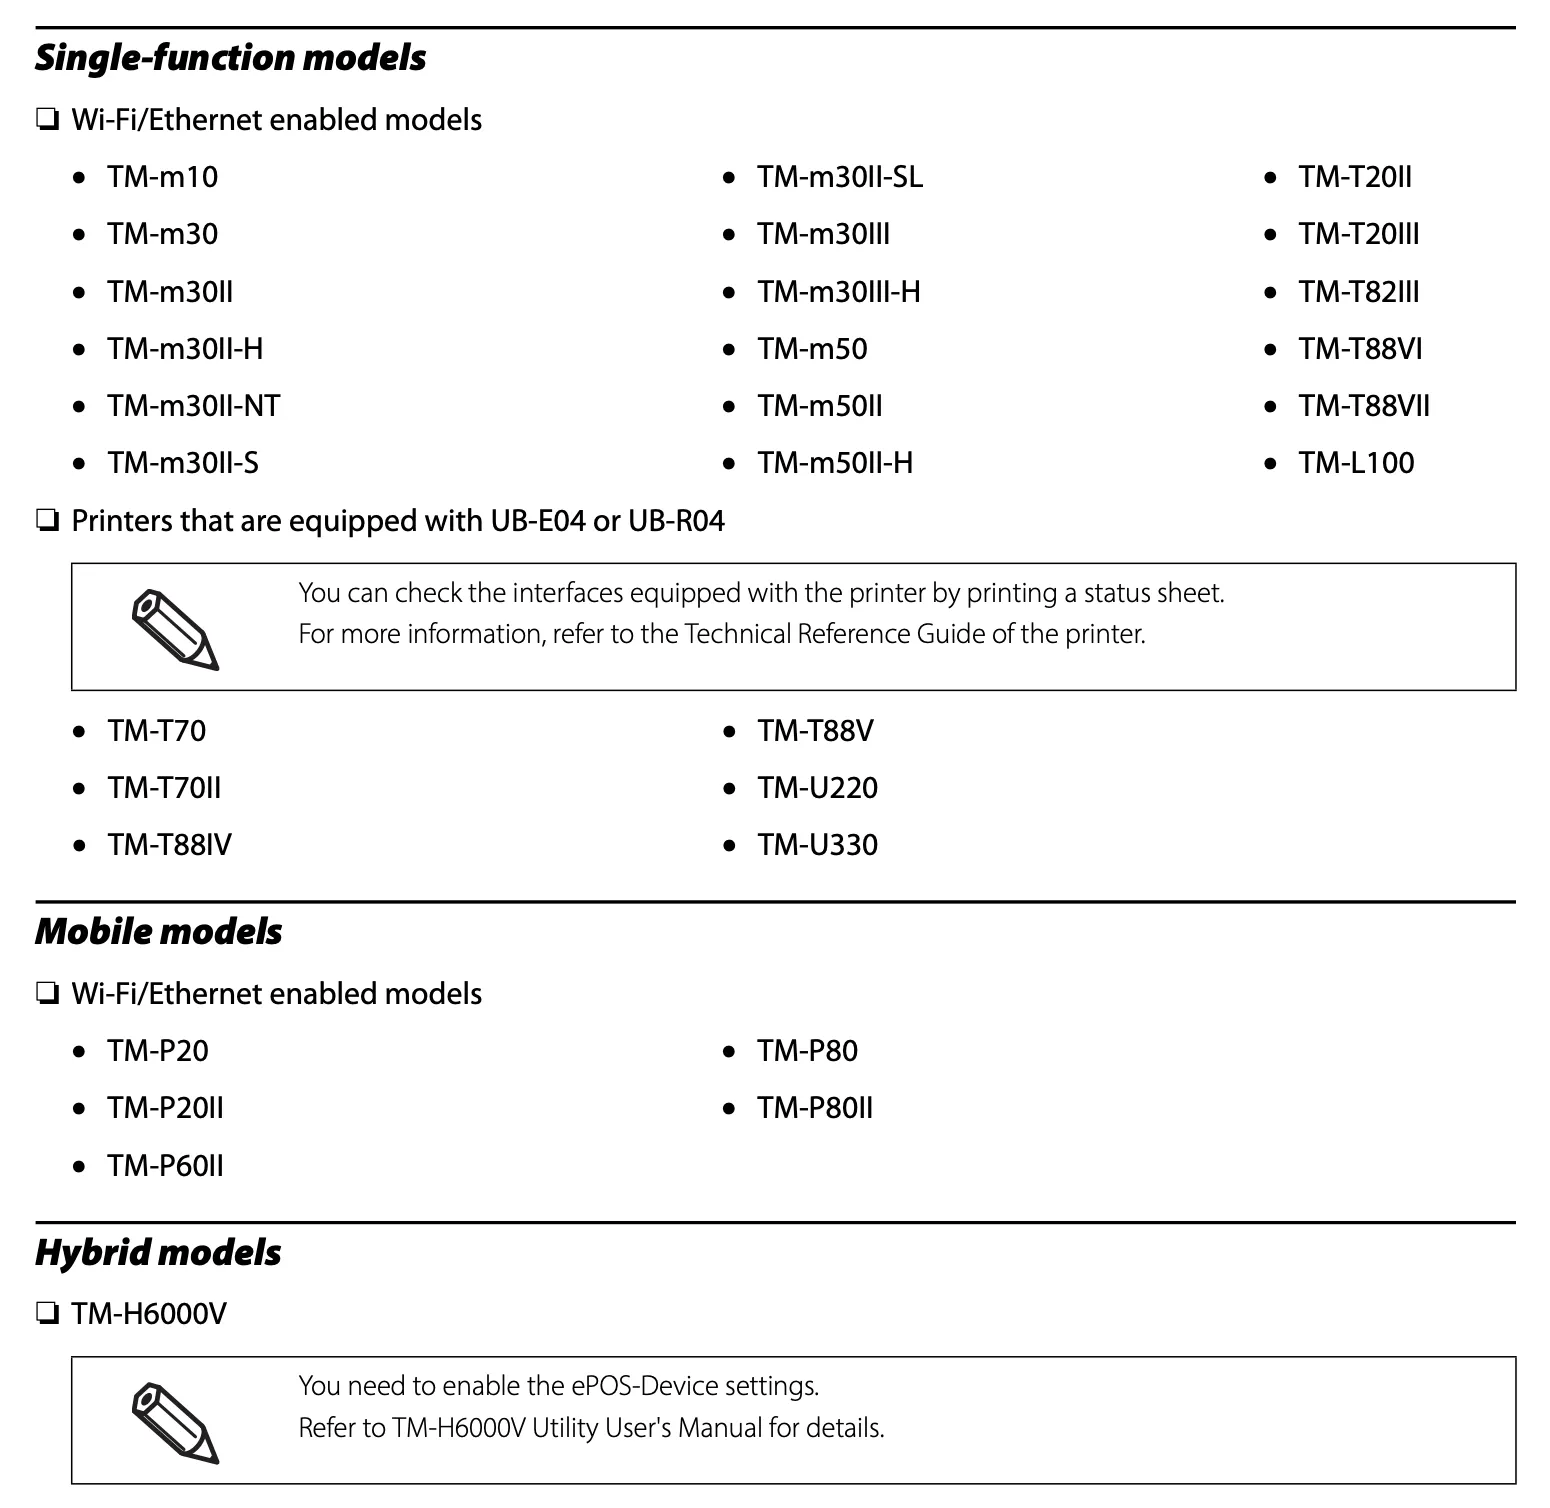
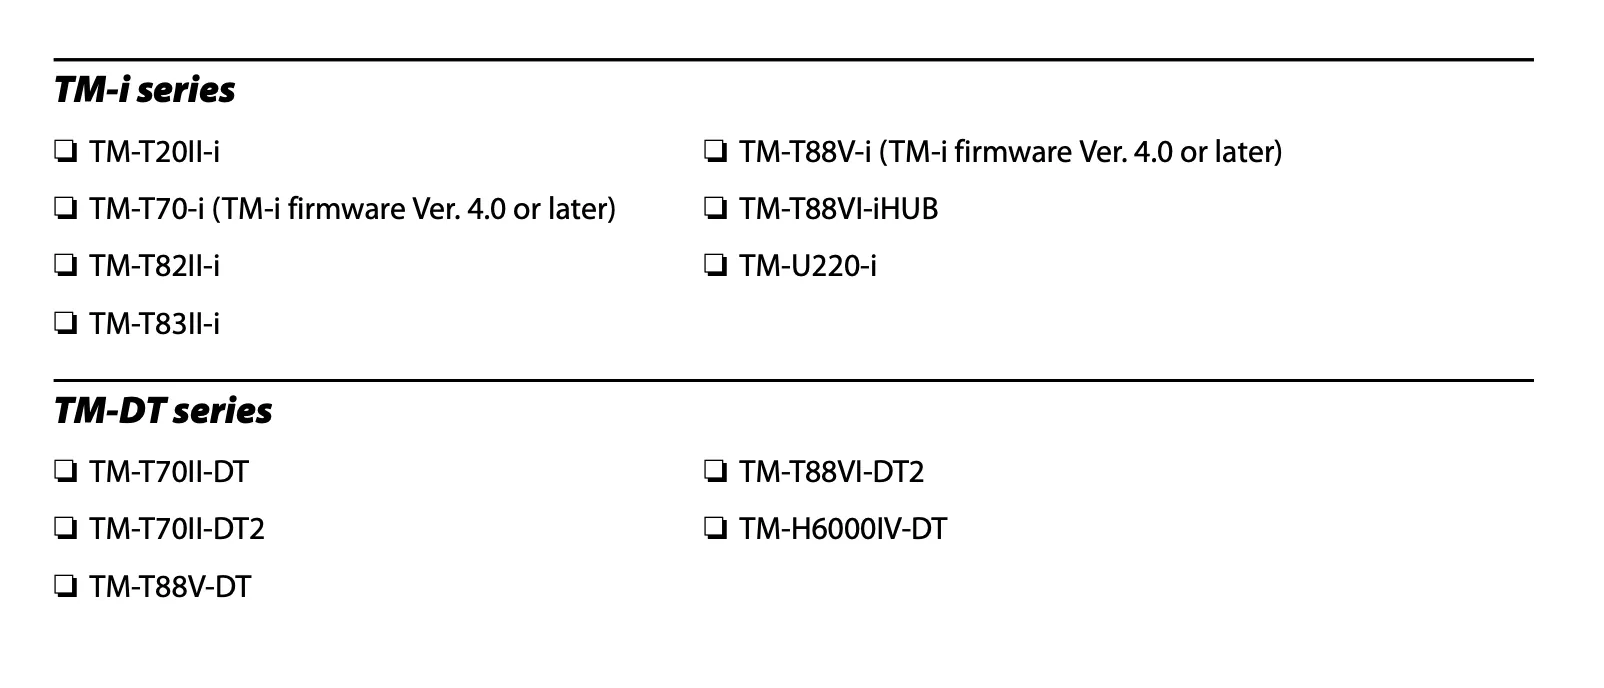
BETA currently integrates with Epson receipt printers (e.g., TM-m10 with Ethernet and similar models). Connecting your Cash Drawer to your EPSON printer, allows you to use a cash drawer with BETA.


epson / epson epson + <device serial number> / epsonSome EPSON printer models require HTTPS for browser communication. For BETA you should enable HTTPS properly so the printer is trusted by your browser and BETA can communicate securely. Follow these steps:
For a long-term solution, you must generate a self-signed certificate. Then, export and import it into your browser.
Step 01 | Understand the EPSON printer’s IP address
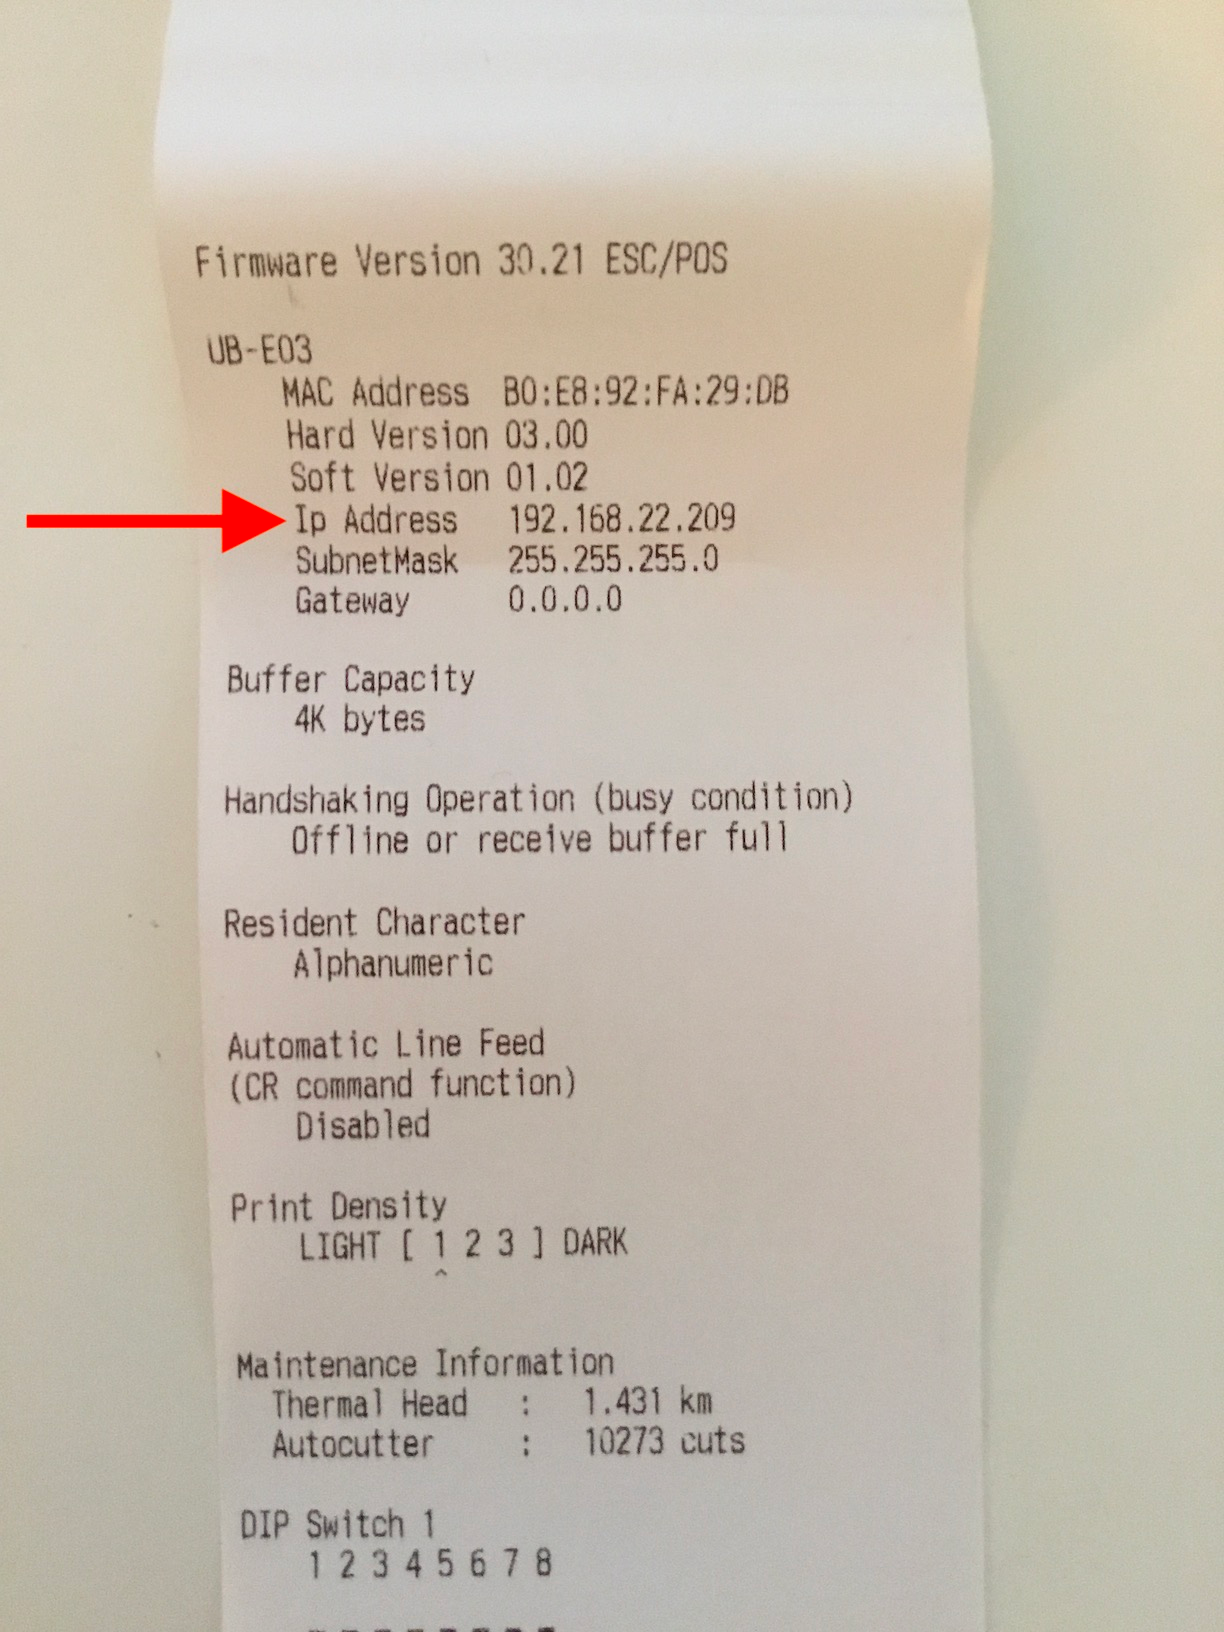
Ensure that the printer is powered on, and connected to the internet, via and ethernet (Please follow your EPSON printer model’s User's Guide, for more detailed instructions)
The Printer will print a receipt with information including the IP address, it should look something like this (e.g., https://192.121.1.22)
Step 02 | Generate a self-signed certificate on Windows 10
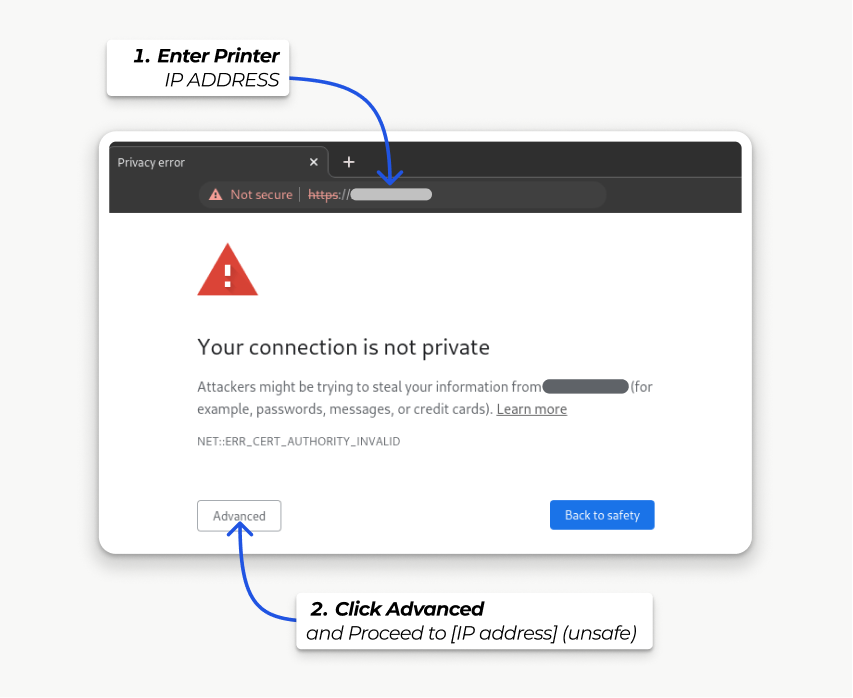
Navigate to the printer’s IP address (e.g., https://192.121.1.22) and force the connection by clicking:
Advanced
Proceed to [IP address] (unsafe)
Then, sign in using your printer credentials to access the printer settings. To sign in, enter epson in the ID field and your printer serial number in the Password field.
Click Certificate List in the Authentication section, and click create to generate a new Self-Signed Certificate. The Common Name should be automatically filled out. If not, fill it in with the printer IP address number. Select the years the certificate will be valid in the Validity Period field, click Create, and Reset or manually restart the printer.
The self-signed certificate is generated. Reload the page and click SSL/TLS in the Security section to ensure Selfsigned Certificate is correctly selected in the Server Certificate section.
Step 03 | Export a self-signed certificate on Windows 10
The export process is heavily dependent on the OS and the browser. Start by accessing your printer settings on your web browser by navigating to its IP address (e.g., https://192.121.1.22)
Then, force the connection as explained in the Generate a self-signed certificate tab (see above). The export process is heavily dependent on the OS and the browser.
Step 04 | Export a self-signed certificate on Windows 10
Start by accessing your EPSON printer settings on your web browser by navigating to its IP address (e.g., https://192.121.1.22). Then, force the connection as explained in the Generate a self-signed certificate tab.
click Not secure next to the address bar
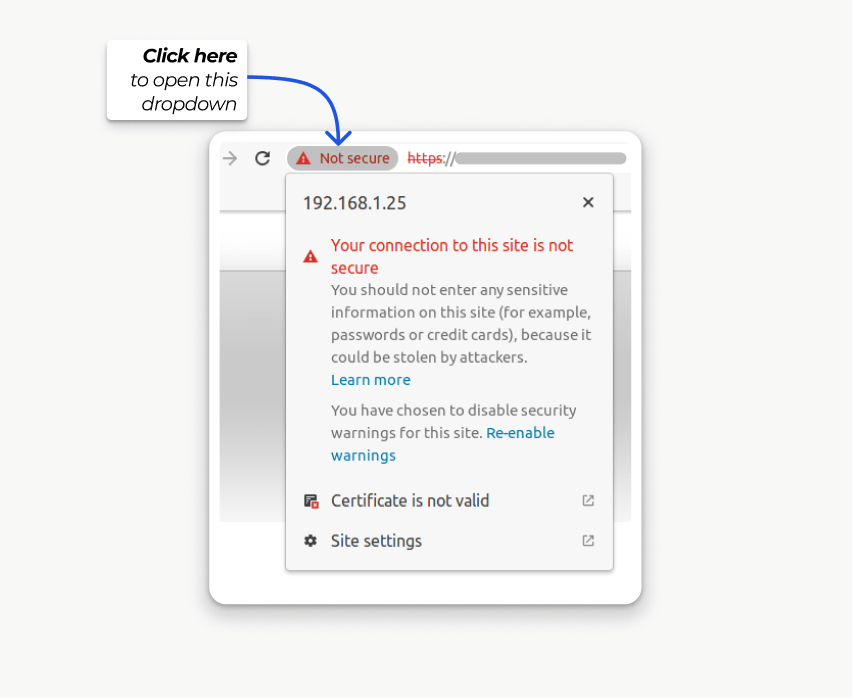
in the dropdown, click Certificate is not valid
go to the Details tab and click Export
add .crt at the end of the file name to ensure it has the correct extension
select Base64-encoded ASCII, single certificate, at the bottom of the pop-up window
save, and the certificate is exported

.crt. Otherwise, some browsers might not see the file during the import process.Step 05 | Import a self-signed certificate on WINDOWS 10
Windows 10 manages certificates, which means that self-signed certificates must be imported from the certification file rather than the browser. Follow along below
open the Windows File Explorer and locate the downloaded certification file;
right-click on the certification file and click Install Certificate
select where to install the certificate and for whom - either for the Current User or all users (Local Machine). Then, click Next
on the Certificate Store screen, tick Place all certificates in the following store, click Browse…, and select Trusted Root Certification Authorities

click Finish, accept the pop-up security window;
restart the computer to make sure that the changes are applied.
On Mac OS, you can secure the connection for all browsers by following these steps:
open Safari and navigate to your printer’s IP address. Doing so leads to a warning page;
on the warning page, go to Show Details ‣ visit this website ‣ Visit Website, validate;
reboot the printer so you can use it with any other browser.
To generate and export an SSL certificate and send it to IOS devices, open Google Chrome.
Step 01 | Understand the EPSON printer’s IP address
Ensure that the printer is powered on, and connected to the internet, via and ethernet (Please follow your EPSON printer model’s User's Guide, for more detailed instructions)
The Printer will print a receipt with information including the IP address, it should look something like this (e.g., https://192.121.1.22)
Step 02 | Generate a self-signed certificate on Mac OS
Navigate to the printer’s IP address (e.g., https://192.121.1.22) and force the connection by clicking Advanced and Proceed to [IP address] (unsafe).
Then, sign in using your printer credentials to access the printer settings. To sign in, enter epson in the ID field and your printer serial number in the Password field.
Click Certificate List in the Authentication section, and click create to generate a new Self-Signed Certificate. The Common Name should be automatically filled out. If not, fill it in with the printer IP address number. Select the years the certificate will be valid in the Validity Period field, click Create, and Reset or manually restart the printer.
The self-signed certificate is generated. Reload the page and click SSL/TLS in the Security section to ensure Selfsigned Certificate is correctly selected in the Server Certificate section.
Step 03 | Export a self-signed certificate on Mac OS
Start by accessing your printer settings on your Chrome web browser by navigating to its IP address (e.g., https://192.121.1.22)
Then, force the connection as explained in the Generate a self-signed certificate tab.
click Not secure next to the address bar
in the dropdown, click Certificate is not valid
go to the Details tab and click Export
add .crt at the end of the file name to ensure it has the correct extension
select Base64-encoded ASCII, single certificate, at the bottom of the pop-up window
save, and the certificate is exported
.crt. Otherwise, some browsers might not see the file during the import process.Connect your printer to the local network via WIFI or ethernet cable. You may need an ethernet card depending on your printer type, please see more information in the list of compatible printers.
If you’re using an ethernet card, make sure the pins are set correctly (See the manual for your printer. If you’re using a TM-T88V you need to have pin 2-8 ON and all the rest of the pins OFF.)
Access the printer using the EpsonNet Utility, make sure the printer is set to automatically assign IP address.

Power the printer off.
Press and hold the feed button.
Power the printer on and continue to hold the feed button.
After a few seconds a settings sheet will print, including the IP address of the printer
Navigate to the Integration Page on your Dashboard to set up your printer configuration.
Enter the IP address that your printer printed out. You can also run a test print here to confirm everything is working as intended.
Navigate to the BETA Integrations Page via the link below, then find EPSON.
Enter your device’s IP address and Port. The recommended:
HTTP port is 8008
HTTPS port is 8043.
The EUB-E04 may be on port 9001, 9100.
Click Print Test Receipt to verify that a receipt is produced.
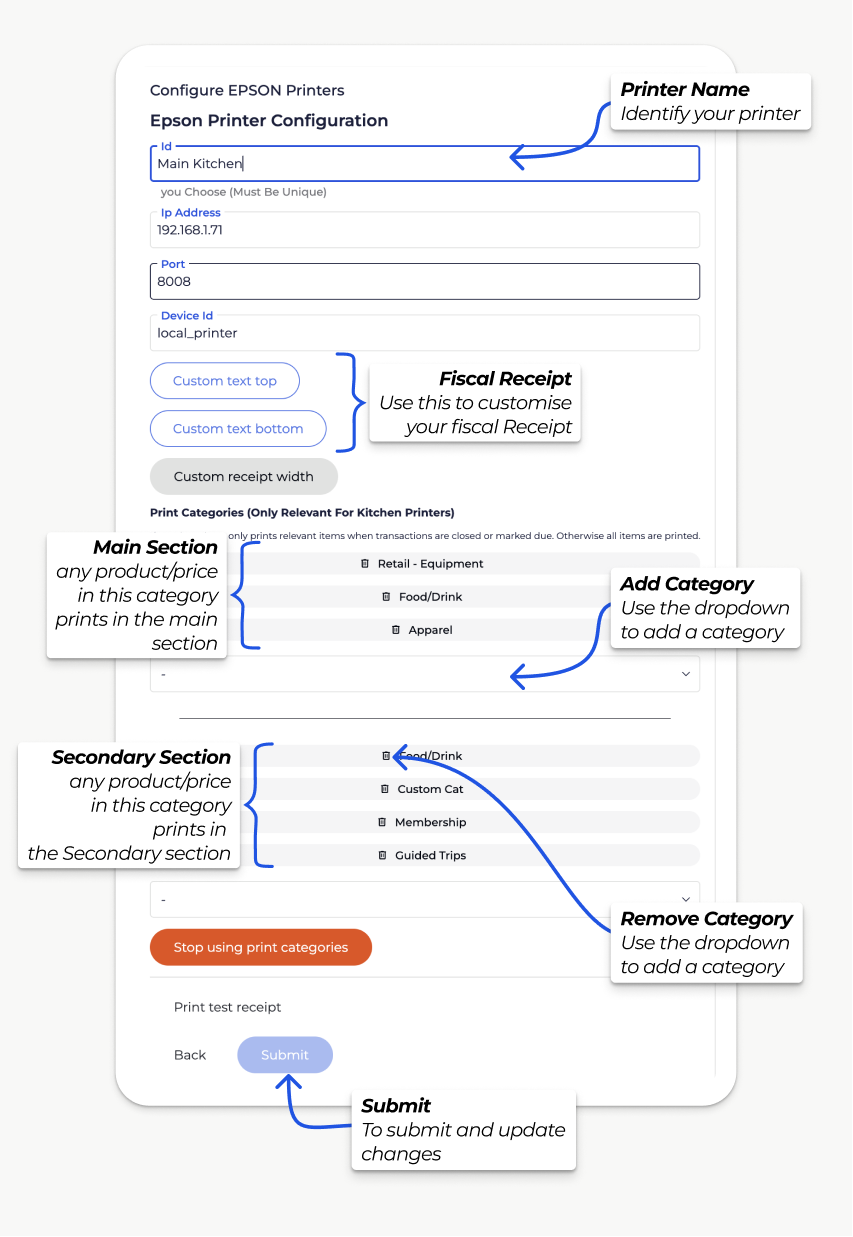
BETA supports multiple printer connections, allowing you to assign specific printers for different tasks. You can also designate a printer as a Kitchen Printer for processing food and drink orders. If no categories are assigned, the printer will print all items from the transaction.
Click Add another Printer
Enter the settings, IP address etc, as explained in › Configure your Printer
Give the configuration, a unique id eg. kitchen
Visit this URL, and replace <replace_with_printer_id> with your saved id
eg ?id=kitchen
Visit the Configure EPSON printers,
and click save  , to select which printer will be using that config.
BETA supports printer connections, allowing you to assign specific printers for different tasks. You can also designate a printer as a Kitchen Printer for processing food and drink orders.
Navigate to the Settings » Integrations page
Click on EPSON
Add / Edit a printer
Add the Price Categories to the MAIN section
if required, add to the SECONDARY section too
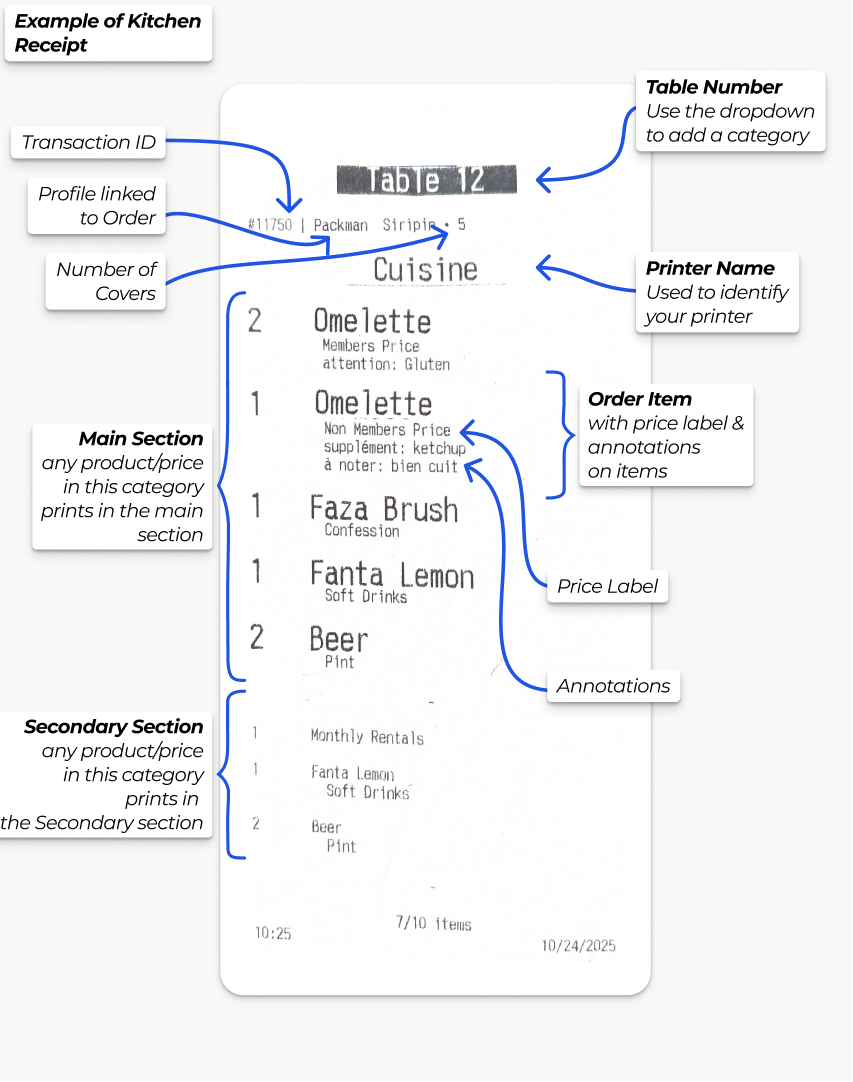
The *kitchen* printer to print Food Orders in Price Category
Cafe:Food, Cafe:Snacks
If you’re looking to switch product categories, please see the help article linked below,
Manage Product Options, Product Prices, Product Price Categories and Price Labels
Control your tangible products, such as retail/cafe items. Set their description and other details and set pricing and price categories.
Once you have configured your EPSON printer/s—steps above— you can now connect your device to your EPSON printer.
Using a thermal receipt printer provides an alternative check-in method for climbers who do not have the BETA app. This will only display if your EPSON printer is connected.
The QR code printed on the receipt is valid for 24 hours and will check in the climber using the pass linked to their account.
Print a Thermal Receipt for Check-In
This guide explains how to print a thermal receipt for check-in, allowing climbers without the BETA app to access facilities using a QR code.
Receipt Types, Print and Send Receipts
How to send and save transaction receipts via email or print them directly, including options for thermal receipts and PDF customization.
The cash drawer connects directly to your EPSON receipt printer. This means the drawer can only be opened ("kicked") through the POS if it is plugged into the printer. If the drawer isn’t connected to the printer, the open command will not work, and the button on the POS will display.

BETA POS integrates with EPSON receipt printers to print out receipts. When the payment is initiated, a call is sent to the printer on the local network to print the receipt and kick the drawer.
Some printers do not allow communication over HTTPS/SSL. The TM-T88V, which is the RGP-recommended printer, is not the correct hardware.
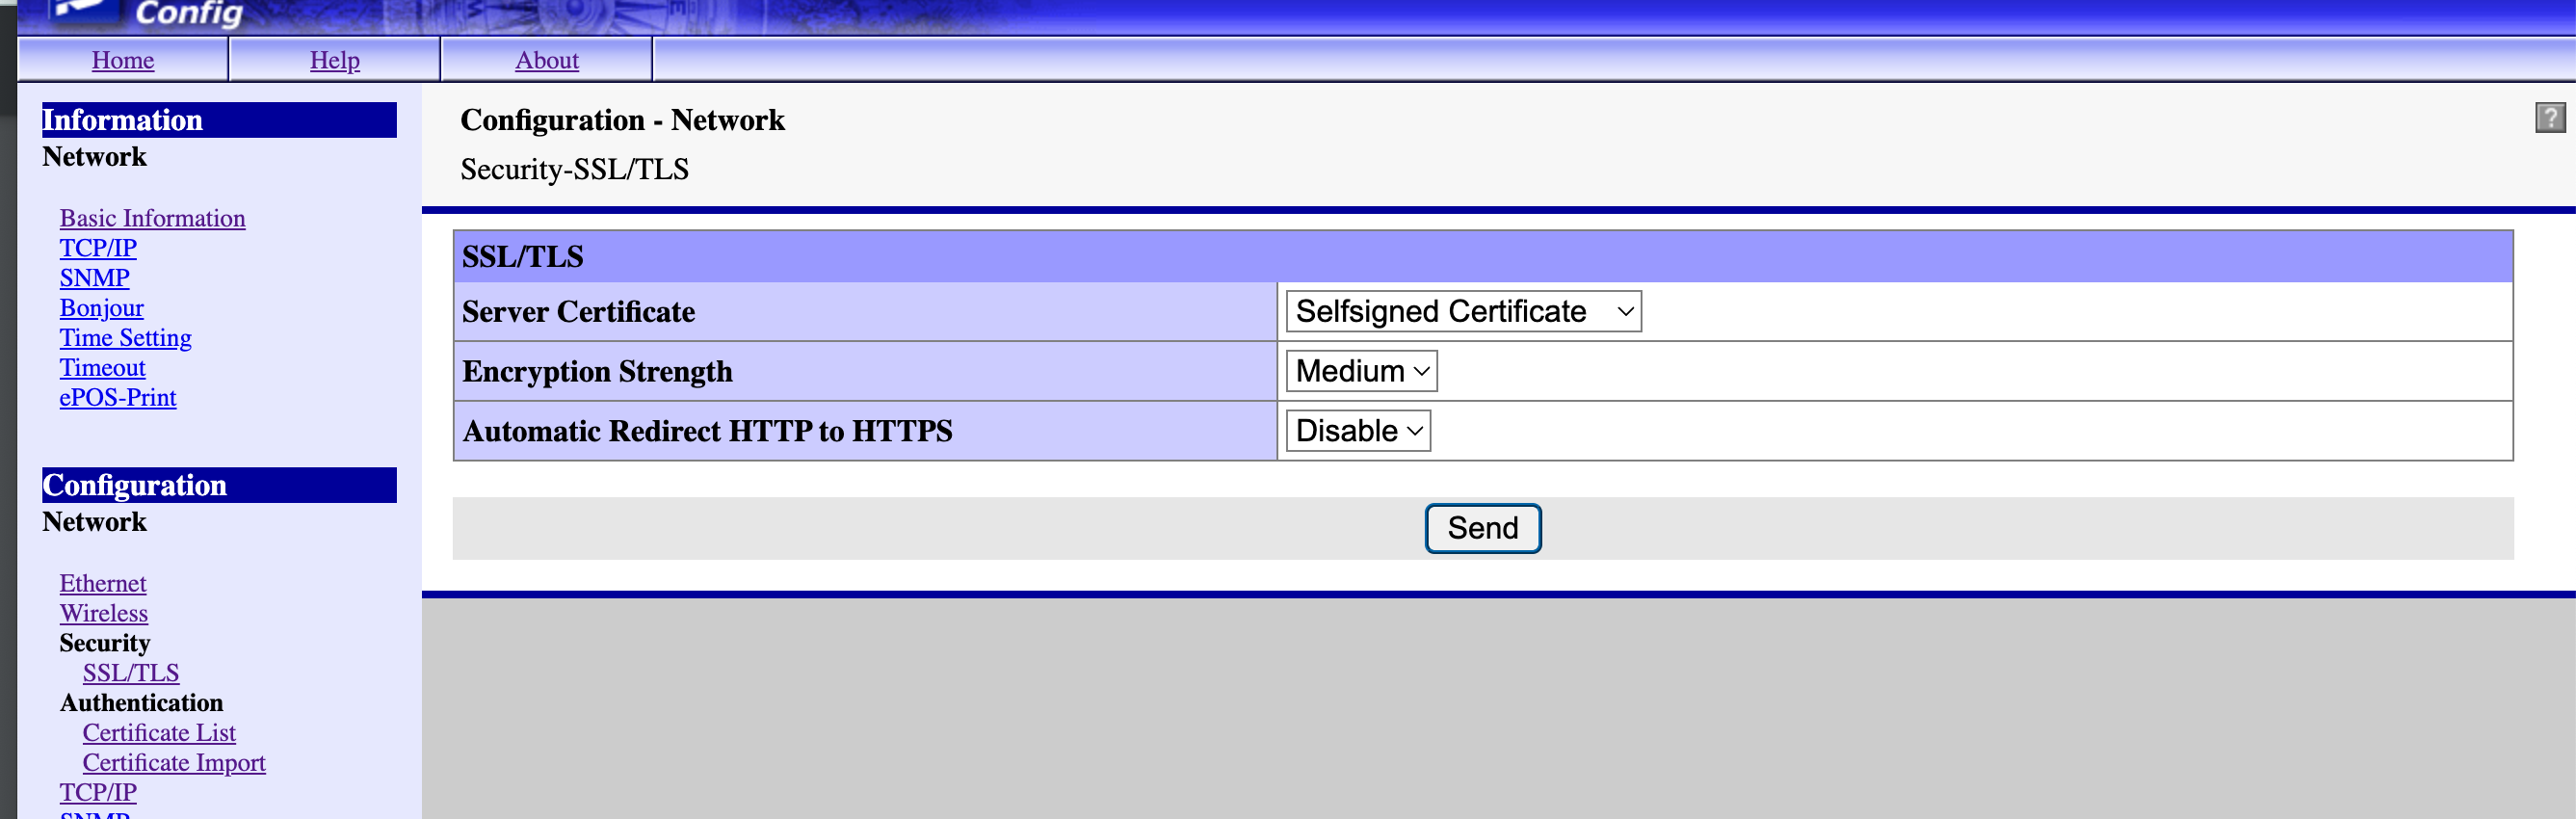
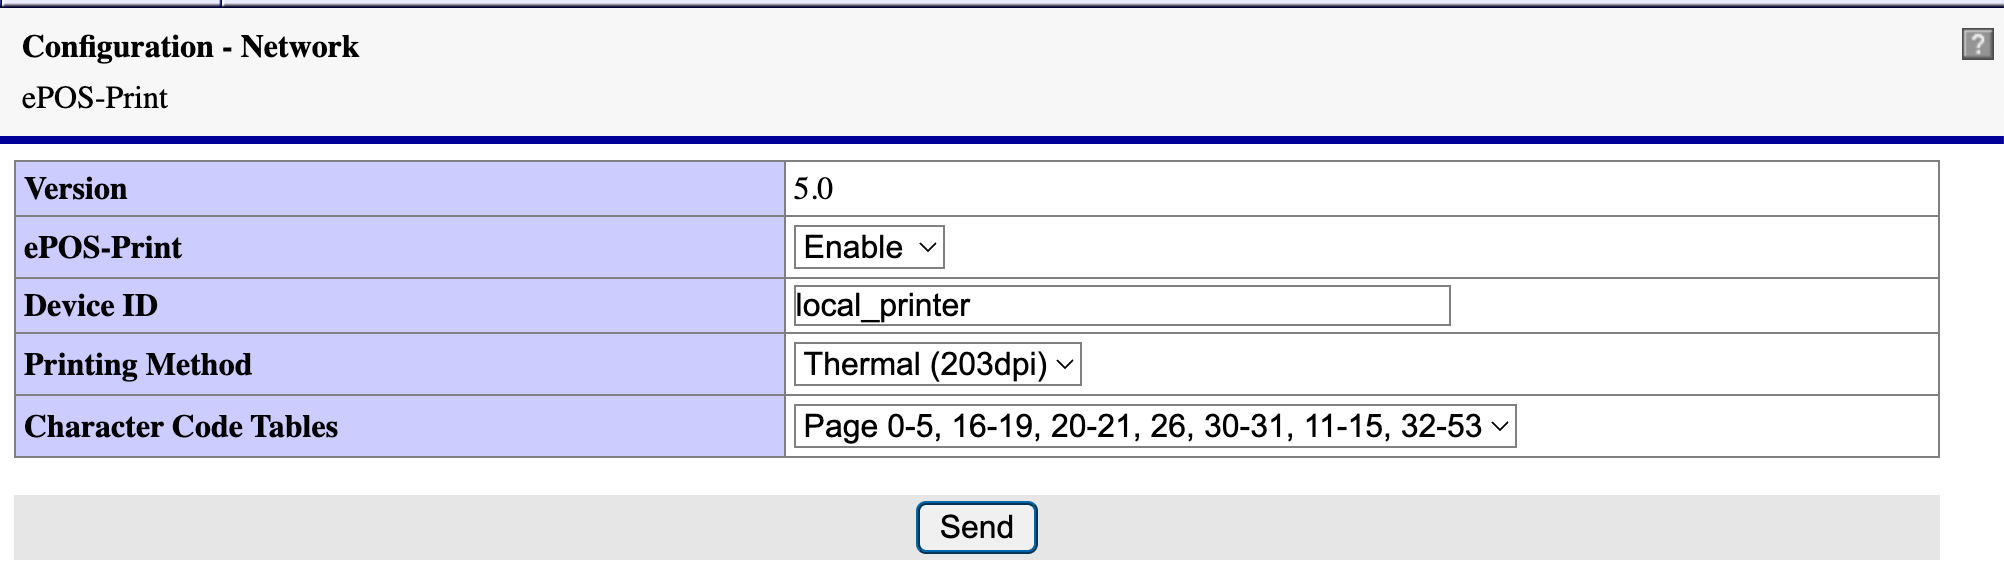
To ensure communication can proceed over HTTP, open the Epson utility by navigating to the printer’s IP address. (username epson, password epson)
Navigate to Network > Security > SSL/TLS
Set Automatic Redirect HTTP to HTTPS to Disable and Send the changes to the printer.
Please note that the port in the BETA settings page may need to be set to 8043.
Another solution is to generate a self-signed certificate. Then, export and import it into your browser.
1) Generate a self-signed certificate
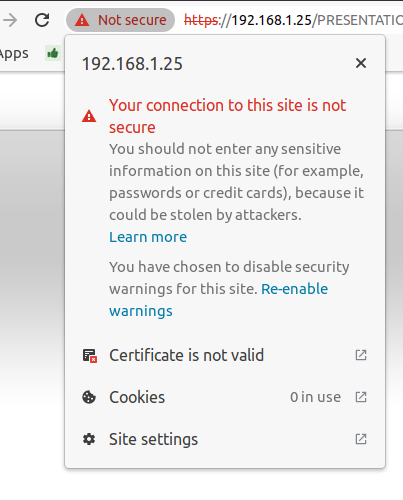
Navigate to the ePOS’ IP address (e.g., https://192.168.1.25) and force the connection by clicking Advanced and Proceed to [IP address] (unsafe).
Then, sign in using your printer credentials to access the ePOS printer settings. To sign in, enter epson in the ID field and your printer serial number in the Password field.
Click Certificate List in the Authentication section, and click create to generate a new Self-Signed Certificate. The Common Name should be automatically filled out. If not, fill it in with the printer IP address number. Select the years the certificate will be valid in the Validity Period field, click Create, and Reset or manually restart the printer. The printer utility may appear stuck after you click the “Create” button, try waiting a few minutes before trying again.
The self-signed certificate is generated. Reload the page and click SSL/TLS in the Security section to ensure Selfsigned Certificate is correctly selected in the Server Certificate section.
2) Export a self-signed certificate
The export process is heavily dependent on the OS and browser.
2.1) If you are using Google Chrome
Start by accessing your ePOS printer settings on your web browser by navigating to its IP address (e.g., https://192.168.1.25). Then, force the connection as explained in the Generate a self-signed certificate tab.
click Not secure next to the Address bar, and then open up Certificate is not valid;
go to the Details tab and click Export;
add .crt at the end of the file name to ensure it has the correct extension;
select Base64-encoded ASCII, single certificate, at the bottom of the pop-up window;
save, and the certificate is exported.
Make sure that the certificate ends with the extension .crt. Otherwise, some browsers might not see the file during the import process.
2.2) If you are using Firefox
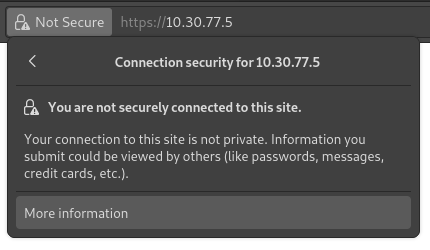
Click the lock-shaped icon  on the left of the address bar;
go to Connection not secure
‣ More information
‣ Security tab
‣ View certificate;
In the View certificate popup
- scroll down to the Miscellaneous section;
- click PEM (cert) in the Download section;
- save, and the certificate is exported.
2.3) Other Browser, note BETA suggests Google Chrome
If you need to export SSL certificates from an operating system or web browser that has not been mentioned, search for export SSL certificate + the name of your browser or operating system in your preferred search engine.
3) Import a self-signed certificate
The import process is heavily dependent on the OS and the browser.
3.1) Windows
Windows manages certificates, which means that self-signed certificates must be imported from the certification file rather than the browser. To do so:
Open the Windows File Explorer and locate the downloaded certification file;
right-click on the certification file and click Install Certificate;
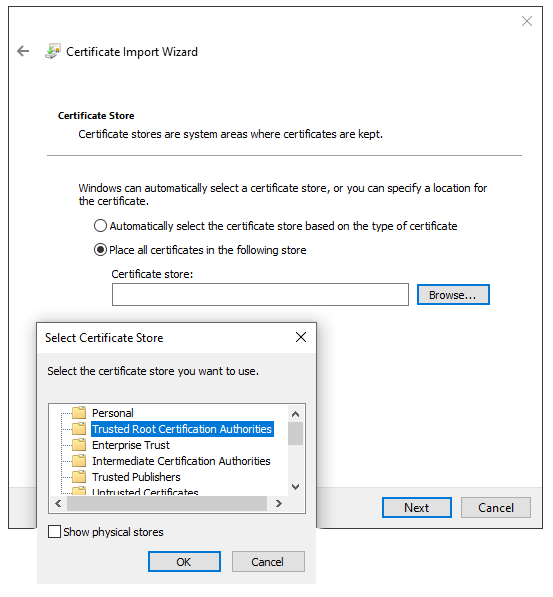
select where to install the certificate and for whom - either for the Current User or all users (Local Machine). Then, click Next;
on the Certificate Store screen, tick Place all certificates in the following store, click Browse…, and select Trusted Root Certification Authorities;
click Finish, accept the pop-up security window;
restart the computer to make sure that the changes are applied.
3.2) Other Browser, note BETA suggests Google Chrome
Similarly, to import SSL certificates from an unmentioned OS or browser, search for import SSL certificate root authority + the name of your browser or operating system in your preferred search engine.
4) Check if the certificate was imported correctly
To confirm your printer’s connection is secure, connect to its IP address using HTTPS. For example, navigate to https://192.168.1.25 in your browser.
If the SSL certificate has been applied correctly, you should no longer see a warning page, and the address bar should display a padlock icon, indicating that the connection is secure.
Sometime issues occur.
Please follow the EPSON FAQ Article on How to Solve Errors: "Subject Alternative Name Missing"; “NET::ERR_CERT_COMMON_NAME_INVALID”; or "Your connection is not private" in Google Chrome, linked below!
EPSON FAQ Article on How to Solve Errors

Still Lost? We’ve got you covered!
Use the search box on the main Help to search the entire list of available help guides, or drop your question in the Support Chat!