BETA’s forms are your gateway to gym entry. With the traffic light system, you can quickly see if a participant hasn’t signed the gym entry form, ensuring a smooth check-in for everyone.


What is a Form in BETA?
A form in BETA is a structured digital document, designed to collect information from a user. It can be used for many purposes, including but not limited to Acceptance of Risk (AOR), Waivers, a Liability Form, surveys, registrations, feedback, applications, data collection or an Acceptance of Risk (AOR) or a Liability Form, depending on the context and your gym’s operations.

What is a Booking Form in BETA?
A booking form is a specialized type of form used when a user makes a purchase or reservation. Its purpose extends beyond collecting basic contact information; it also gathers all additional details required to process and confirm the booking successfully.
Please read the dedicated help article below,
Booking Forms Explainer
Learn how to create and configure Booking Forms for your online booking widget, ensuring mandatory details are collected for purchases.
Build a completely new form from scratch.
Go to the Participant Forms page in BETA and click on the plus button at the bottom right of the page to add a new document template. Give your form a name and select basic settings to start with.
Note, If you have added your tags already (community & above tiers), these will be displayed at this stage as well, as you can choose a tag to be issued to profiles who sign this form e.g., Boulder safety tag issued with an Adult waiver.
Easily create a copy of an existing form to save time when setting up similar forms. This preserves all questions, settings, and layout from the original form, allowing you to make adjustments without starting from scratch.
Read about each section in the Settings of a form, what each setting means and some examples.
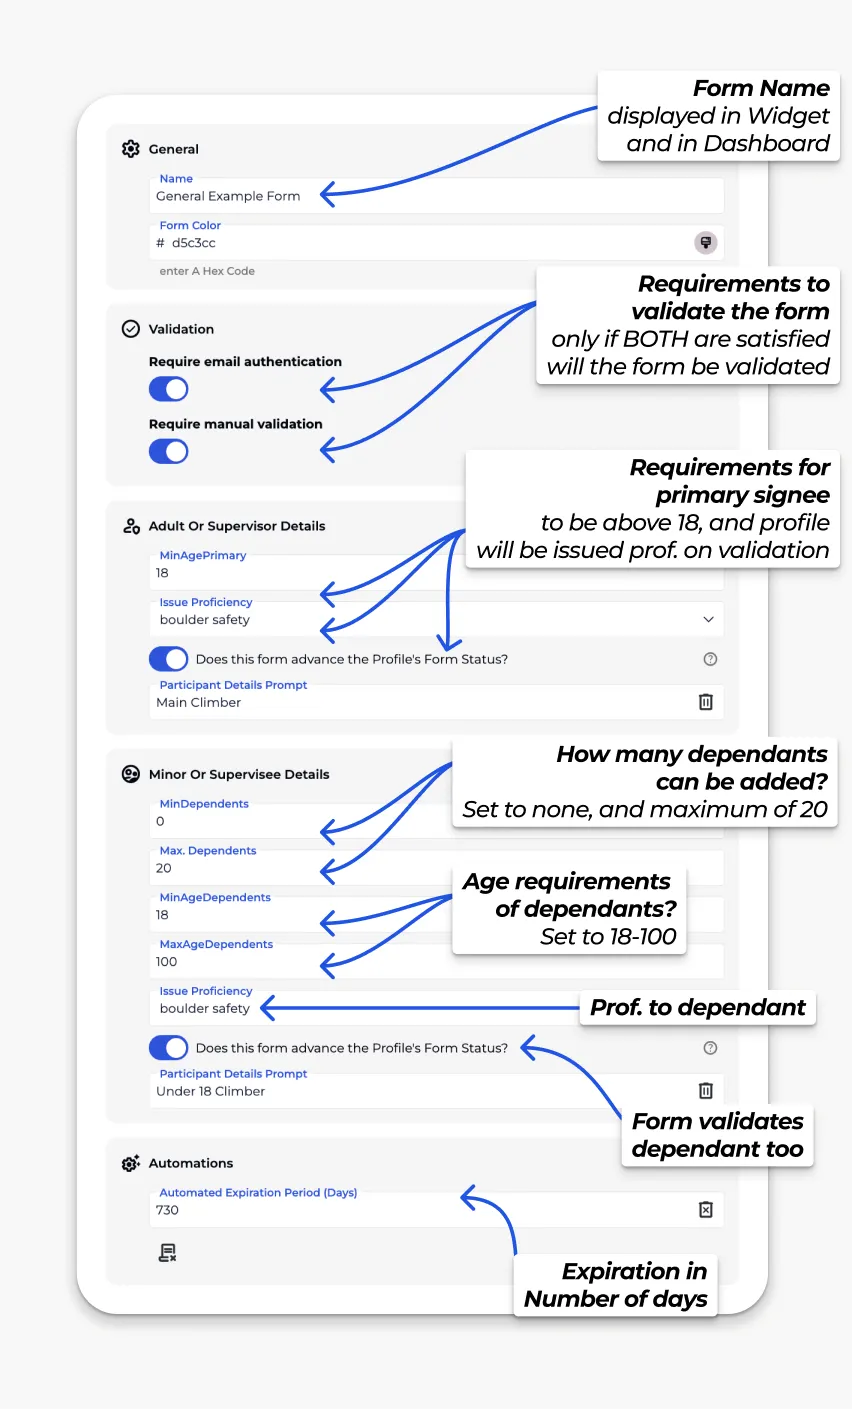
Name: The name will show on your participant form widgets so please make it clear from the name who should be signing this form.
Example, “Supervision Waiver” or “Birthday Party Booking Form”
Form Color (Hex code): Use HEX codes to select the color of your form widget.
Example: #FF5733 for a bright orange waiver form.
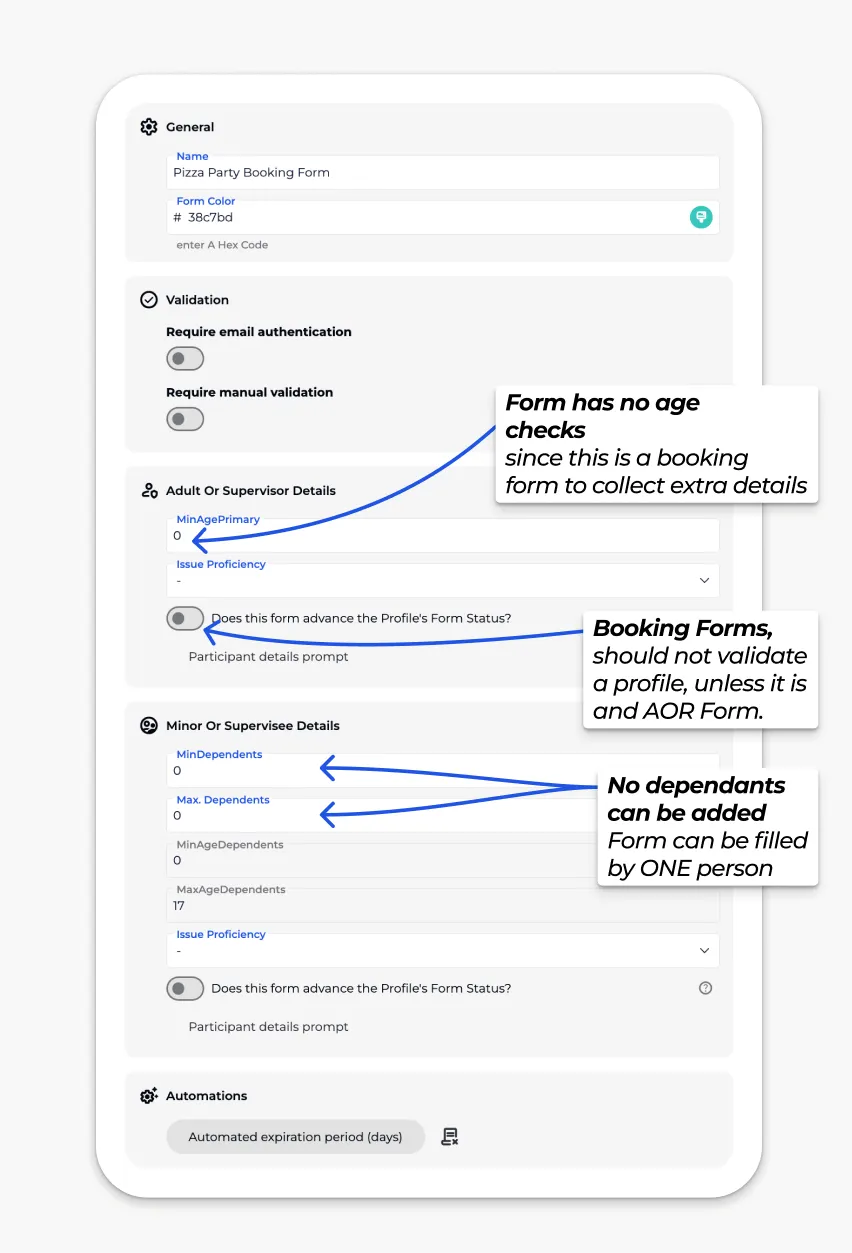
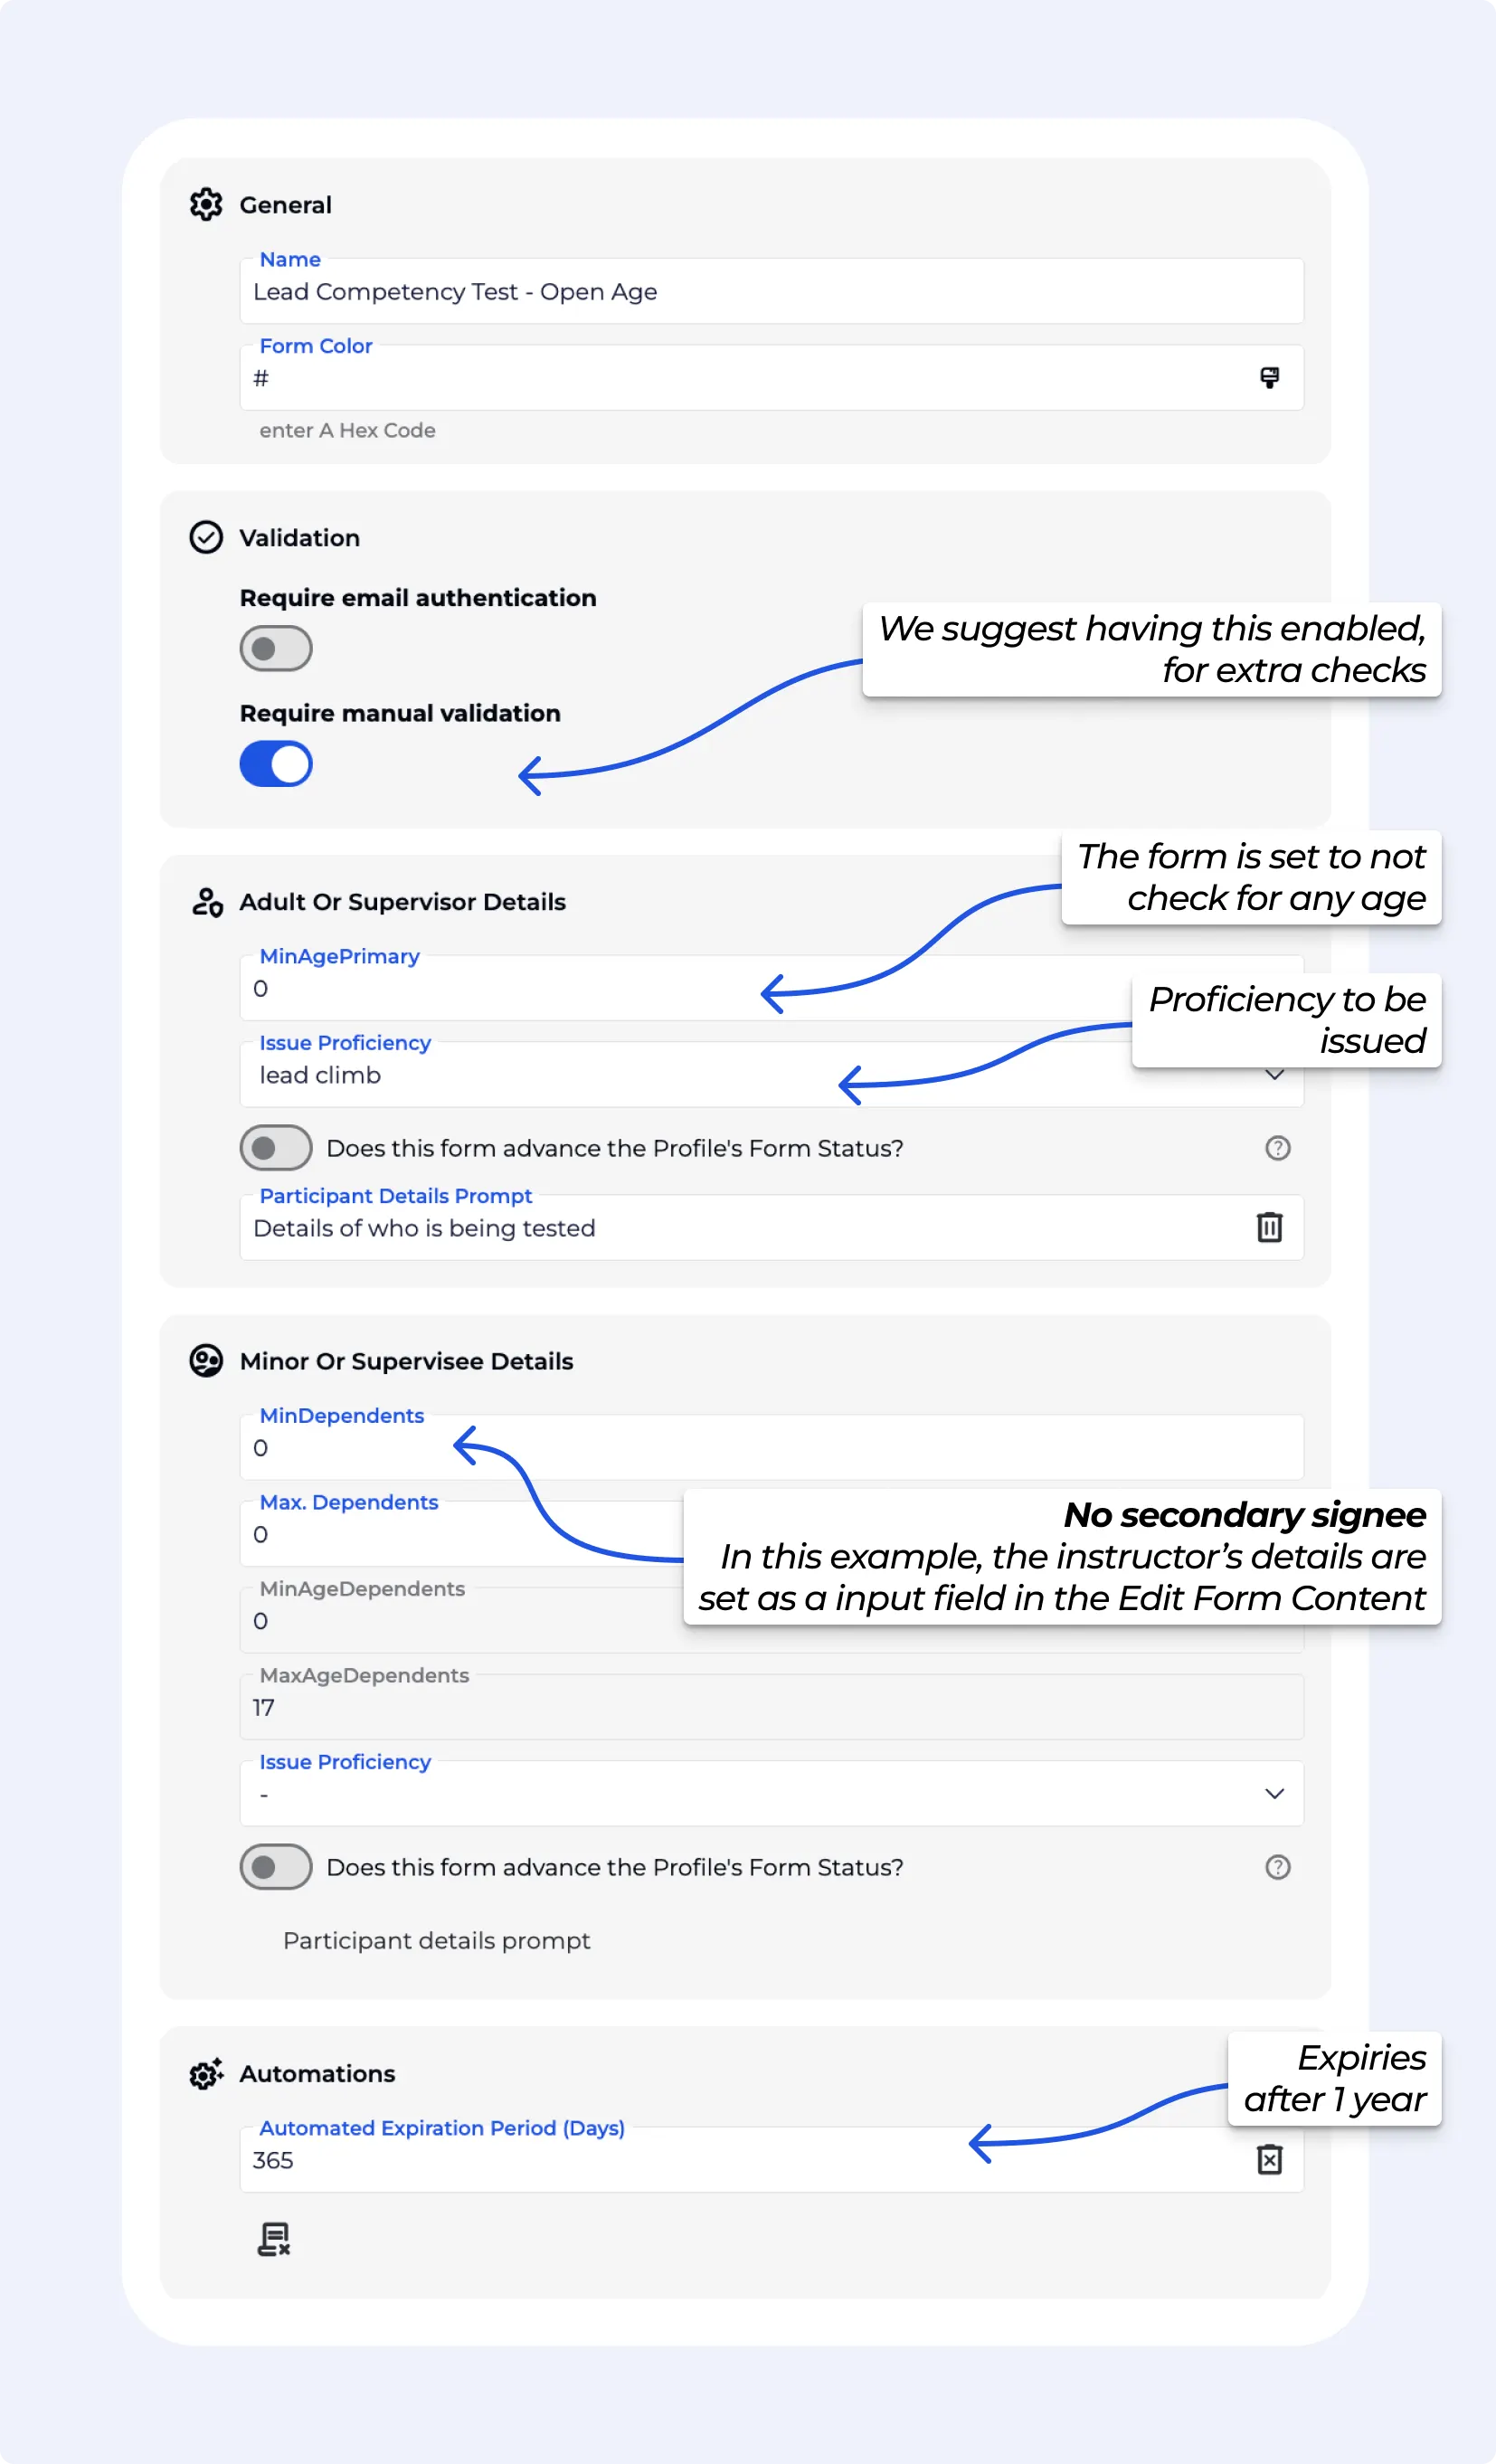
Require email authentication: The primary signee must confirm their email before the form is validated. (we suggest that this is turned ON!)
Example: Use this for legal waivers to ensure the signer’s identity is verified, and that their correct email is collected.
Email validation helps ensure that liability forms and accounts are linked to real individuals’ email. This supports smoother check-ins (such as allowing for QR code generation), improves communication, and streamlines other operational processes. It also allows climbers to access and manage their account through the Members Home. Additionally, having a verified email can be beneficial for optional marketing and updates. This is not legal advice and is provided for general informational purposes only.
Require manual validation: Staff must manually validate to approve the form before it’s active.
Example: Use this when supervisor qualifications need to be confirmed by staff.
 Best Practice: Before making changes to Form Settings, double-check how the new rules will affect existing submissions. This helps avoid unexpected validation outcomes across your dashboard.
This section allows you to control the for the “primary” participant/Adult/Supervisor.

Setting Name | Description |
Minimum age (Primary) | The youngest age allowed for the main signer (the “primary” participant). Example: Set to 18 if the primary must be an adult. |
Issue Tag or Proficiency | Automatically assign a note/proficiency when the form is completed. Applies only to the primary. This automation links a specific form to a predefined proficiency. When a visitor submits the form:
Example: Set to Supervisor so that adults signing a supervision form are tagged accordingly. Business tier or higher. |
Does this form advance the Profile’s Form Status? | Determines whether completing this form updates the participant’s overall status (e.g., validated, approved).
|
Primary Participant details prompt | The label shown for primary, allows for form localisation. Example: Change “Participant” to “Supervisor” for a supervision form, by default it will display Adult or supervisor details |
This section allows you to control for the “Secondary” Minor or Supervise Details. BETA will show the “linked” dependant(s) in the Form section of the Profile.

Setting Name | Description |
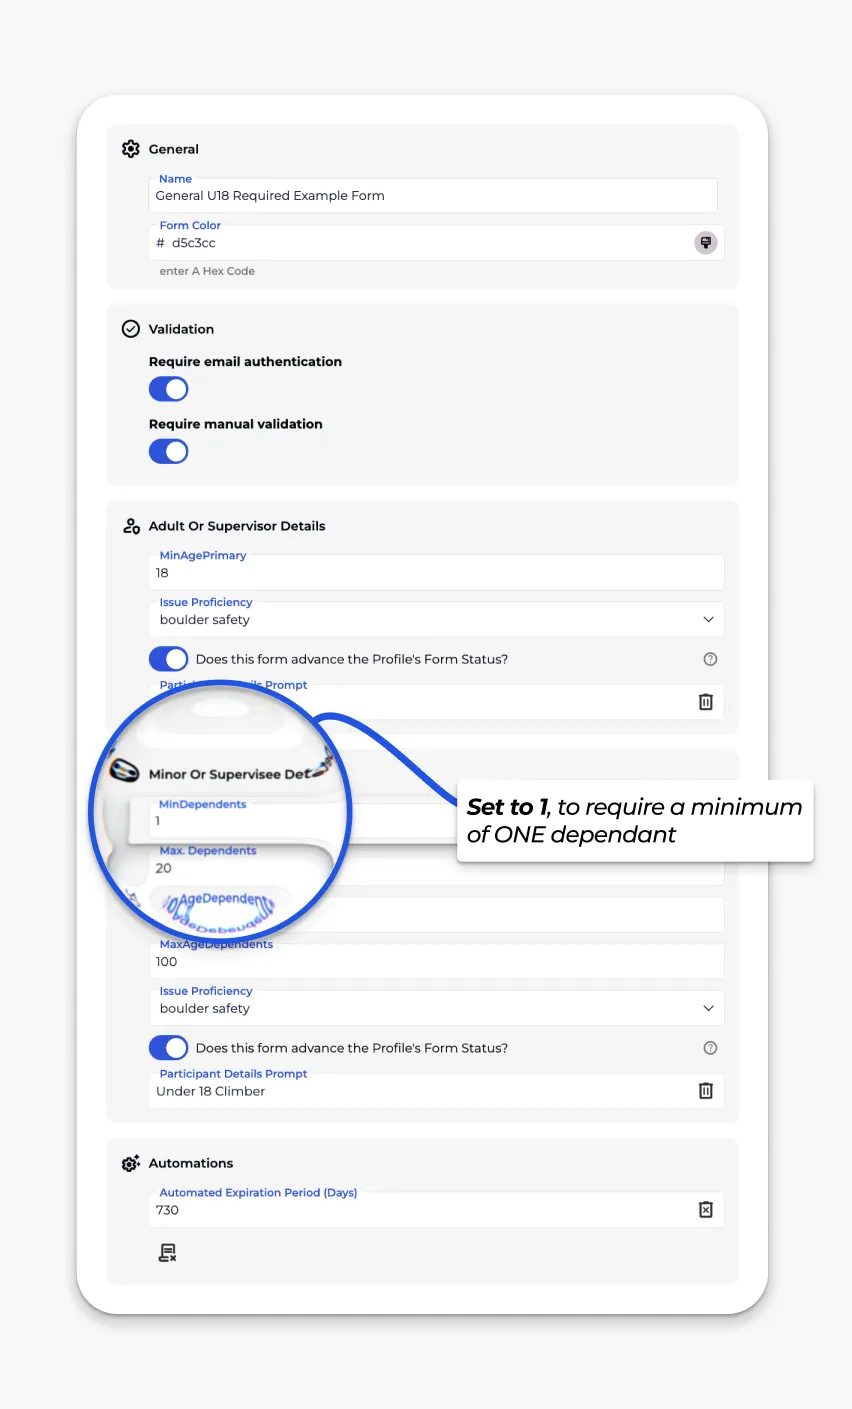
Minimum Dependants | The lowest number of dependants required for this form. Example: Set to 1 if the form must always include at least one child. |
Max. Dependants | The highest number of dependants allowed on the form. Example: Set to 2 if one adult can only supervise up to two minors. |
Minimum Age Of Dependants | Youngest age allowed for dependants. Example: Set to 5 to only allow children aged 5+ to be added. |
Maximum Age Of Dependants | Oldest age allowed for dependants. Example: Set to 17 if minors must be under 18. |
Issue Tag Or Proficiency | Automatically assign a note/proficiency when the form is completed. Applies only to the Dependant/s. This automation links a specific form to a predefined proficiency. When a visitor submits the form: • The corresponding proficiency is automatically added to their profile. • No manual action is needed—unless validations are in place. Example: Set to Novice so that Minor or Supervisee Details are tagged accordingly.
|
Does this form advance the Profile’s Form Status? | Determines whether completing this form updates the participant’s overall status (e.g., validated, approved).
|
Participant details prompt | The label shown for dependants, allows for form localisation. Example: Change “Participant” to “Child” or “Climber” , by default it will display Minor or Supervisee Details. |
This automation is available on BETA Business
Automation Expiration Period (Days): allows you to set a default expiration period (in days) for forms, waivers, or Agreements of Responsibility (AORs). Once the set period passes, the visitor’s form will automatically expire.
This does not remove any proficiencies that were previously granted; only the form status is affected.
Example, 365 days - the form will expire in 1 year after signing
Bulk Expire Forms
Learn how to bulk expire forms with manager permissions. Set expiration dates based on specific dates or days after signing to keep your documents updated effectively.
Forms will automatically expire if a participant no longer fits the age ranges you’ve set. This applies to both primary signers and dependants:
Primary (adult/supervisor): If your minimum age is set to 18 and a participant’s profile no longer meets that criteria (for example, they turn 18 and the form was configured for under-18 only), the form will expire.
Dependants (minors/supervisees): If a dependant reaches the maximum age limit you set (e.g. 17 on a U18 form), the form will automatically expire on their 18th birthday.
This ensures that forms always stay valid for the correct age groups without needing manual intervention
Troubleshooting - when climbers age out of waivers
Learn what to do when a climber's waiver expires after they enter a new age bracket.
Unsure where to start, here are some very common form types for climbing gyms, their behaviour and relevant Form Settings.
One main registrant and multiple dependent details can be filled on the form
The document will be registered to all climbers listed on the form
If there are any dependents on this form, the form will auto-expire when the dependent turns 18.
Attention, a form MUST contain a signature field to generate a .pdf - keep this in mind if you are using a form as a Acceptance of Risk (AOR) or a Liability Form.
One primary registrant aged 18 and above and at least one under 18 required.
The document will be linked to the dependent listed on the form.
The form will auto-expire when the dependent turns 18.
Attention, a form MUST contain a signature field to generate a .pdf - keep this in mind if you are using a form as a Acceptance of Risk (AOR) or a Liability Form.
Form that allows only one submission per person when sent via profile. Primary of ANY AGE, and does not validate the profile or issue any notes/proficiencies. Booking forms are available on the Business Tier and above.
The Proficiency Instructor Form for situations where a climber completes a competency test and, upon signing the form, is automatically issued a Lead Belay Proficiency. In the below example, this setup:
Any age can be the primary signer (usually the climber themselves).
Only one primary signer is allowed - for the preferred  Form linked only to the Participant
If you set an expiration date on the form, the linked proficiency will carry the same expiration period.
Options for linking forms
You have two ways to configure the form, depending on how you want to link the staff instructors and climber:
Competency Form Option 01: Form linked only to the Participant (typically preferred)
Most gyms choose the participant-only form with an instructor signature field. This ensures a clear record of who signed off while keeping the proficiency neatly tied to the climber’s profile.
The form is stored under the participant’s profile.
In the Form Content an input field is included for the instructor’s name and a signature field so you know which instructor signed off on the assessment.
This approach is usually preferred by gyms because it keeps the record ONLY tied to the climber, without additional participants linked.
Tip: It is highly recommended that this form is set to “hidden” and it only be accessed via a QR/link that is safeguard. We also suggest that this form is set to Require manual validation, for extra safeguards.
You can include the details and procedures in the form, to guide the instructor through the competency test.
Competency Form Option 02: Form linking the Instructor and Participant together
If you make the Primary Signee the Instructor, and the Secondary the Climber the form connects both the instructor and participant.
The form connects both the instructor and participant.
This allows quick viewing of which instructor assessed each climber.
However, it also means the form will display under the instructor’s profile with the participant listed as a dependent, which some gyms may not want.
Here are all the input fields for creating your form.
Fields marked with an asterisk (*) are mandatory, meaning visitors must fill them to submit the form. If you would like to include a mandatory field in your form but are fine with visitors choosing not to answer, instruct them to enter "N/A" in that field.
Text | Inserts text into the form, the text can have some basic formatting. |
Checkbox | A checkbox, which is required to be |
Checkbox No Required | A checkbox, which is required to be |
Signature* | Electronic signature. All forms must contain a signature field. |
Input Field* | For any other information e.g. Emergency Contact Name, Emergency Contact Phone |
User Info | This brings over the information of the participants. We suggest always putting this field at the end of the form. |
Title | Inserts text as a header, ie bold and large sized text. Use this for sections in your forms. |
Multi Select | A multi-select allows you to enter multiple choice questions from a list, such as "yes" or "no." questions or any other relevant choice. |
Image Capture | Available on Business & above. Allow Signee’s to take a photo, such as a selfie. The image is embedded into the form |
Static Image | Available on Enterprise & above. Insert an image into the form, such as branding etc, the image will display on the form widget, and will be embedded into the form. File must be in .png format, and we suggest a png of size: 600 × 260px |
File Upload | Available on Enterprise & above. Allow Signee’s to upload other file types, such as an image, pdf, video etc. This will be stored on the cloud, accessible only if logged into BETA. |
In the case where you have a question or section that you want to change from required to optional, you can go into : Settings » Participant Forms » Edit Form Content » Add New (bottom of page) Multi Select » click on the Checkmark to make it optional.
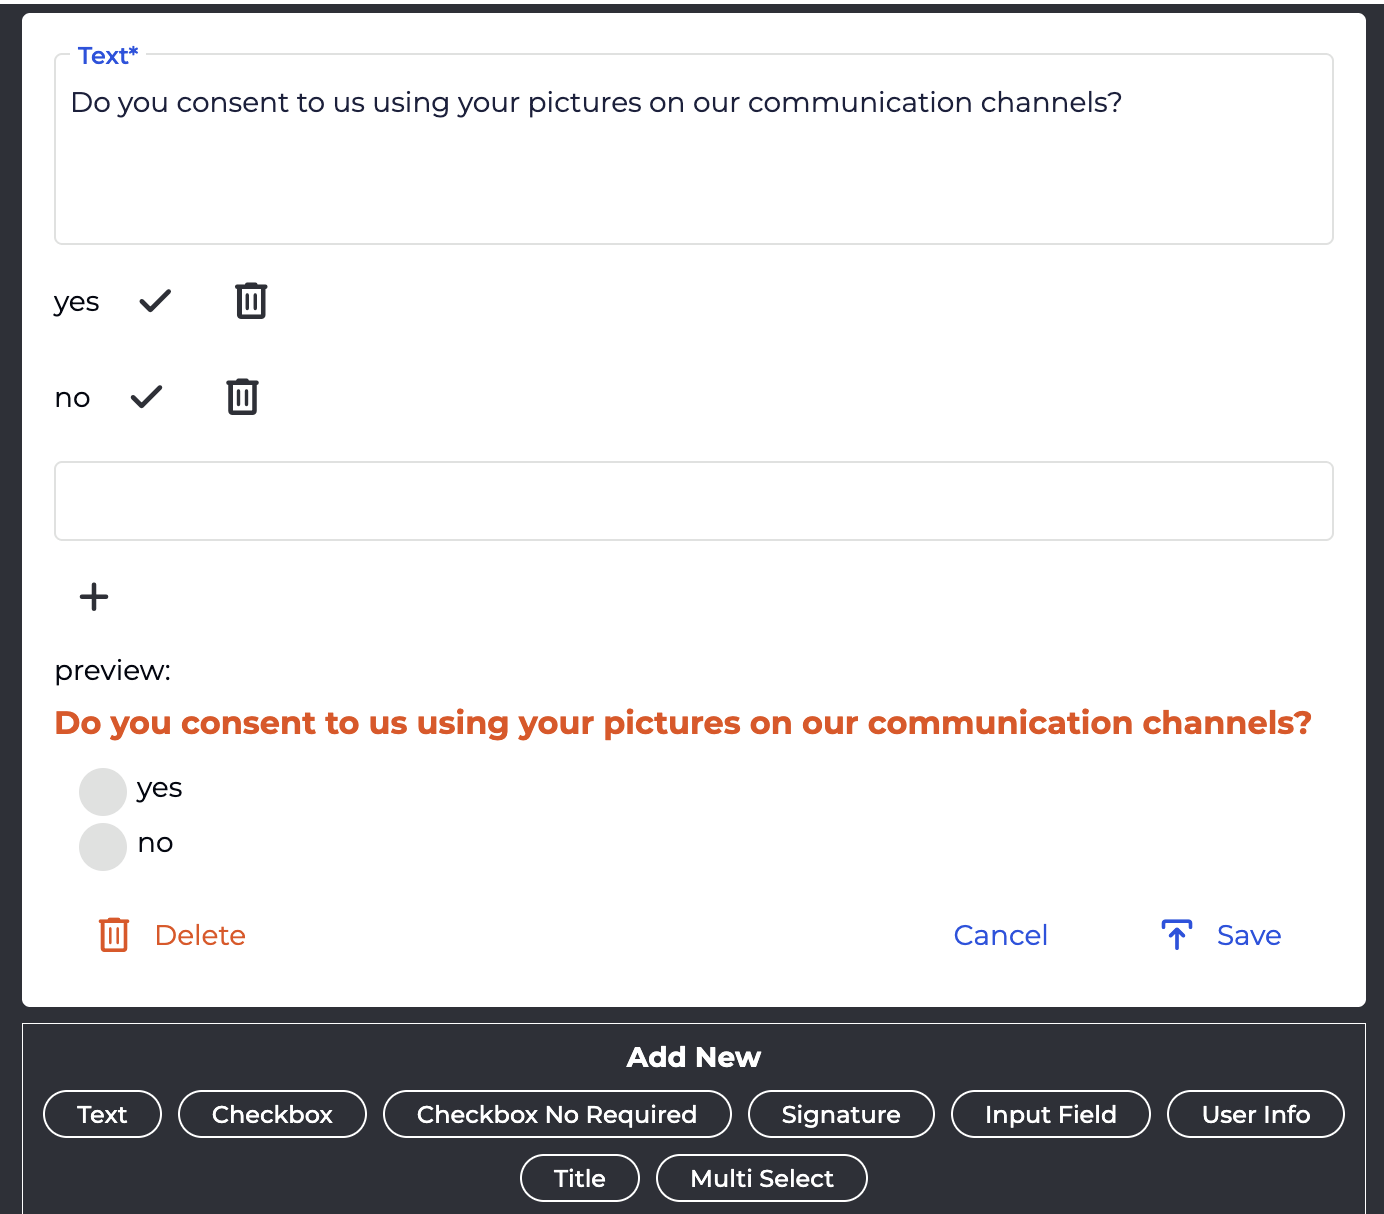
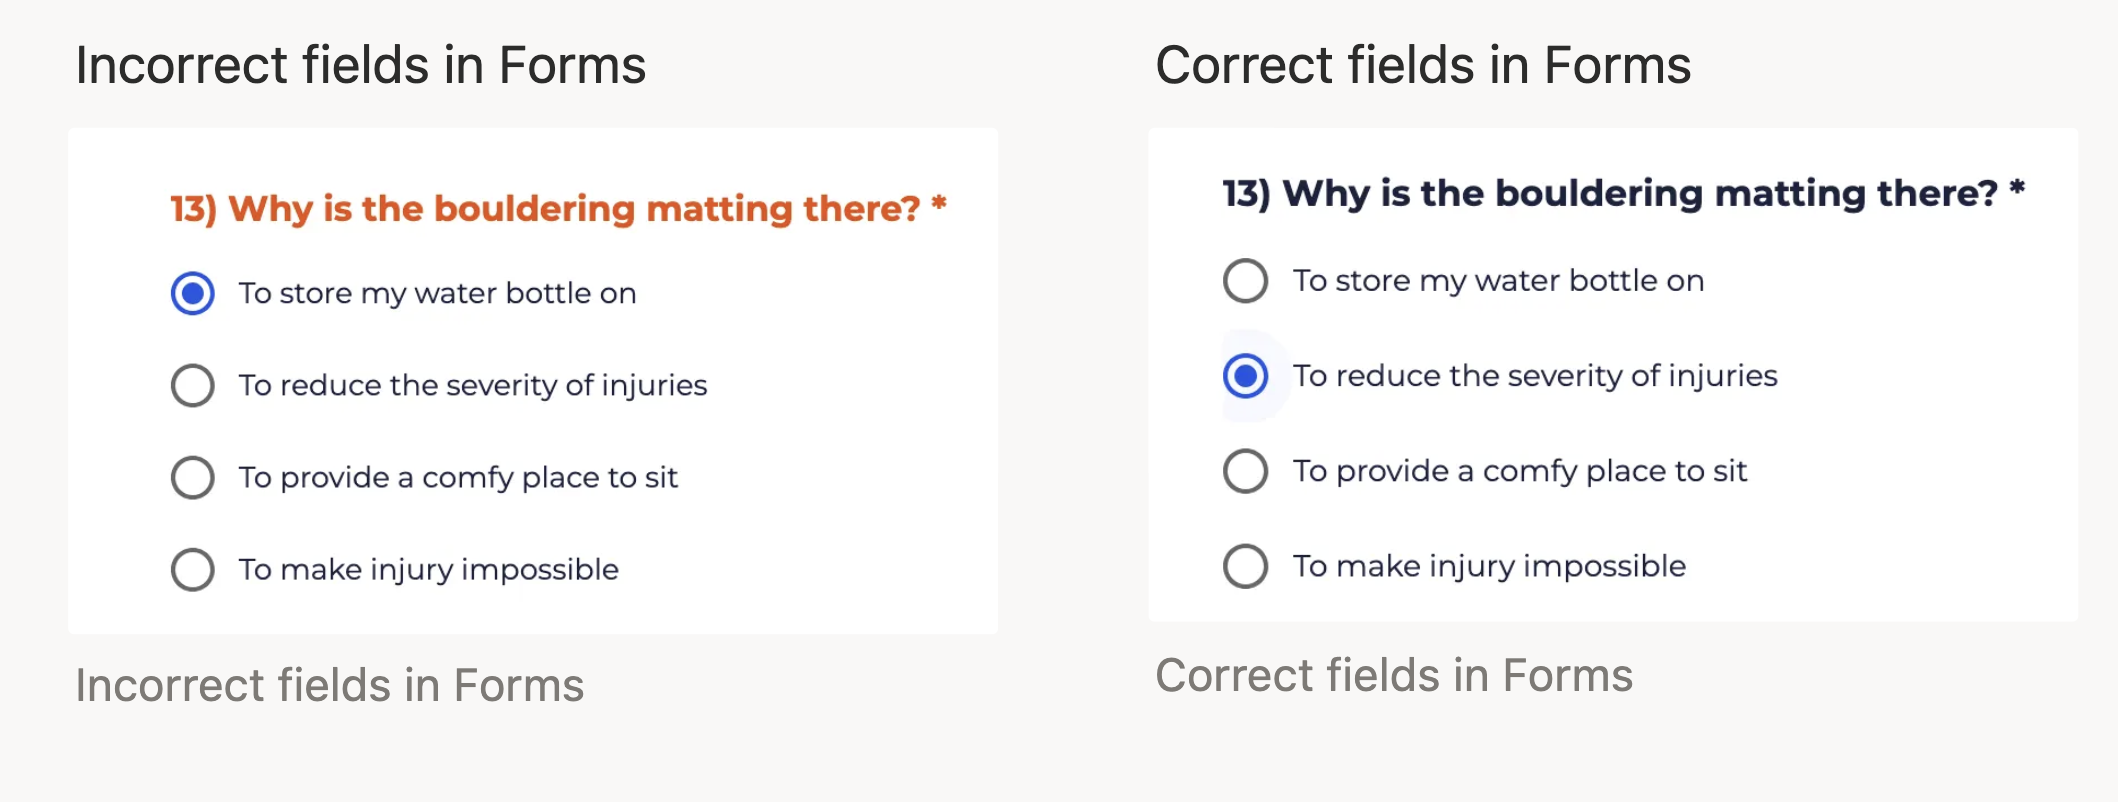
Incorrect or missing fields will appear with an orange title, whilst correct fields will appear with a grey title. Keep this in mind if you or your visitors have any issues submitting a form.
Bulleted List
<ul>
<li>Example 1</li>
<li>Example 2</li>
<li>Example 3</li>
</ul>
Will appear as:
Example 1
Example 2
Example 3
Numbered List
<ol>
<li>Example 1</li>
<li>Example 2</li>
<li>Example 3</li>
</ol>
Will appear as:
Example 1
Example 2
Example 3
Italics
<i>Example 1</i>Will appear as:
Example 1
BreakLine
Text here<br>Lorem ipsumWill appear as:
Text here
Lorem ipsum
Insert an External Link
<b><a href="INSERT_LINK_HERE">Click to read our Terms & Conditions.</a></b>
In BETA, every form has a status that determines how and where it’s visible to your customers. Understanding these statuses helps you control access and manage your forms efficiently.
A Default Form Widget is a static form view where the URL never changes. You manage which forms appear in it by updating their status (e.g., setting them to Default or Hidden). Your default waiver widget will automatically update the waivers shown when you publish, hide, or archive new forms. Allowing you to not have to update your iFrame/URL/QR code.
A Custom Widget allows you to display only specific forms you choose, regardless of their status in the default widget.
Details | |
Draft | This status is the one set when you create a new form. The form is still being prepared and is not visible to customers. |
Default | This form is public and will appear in your Default Form Widget (your standard waiver view). |
Hidden | This form is hidden from ONLY from your default widgets and will only be accessible through a Custom Forms widget via direct link or QR code. |
Archived | This form is archived and no longer actively used. It will not appear in your default form widget and can only be accessed via a Custom Widget. |

Still Lost? We’ve got you covered!
Use the search box on the main Help to search the entire list of available help guides, or drop your question in the Support Chat!