Here, we will guide you through the difference between entry types and pass prices, the process of creating a pass and the visual identification of different entry type states.
Below is a video about the Pass Creation process for Onboarding, it goes through the main points on how to set up Pass Prices, and Entry Types.
In BETA, a pass is a pre-purchased access key that grants climbers entry to your gym. Passes serve as a convenient way to manage gym entry.
The term "Pass" is the general term, and within it, we have two important components:
Pass Price
Entry Type
These elements help define the cost, billing method and usage rules for a specific pass.
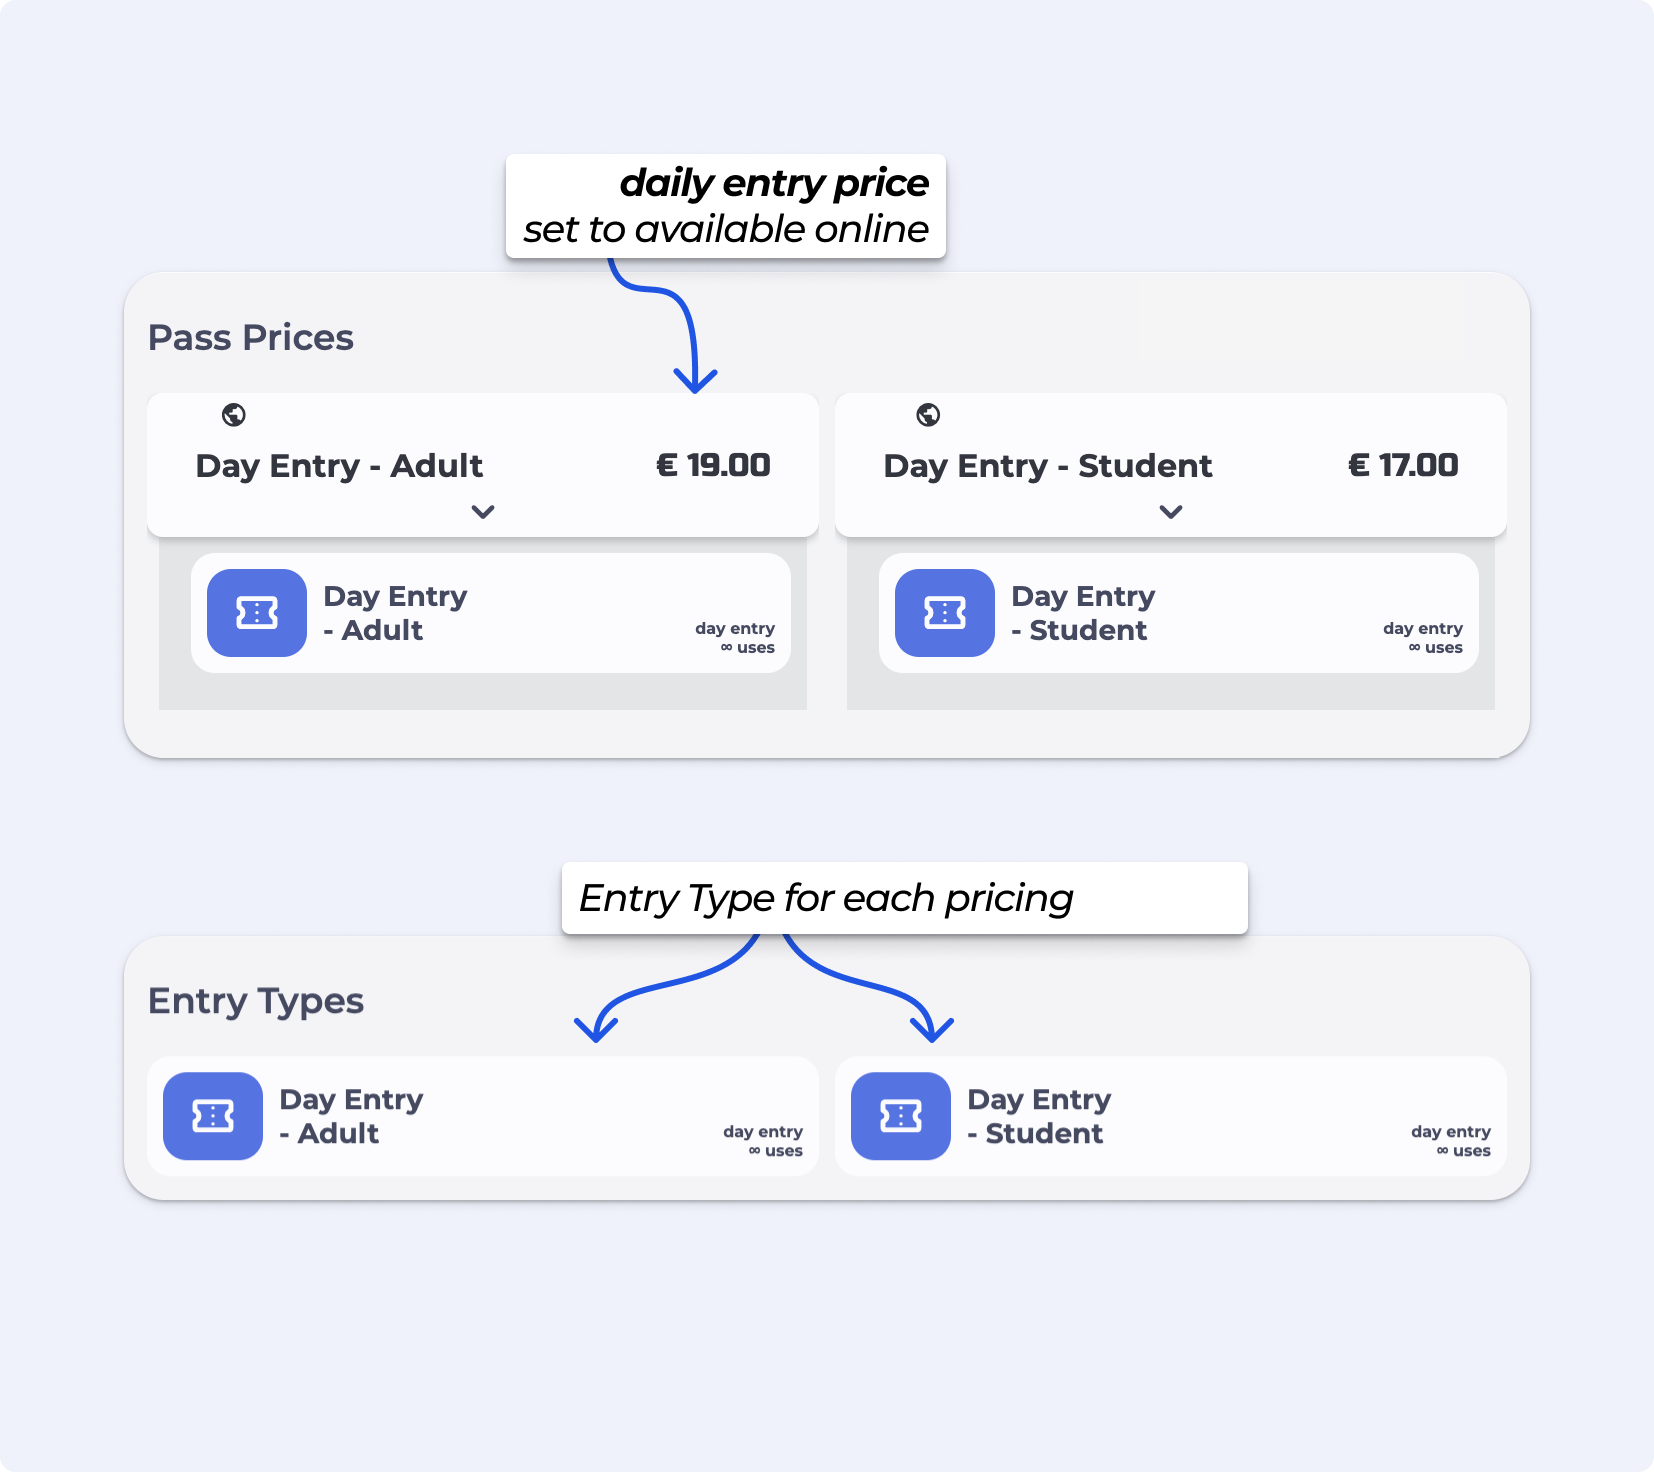
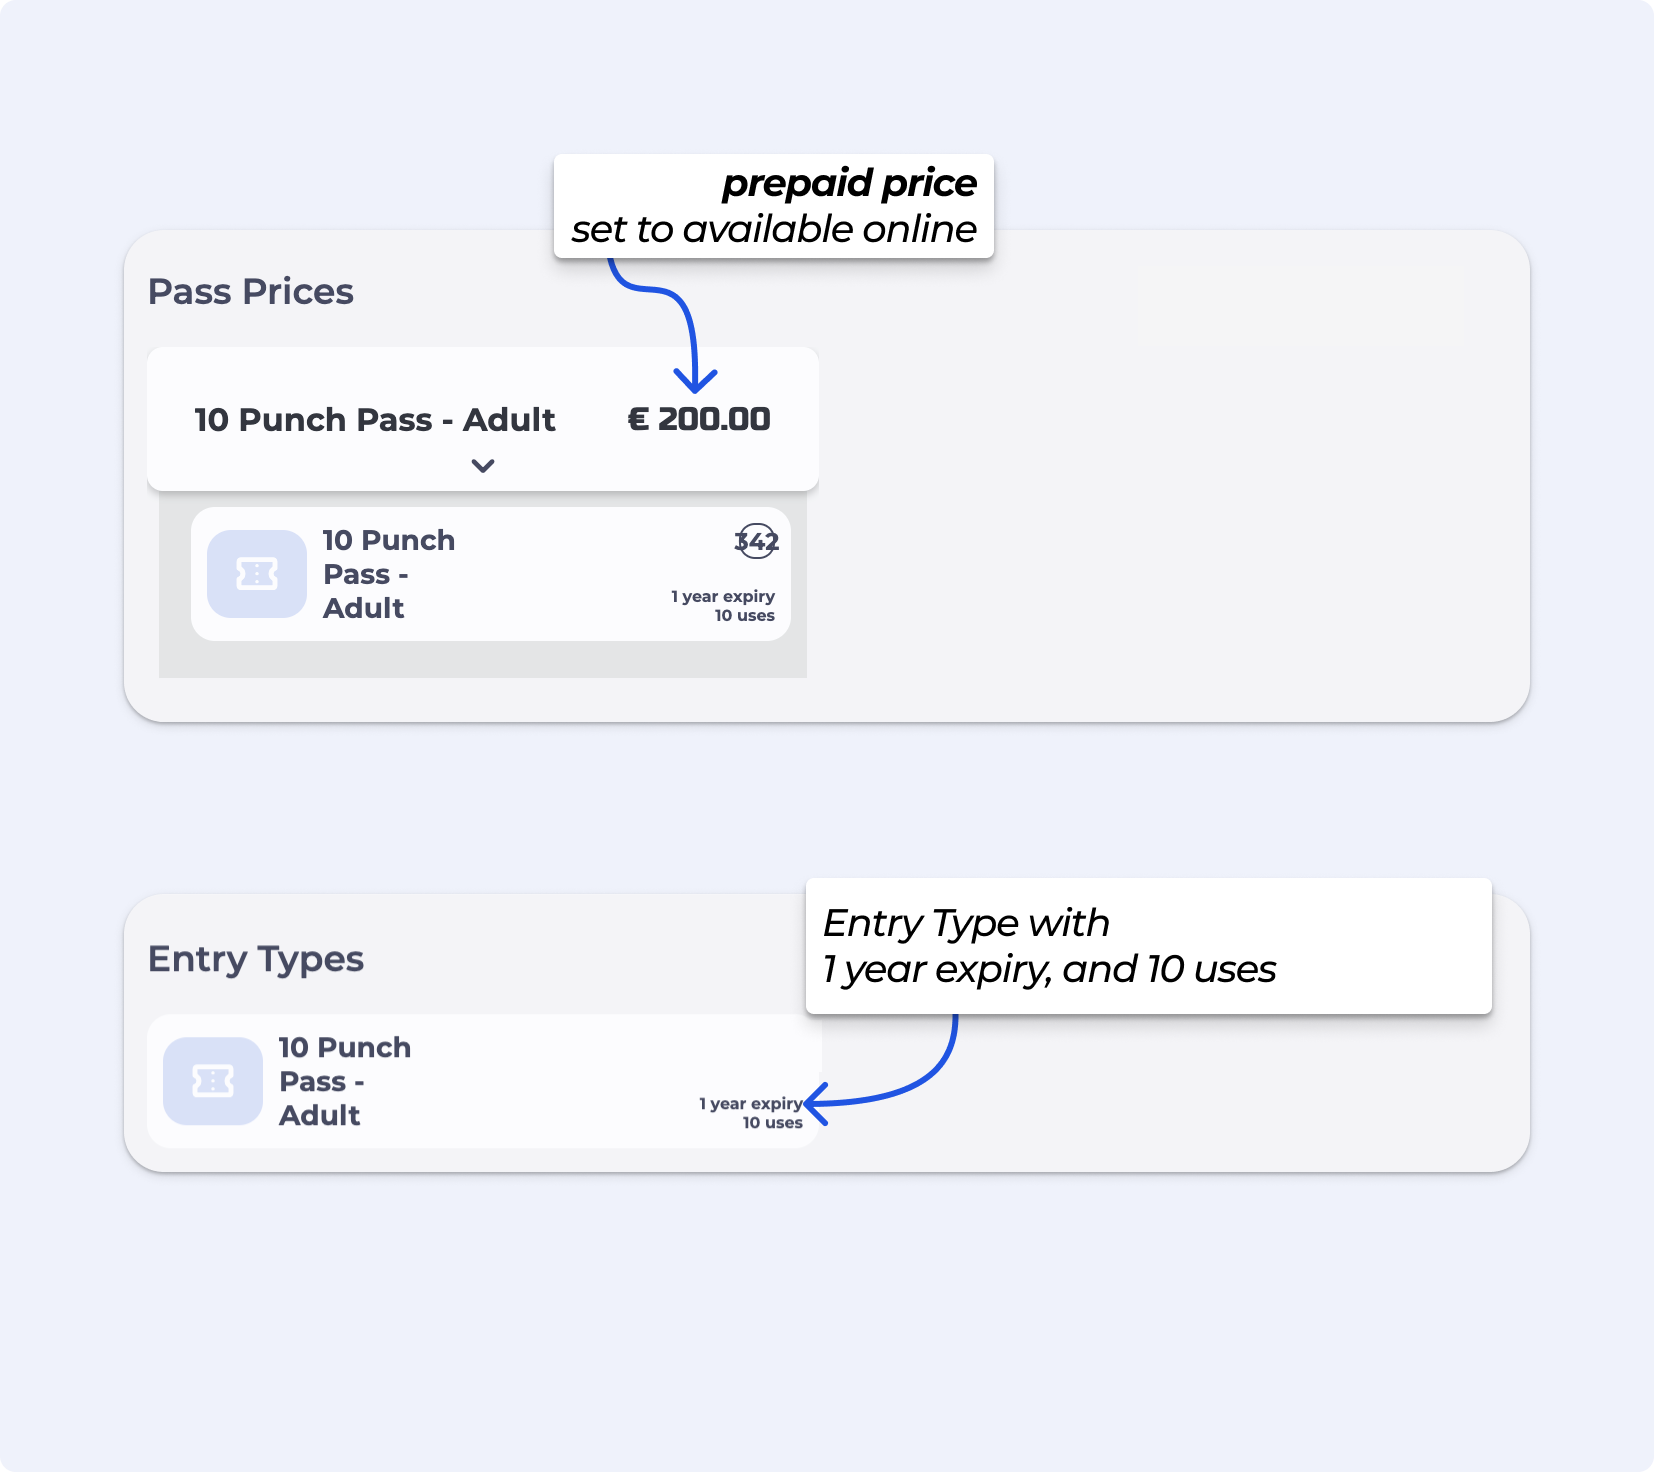
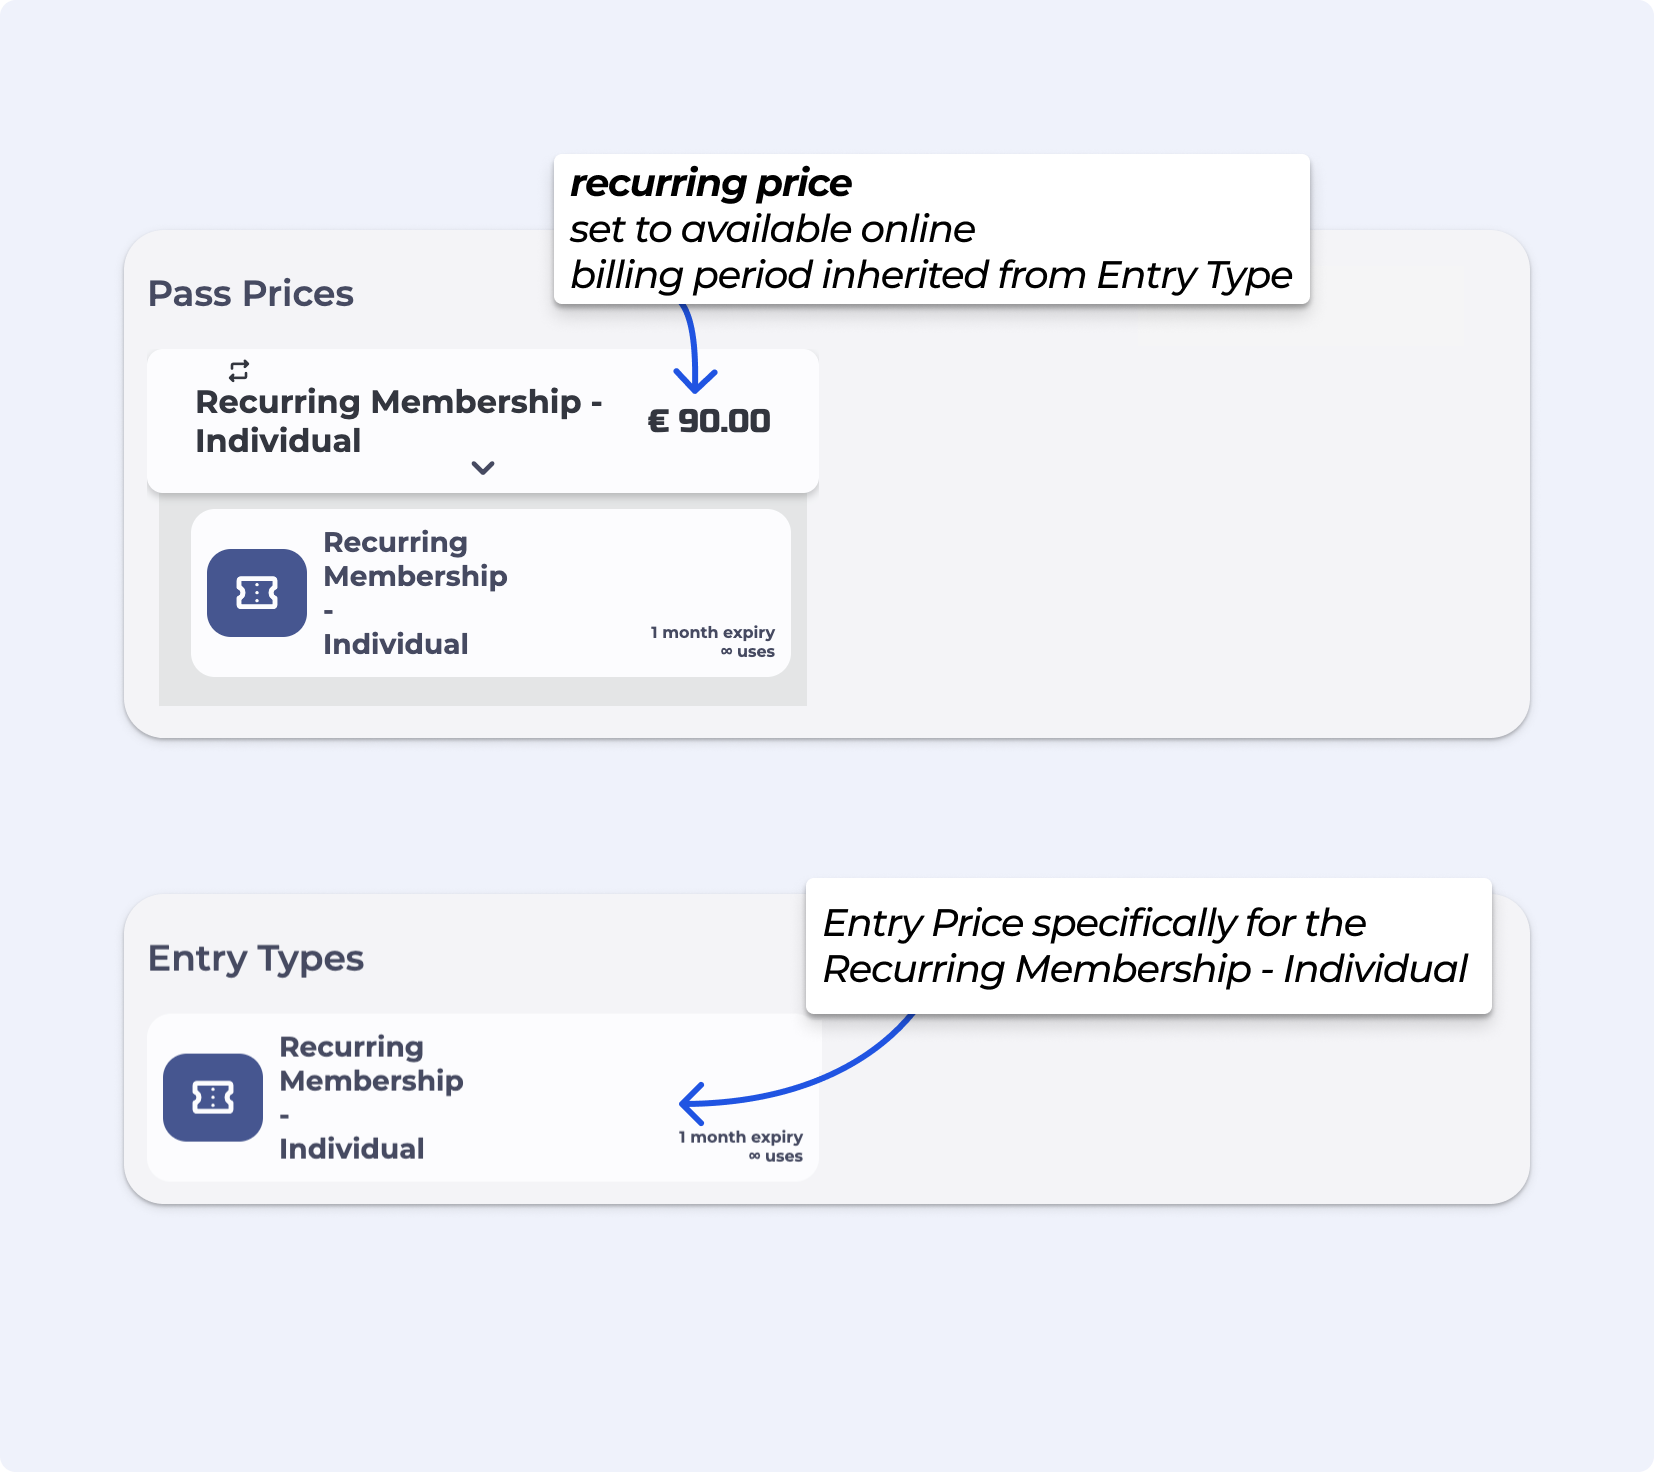
When you navigate to the Passes page, you will notice two sections: Entry Types and Pass Prices.

Think of it like this:
the Pass Price is the basket  , sold at a certain price,
and the Entry Type(s) are the goodies or goody  in that basket
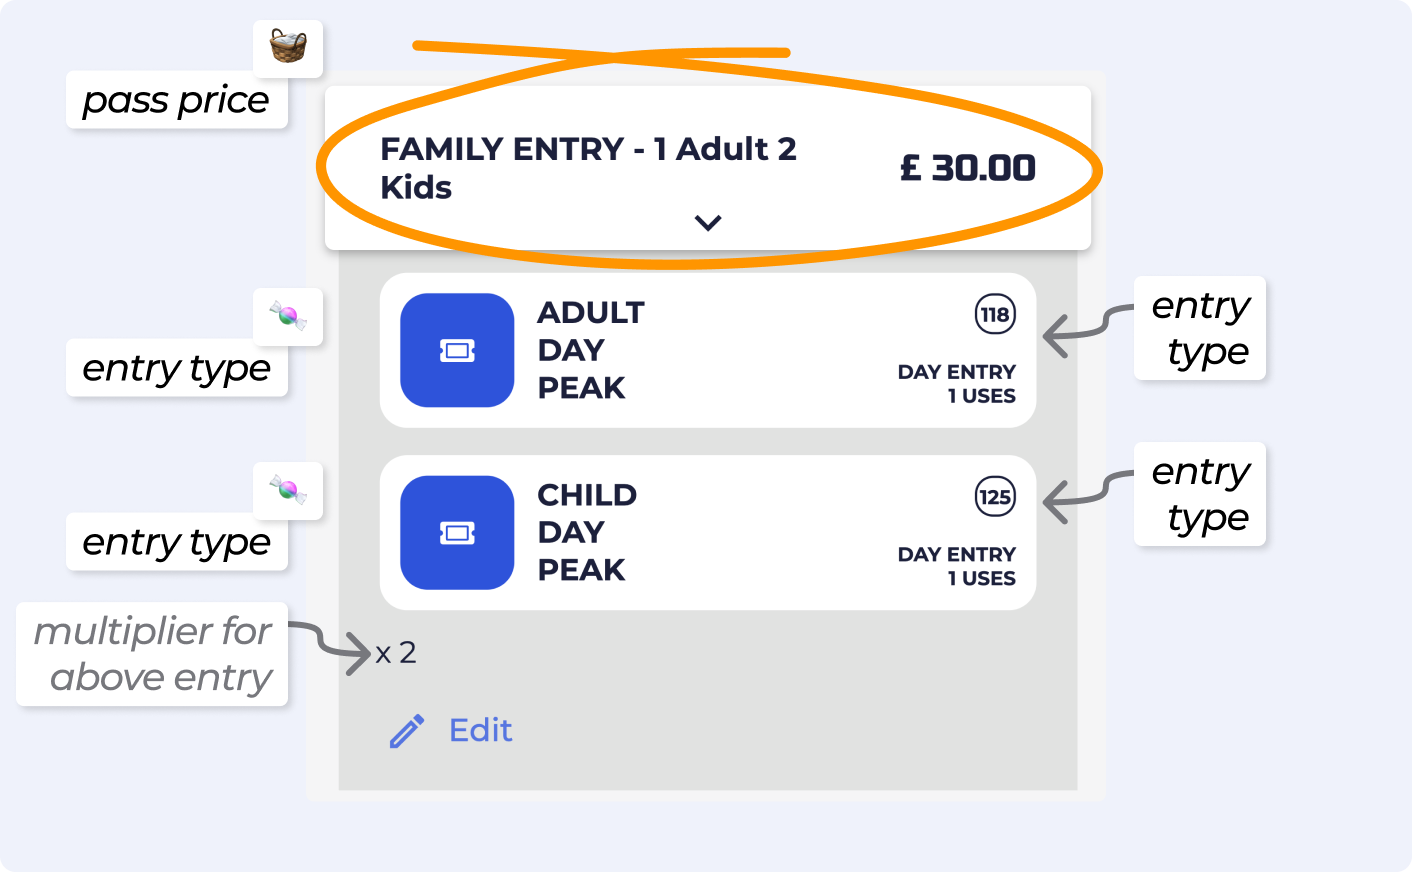
Entry Types
Entry Types define the type and quantity of entries, as well as their expiry details.
Pass Prices
Pass Prices allow you to set the pricing, recurrence, tax rate, and bundled entry types for a particular pass.
Once a visitor buys a pass through the POS and it is linked it to their profile, the associated entry type(s) from that pass price will be visible in the visitor's profile.
Entry types can be in various states, allowing you to track the usage history when a visitor checks in. To check the status of an Entry Pass, simply navigate to the visitor's profile from the Visitor’s page in the BETA dashboard.
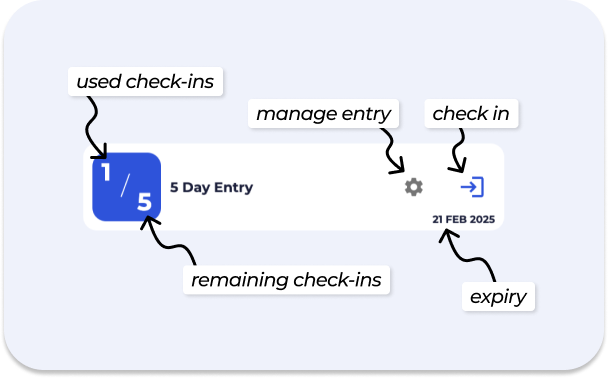
The basic details displayed on most entry types in a visitor’s profile include:
Used check-ins
Remaining check-ins
Manage entry icon
Check-in
Expiry
The colour will represent the state of the entry type
Active and unused
Dark blue
The pass is currently valid and can be used for entry. This pass has 0 entries recorded on it.

Active and used
Blue
The pass is currently valid and can be used for entry. This pass has been used before and has entries recorded on it. Below, 2 entries have been recorded on a 10 punch pass.

Active but unavailable for check-in
Light grey
The pass is active however cannot be used for entry at this time. Passes might have time-restrictions associated to check-in (e.g. lunch passes valid from 12:00pm - 2:00pm only).

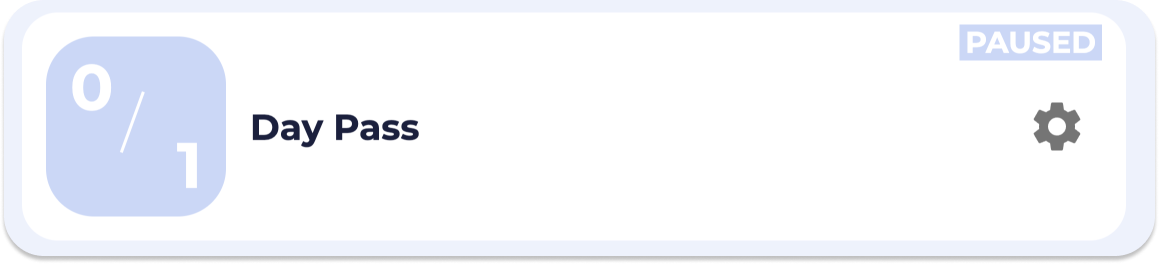
Paused
Light blue
The pass is temporarily inactive and cannot be used for check-in.
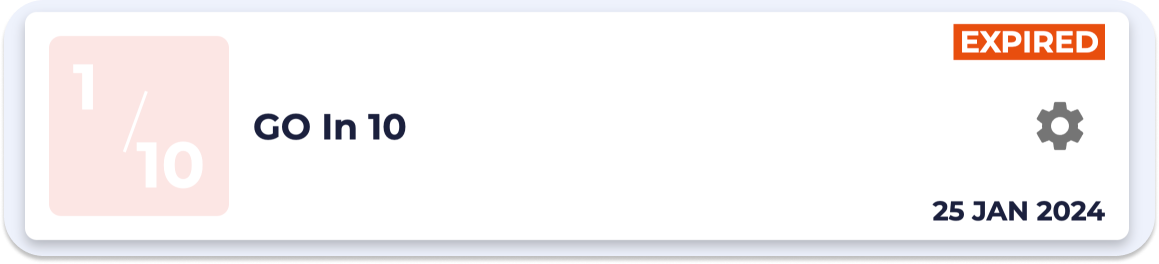
Expired
Orange
The pass validity period has ended and can no longer be used for check-in.
Revoked
Light grey
The pass is inactive and cannot be used. The pass was revoked due to a failed subscription payment or following a refund.

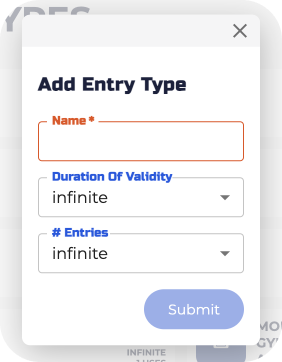
Name: Name your entry type
The entry type name will be visible in the visitor’s profile, so ensure it accurately represents the person type (e.g., adult vs child) and entry category (i.e., duration of validity). Here are some recommended suggestions:
Adult - 1 Month
Pass Junior - 3 Month Pass
Duration of Validity: How long is your pass valid from the date of first use ie. check-in
Available Entry Type Durations (BETA’s Club tier & above):
Infinite – No expiry.
Day Entry – Expires the next day (not 24 hours).
7-Day – Expires 7 days after issue.
14-Day – Expires 14 days after issue.
1 Month Expiry – Expires one month after issue.
3 Months Expiry – Expires three months after issue.
6 Months Expiry – Expires six months after issue.
1 Year Expiry – Expires one year after issue.

# Entries: How many entries can be made?
1 = single use
Infinite = unlimited entries e.g. subscription
For number of entries > 25, please contact our onboarding support team once you create the Entry Configuration!
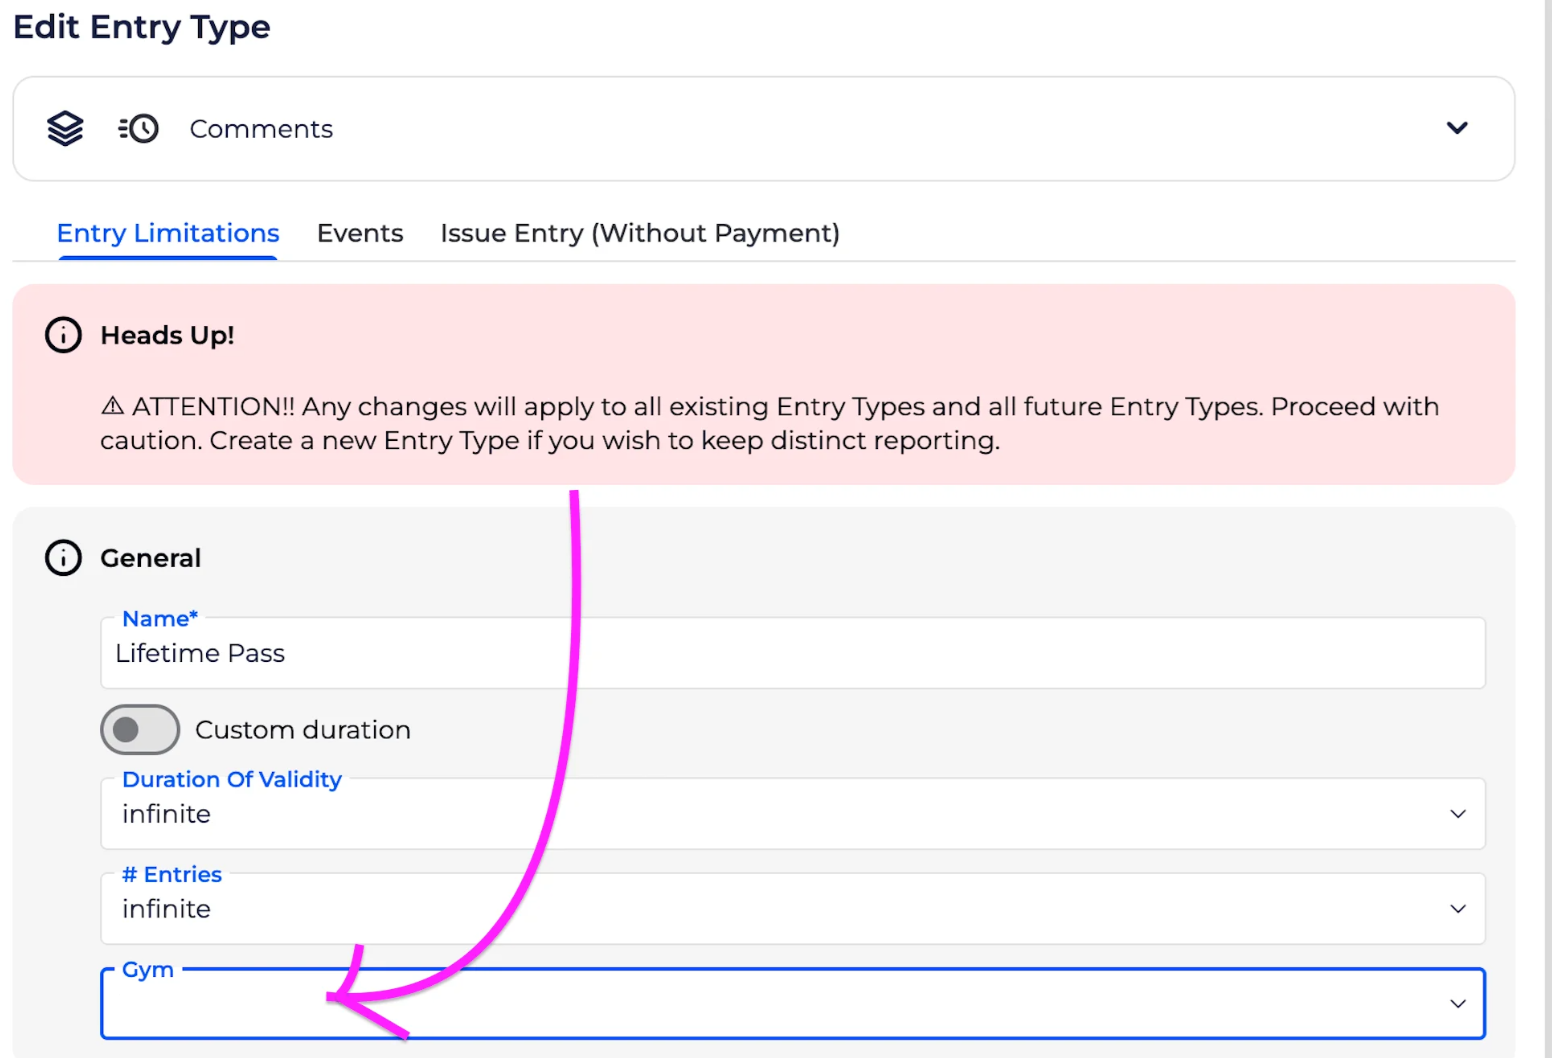
Gym: create an entry type ONLY in a specific location
Please note, an Entry Type can be edited from a profile with Owner Permissions or above in BETA.
After creating an entry type, you have the option to customize various features related to that entry type. Features are customisable based on the tier your gym is on, as detailed in the right column.
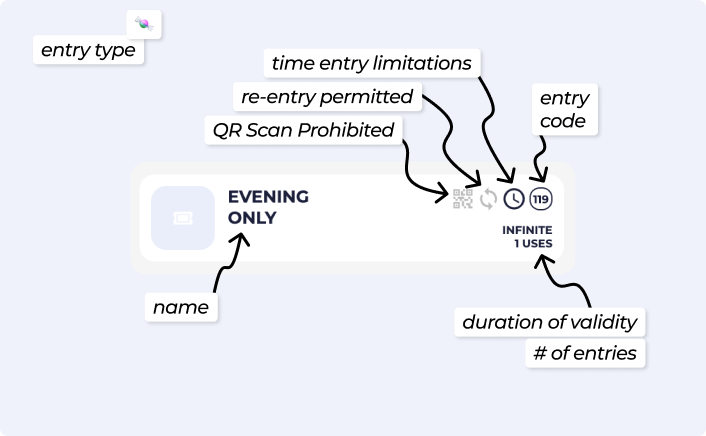
The Entry type configuration will be displayed as different symbols in your list of Entry Types on the Passes Page, so that you know which settings are related to that entry type.
Manually Issuing an Entry skips the payment step; only do this if you wish to grant free entry, e.g., for staff, birthday entry etc.
See the help article below on how to manually issue a pass (without a sale/transaction),
Manage Profile's Passes
This help article covers the management of passes on a visitor’s profile. Including transferring/gifting passes, changing their expiry date/start date, undoing a visit from a pass and more.

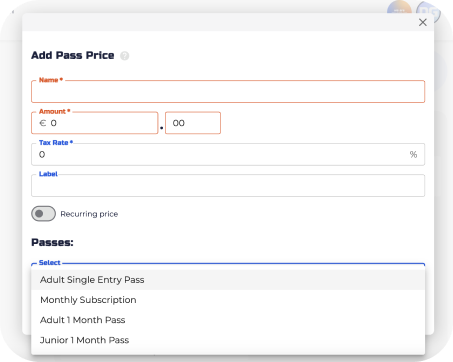
Name: Name of the pass price
 The pass price is displayed in the POS and in the sales transaction search and reports.
Amount: This is where you specify how much the pass will cost.
Recurrence: You can decide if the pass is a one-time purchase or if it recurs over a specific period.
Tax Rate: Define the applicable tax rate for the pass.
Entry Types: Associate one or more entry types with the pass price, determining what's included in the pass.
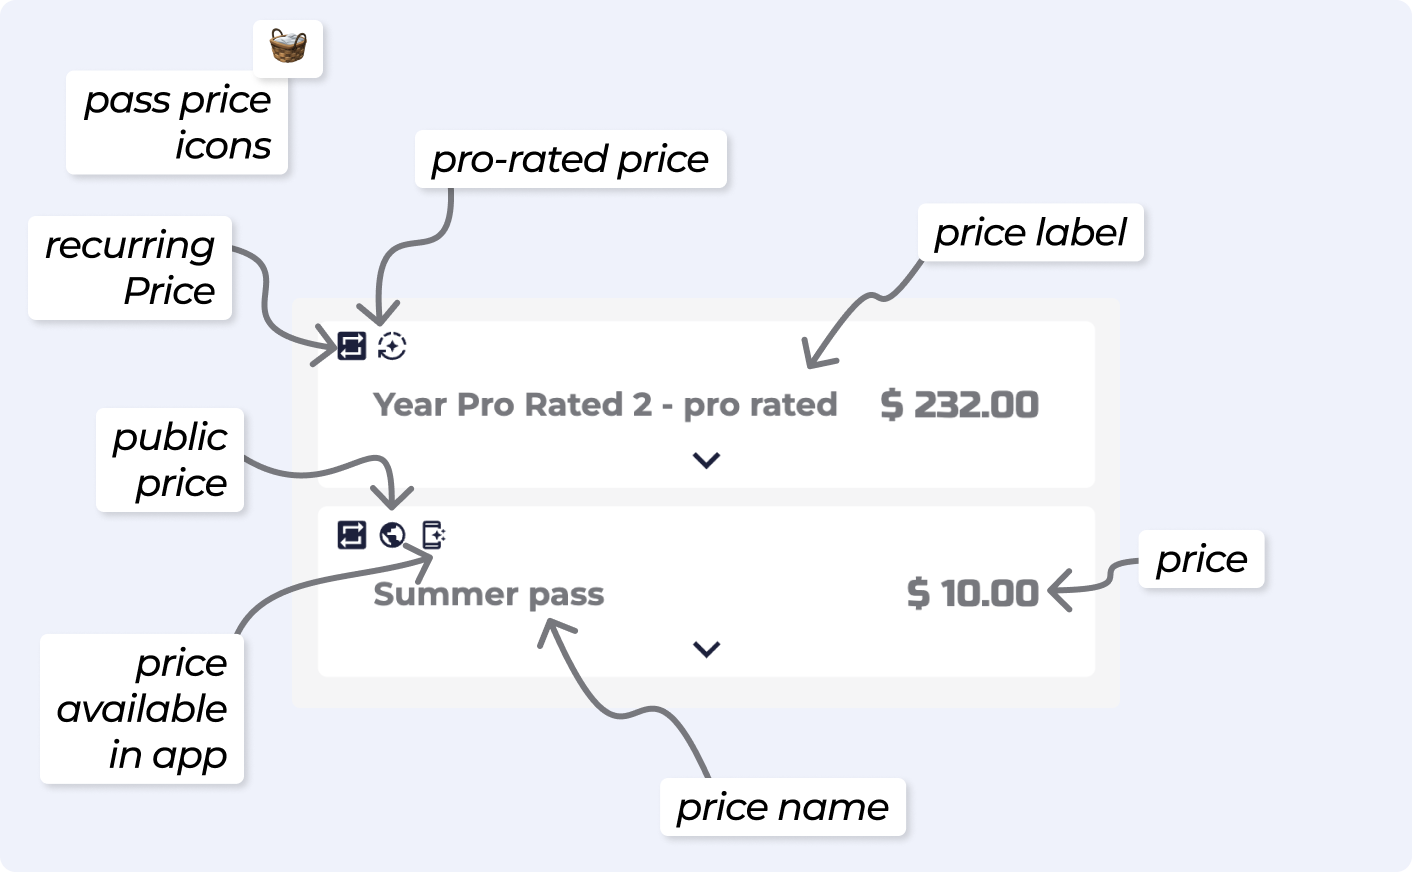
The Pass Price configurations will be displayed as different symbols in your list of Pass Prices on the Passes Page, so that you know which settings are related to that Pass Price.
Add-ons are a great way of either upselling during the online check out process, or tying required items to a purchase.
Example, A $20 Registration Fee tied to the purchase of a membership
Looking to learn more about Add ons? See the help article below,
Link Product Add-Ons to a Pass/Event Price
Link product add-ons to prices or events, create bundles, and manage checkout options effectively.
You can issue a pass to a visitor by selling a pass price via the POS with a transaction.
Read more in the article linked below,
Allows you to set where you customers will be able to purchase this pass price
When you add or already have a price created, you can utilise the below functionalities:
Sell online - Sell at this price, online on your website
Sell in the BETA app - Sell at this price, via the BETA app
Available to passholders - Who Can Access Available to passholders Event Pricing?
PREPAID
The price is available if profiles have a prepaid pass that is still valid on the date of the event. Once the Entry Type expires, it can no longer be used for event pricing.
SUBSCRIPTION
The discounted price is available if you have an active recurring subscription. As long as your subscription is active, you’ll automatically qualify for this price.
Now that you’ve understood the difference between an entry type and a pass price, you can create a pass. To create a pass, follow along our guides below:
Looking to create a single/multiple entry passes?
Looking to create your Staff Memberships?
Looking to create a prepaid pass?
Create Entry Types & Pass Prices
This guides covers all you need to know about entry types and pass prices, to get you started.
Looking to creating a recurring subscription pass?
Set up and Sell a Recurring Subscription
Learn how to set up and manage subscriptions using Stripe with our step-by-step guide. Perfect for recurring payments and optimizing your Point of Sale system.
Day/Single Entries | One-time or limited-time access. Available on the Club Tier and Above.
Example, Day Pass Student
PrePaid | Passes with multiple or unlimited entries, expiring after a set period. Available on the Club Tier and Above.
Example, 10 Punch Pass or 1 month Adult
Recurring Subscription | Unlimited entries during a defined period with automated billing. Available on the Club Tier and Above.
Example, 1 month Individual Membership
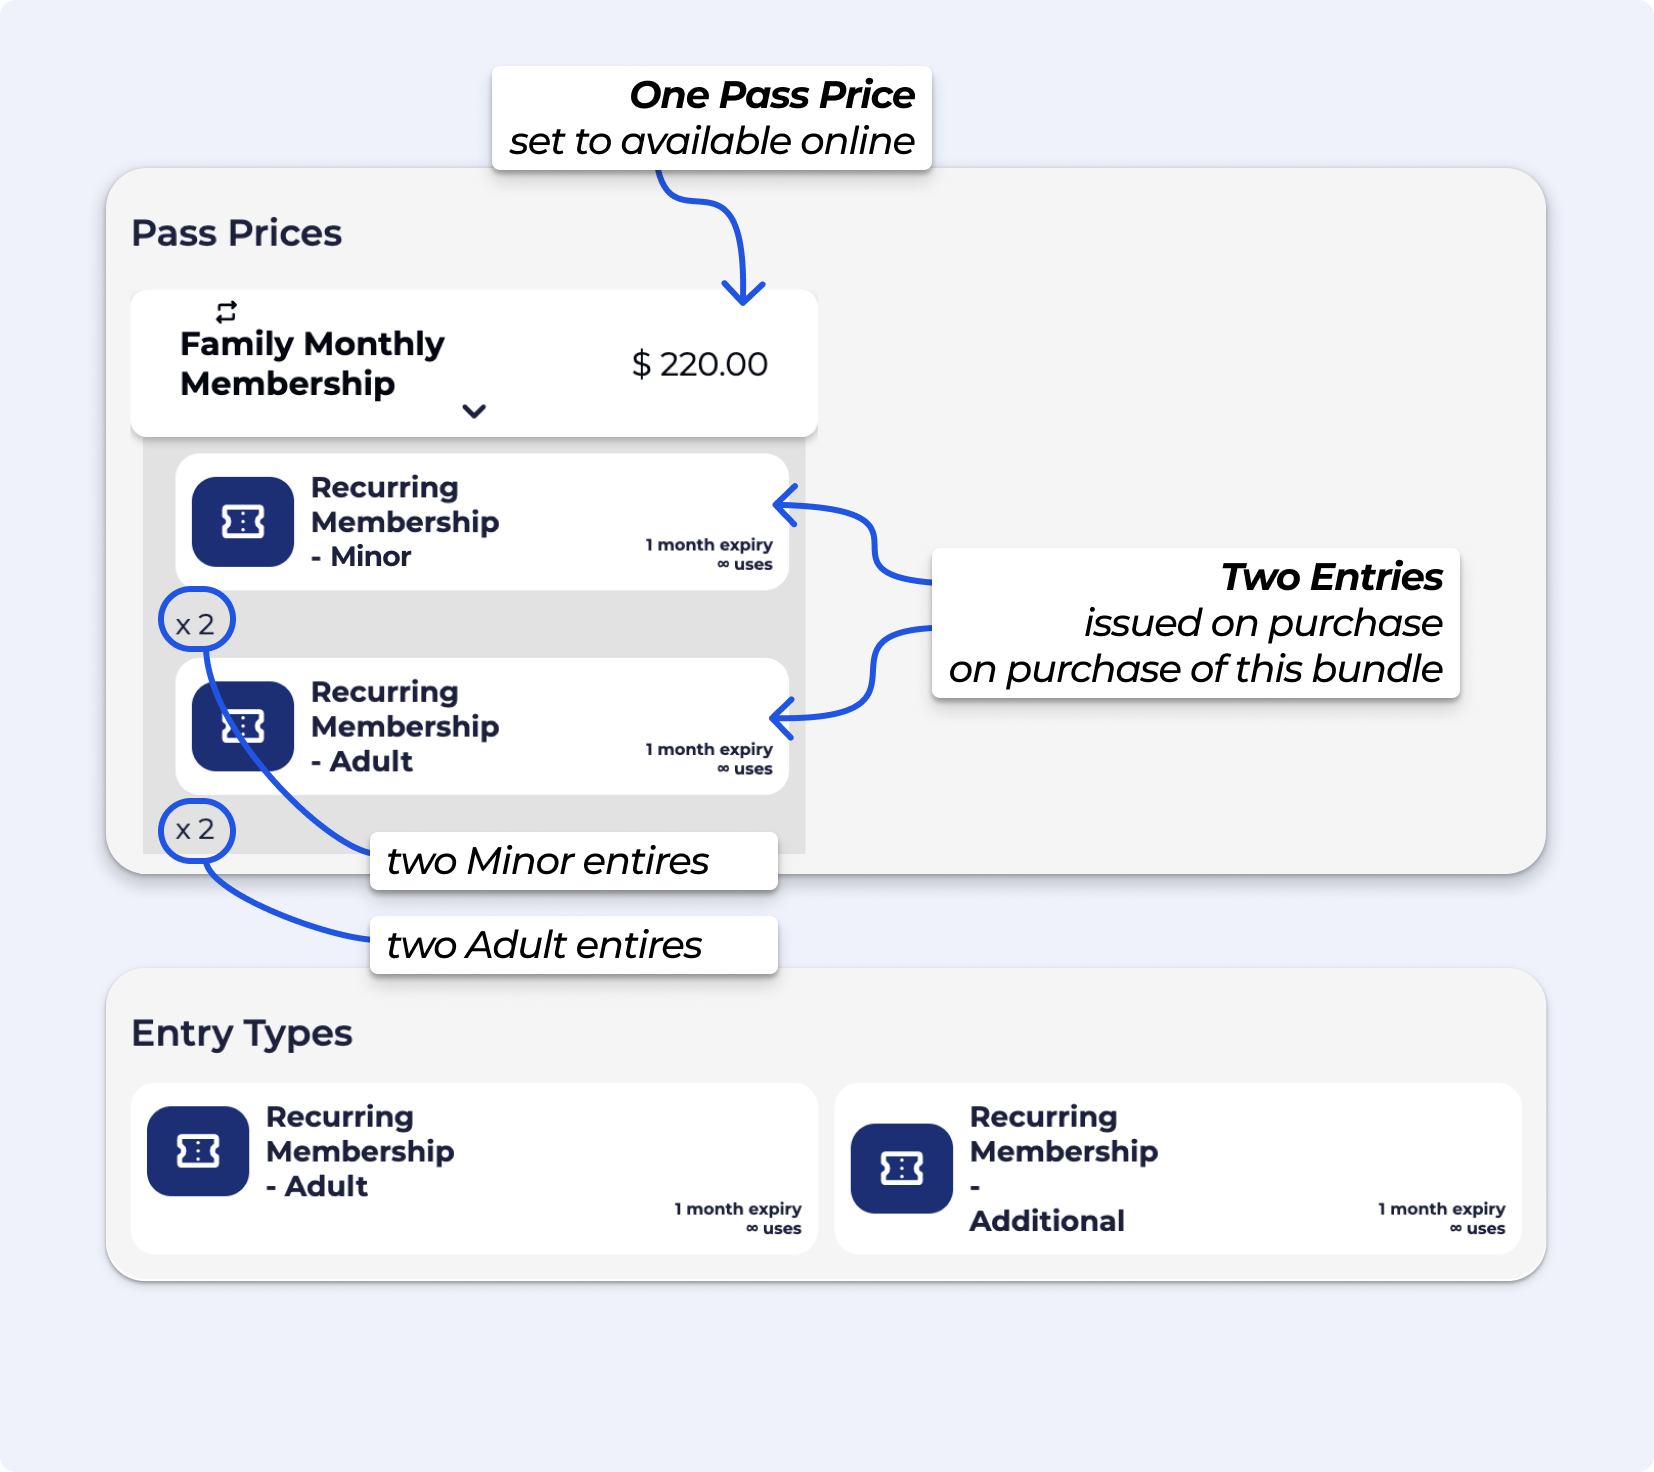
Bundled Passes - Grouped passes that combine multiple entries into one Pass Price. This is a single Pass Price, with various Entries in it. Bundling Pass Prices is Available on the Club Tier and Above.
Example, Family Membership: Two adults and Two Children Bundle
Available on the Enterprise Tier & above
Using Add Ons, you can nest multiple Pass Prices within a single recurring plan, ideal for scaling memberships, recurring passes, or subscriptions as more “members” are added. This gives the option to continually add members to a pass price.
BETA will create one subscription containing multiple pass prices, meaning a single billing profile can manage multiple members, such as in a family pass, multi-person membership, or group recurring package.
Example: You want a Family Membership where the base subscription includes 1 adult, and Addons allow you to add more children or adults with increasing total price.
To let climbers check in at multiple locations, just create the Entry Type on your Main (parent) dashboard.
It will automatically show up at all child gyms (like Child A and Child B)
Climbers can check in anywhere with that Entry Type
No need to recreate the Entry Type at each location
Example, Create an “All‑Access Pass” on Main dashboard, it appears in Child A and B. Then the climber buys it once and can check in at any location.
Create it on your Main (parent) dashboard. It will automatically show up at all child gyms.
Yes. Create the Entry Type on Main so it’s shared across all locations. Then, on each child gym, you can set a pass price for that Entry Type.
This lets the same Entry Type be used everywhere, while allowing each location to set its own pricing (including local tax rates if needed.
Then create the Entry Type directly on that child location instead of Main.
Looking to learn more about how Multi-location works in BETA?
Multi-location Management
Explore our Multi-location Management guide to effectively oversee multiple gym sites from a single dashboard, ensuring consistency and optimized operations across all locations.
This distinction is important, as it ensures proper data management and accurate records.Archiving: This keeps the Pass Price from being sold or used for new purchases (from the POS/widgets/app) but maintains it for those who already have it. It also remains visible in historical sales records. Deleting: Only possible if the Pass Price has never been sold or issued. Once linked to a transaction, deletion is not allowed to ensure data accuracy. Instead, duplicate and archive the pass price if changes are needed. See here how to Edit/Duplicate/Archive/Delete Pass Price & Entry Types or else, follow along here EXPERIMENT: Price Updater
You can do that from by following the steps in Edit a Price Name, Barcode, Manufacturer, Description & Image
From the Pass:Open the Manage Pass popup by clicking the gear icon  on the pass. Check the top-right corner for the transaction the pass was issued from. From the Transaction:Open the Manage Transaction popup. At the bottom, review the items issued in that transaction. Double-click the profile name to open the corresponding profile.
Paused passes can’t be updated directly. To make changes, you need to unpause the pass first. Once unpaused, you can adjust its expiry date to remove it from active passes
Separating entry and pass pricing allows for more accurate reporting by distinguishing between pass purchases and actual entries. For example, a climber might buy a pass but never use it—tracking these separately highlights the difference between sales and activity. Allows for the bundling of entry types for various price points. For multi-location gyms, this setup enables consistent entry types across all locations while allowing for location-specific pricing, providing both flexibility and centralized management.
It is one month based on the day of the month. If the day of the month on which the pass started doesn’t exist in the subsequent month, it expires on the last day of that month.E.g. a pass started on the 30th of Jan will expire on the 28th of Feb
The expiry date will display once the pass has been activated (first use) or if a start date has been manually set. If no expiry date is showing, it means the start date hasn’t been set yet - the Entry on the Profile will show Upcoming
Prepaid passes begin on the first check-in, unless a start date has been manually set when issuing the pass or later in the pass settings.
When a climber has multiple passes on their profile the priority is as follows:
Prefer passes already used.
Prefer unlimited passes over limited ones.
Among those, prefer passes that expire sooner.

Still Lost? We’ve got you covered!
Use the search box on the main Help to search the entire list of available help guides, or drop your question in the Support Chat!